In the previous post, we saw how to create our first AWS account. Now that we have access to the console, the first thing we must do (before anything else) is secure the root user and stop using it for daily tasks. In this post, I’ll guide you step by step to enable MFA on the root and create our first IAM user to replace it.
Why secure the root user?
The root user is the user we created the account with. It has total and unrestricted access to absolutely all AWS services and resources, including actions that no other user can perform (closing the account, changing the support plan, modifying billing information, among others).
Precisely because of that power, AWS recommends not using it for daily tasks and protecting it with the highest level of security possible. If the root credentials are compromised, an attacker would have absolute control over our account. The minimum practices we should apply are:
- A strong and unique password.
- MFA (Multi-Factor Authentication) enabled.
- Keep credentials in a safe place and use root only when strictly necessary.
Important: This is one of the most repeated pieces of advice by AWS in the official documentation and in the Well-Architected Framework. If you’re only going to follow one security practice, make it this one.
Step 1: Navigate to the IAM service
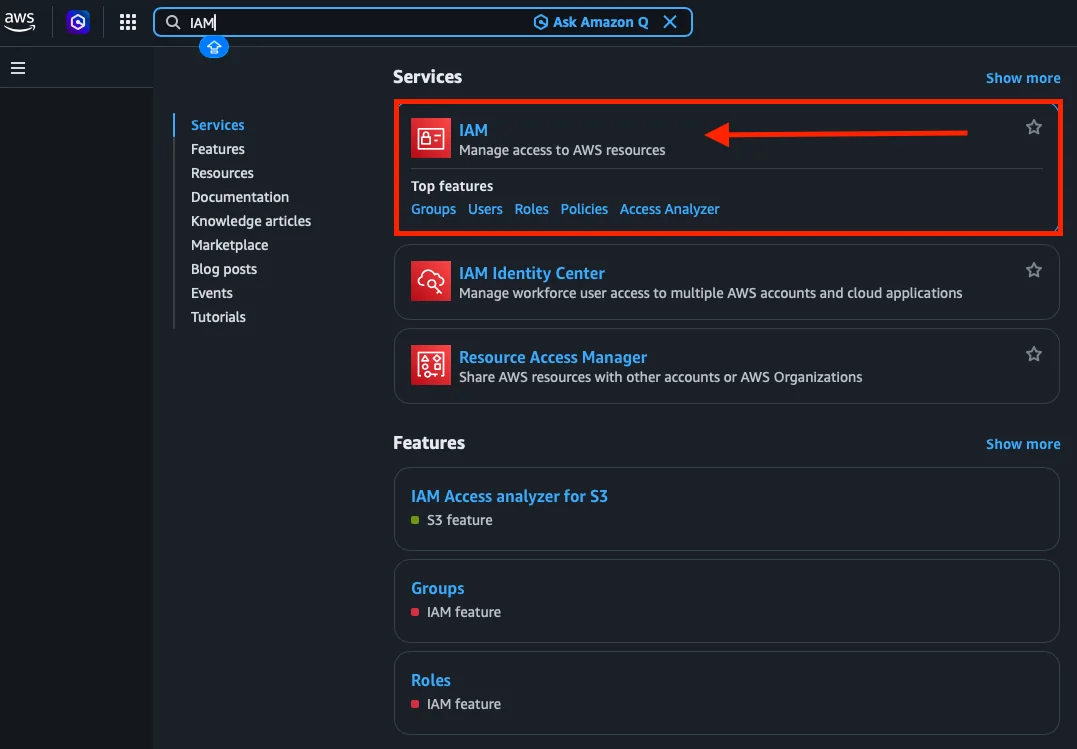
From the AWS console, in the top bar we use the search bar to find the IAM (Identity and Access Management) service.

We type iam and click on the result IAM — Manage access to AWS resources.
Step 2: Add MFA to the root user
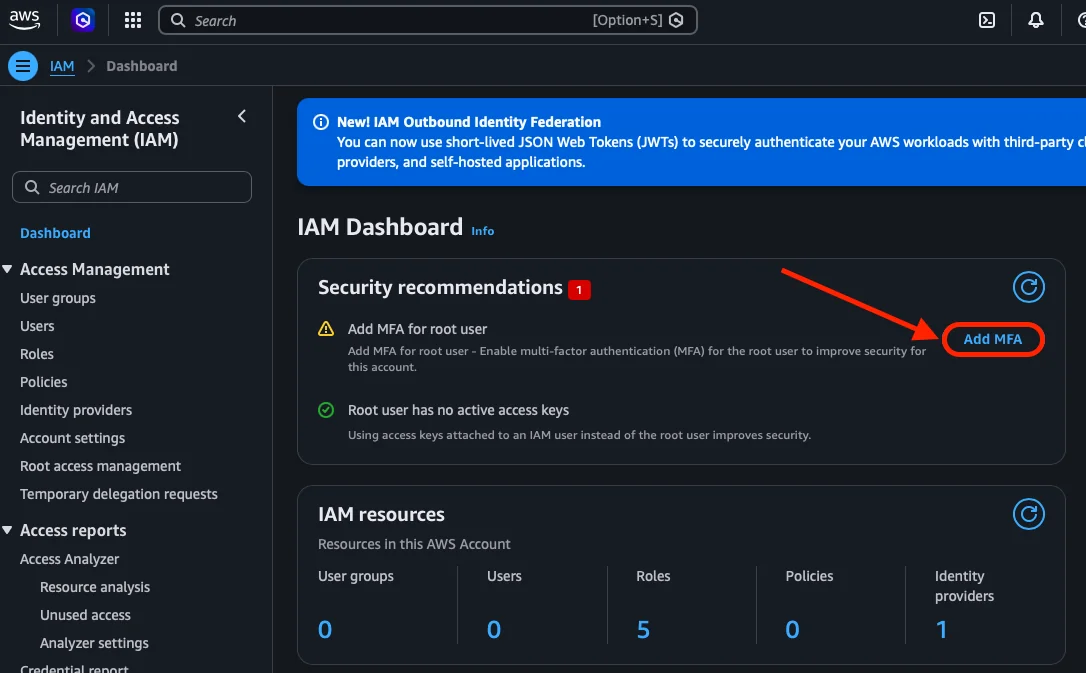
Once inside, we see the IAM Dashboard. In the Security recommendations section, AWS warns us that the root user doesn’t have MFA enabled and shows us an “Add MFA” button. We click there to start.
Step 3: Select the MFA device
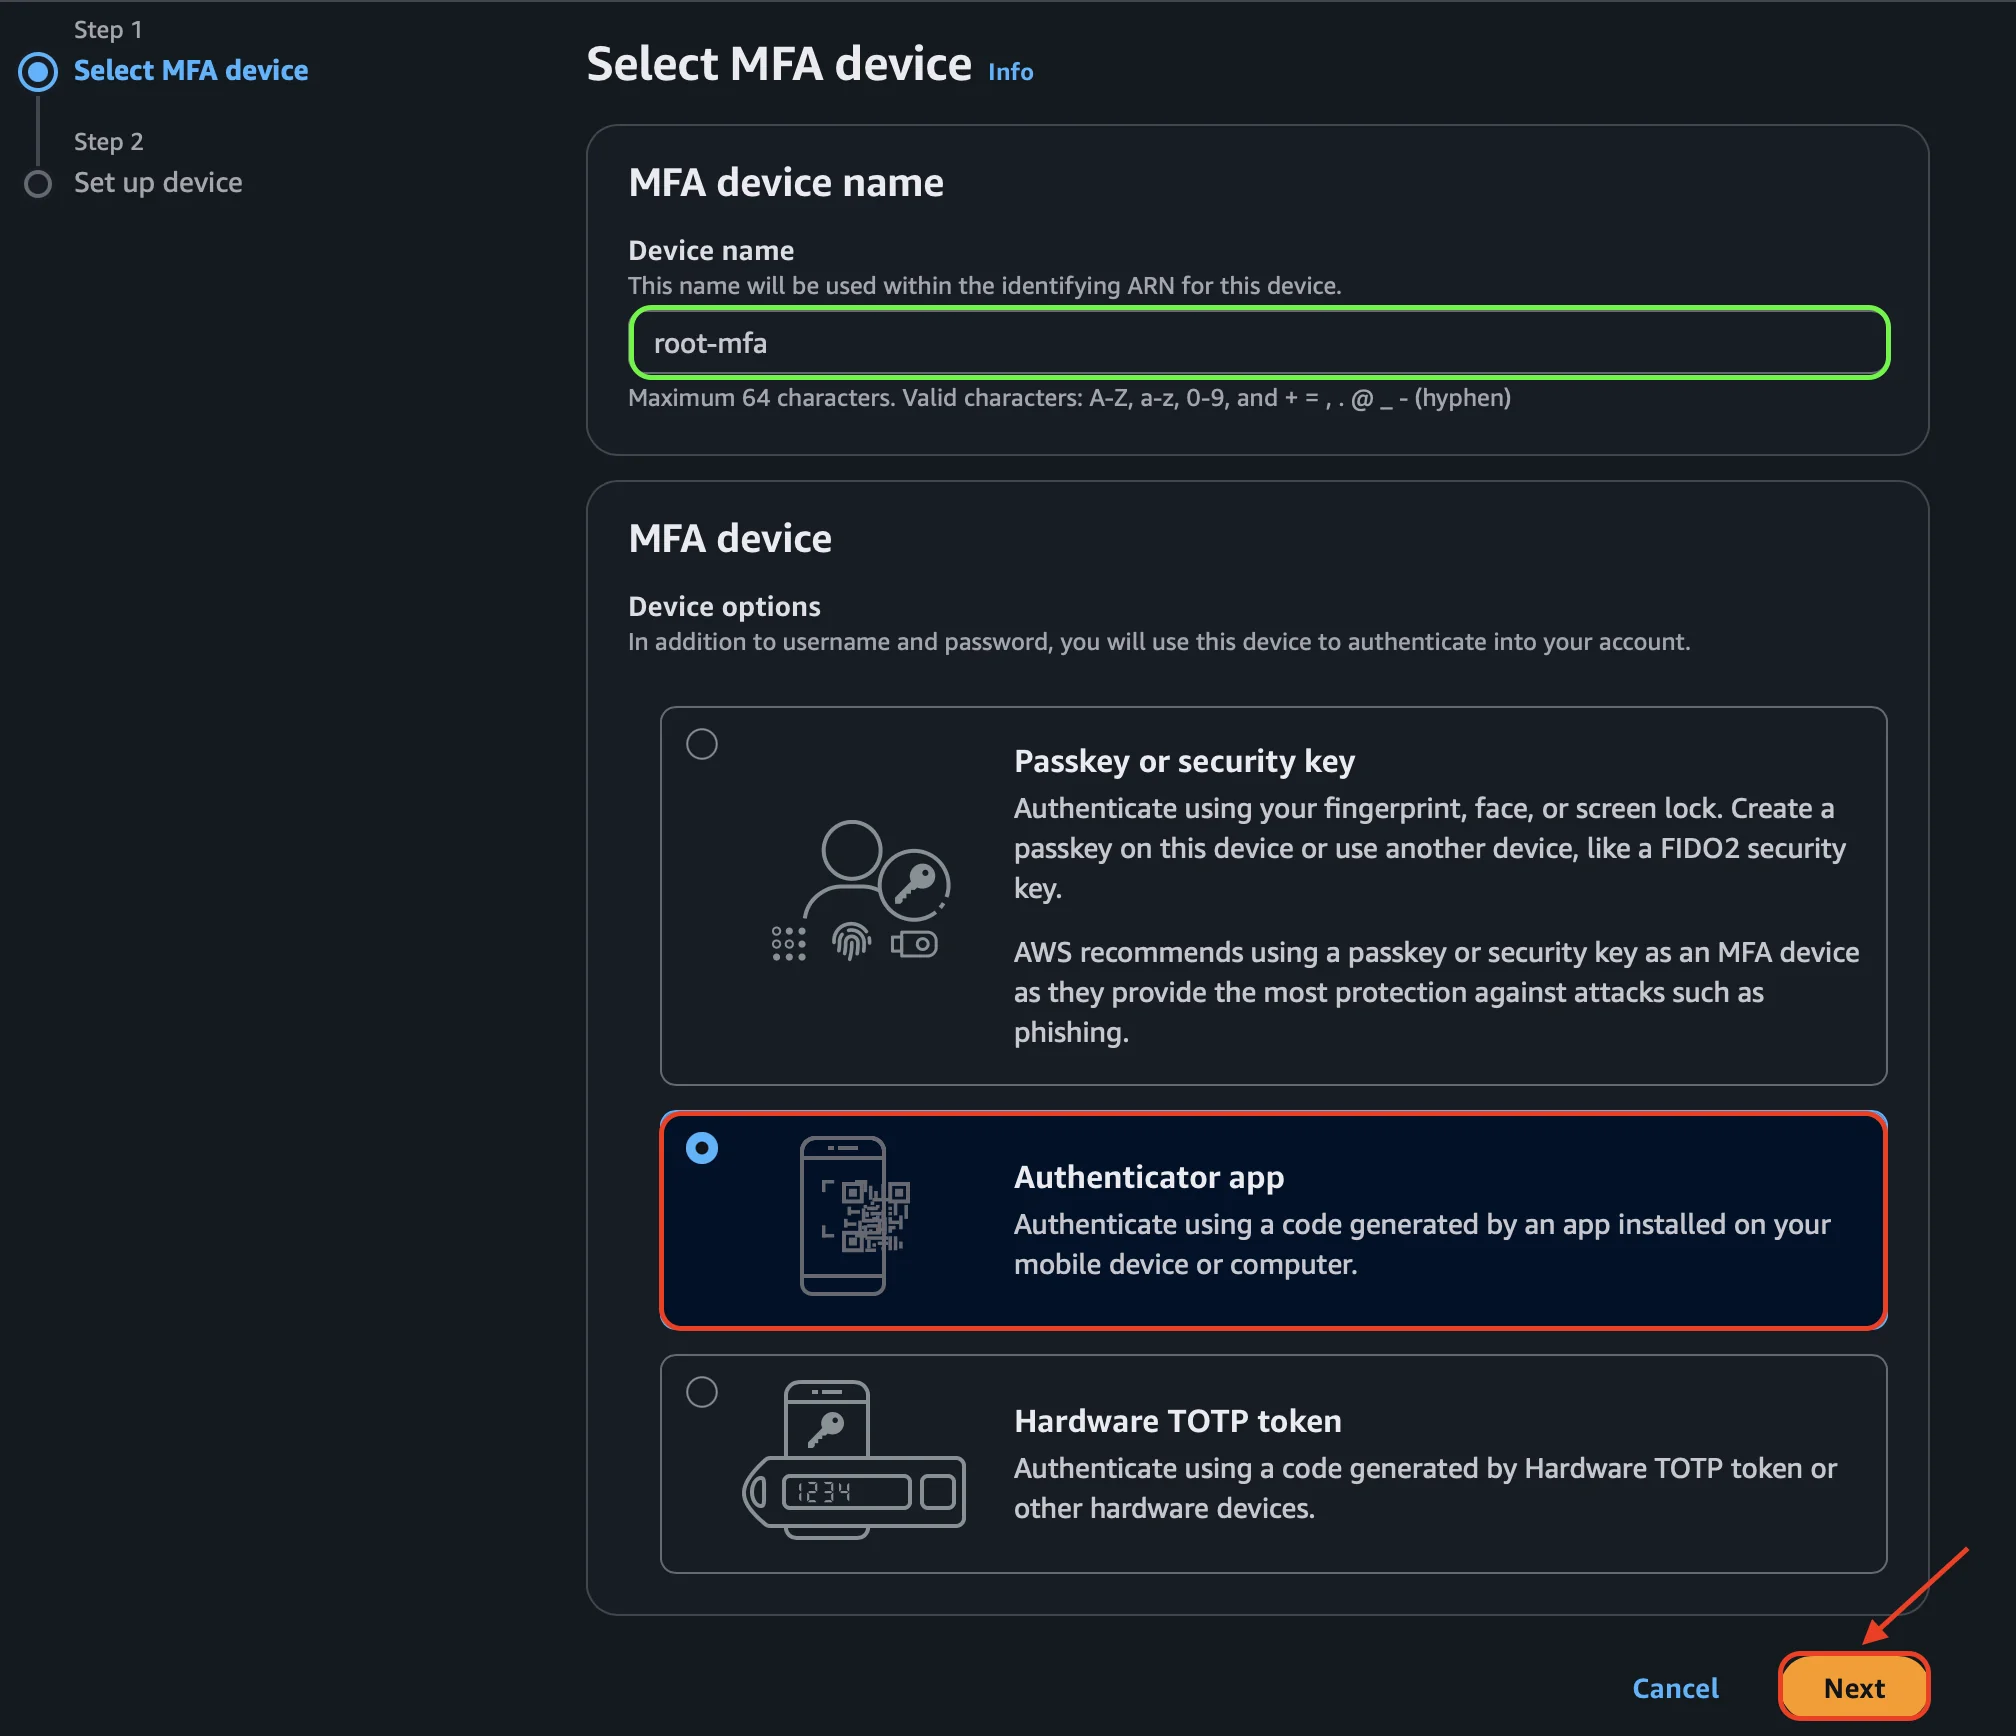
AWS will ask for a name for the MFA device. We give it something descriptive like root-mfa. Then it offers three device type options:
- Passkey or security key — passkey or physical key like YubiKey. The most secure option and the one AWS recommends as primary protection against phishing.
- Authenticator app — an app installed on your phone or computer (Google Authenticator, Microsoft Authenticator, Authy, Duo Mobile, etc.).
- Hardware TOTP token — a dedicated physical device that generates codes.
For this example, we’ll use Authenticator app, which is the most practical option to get started. We select it and click Next.
Step 4: Set up the Authenticator app
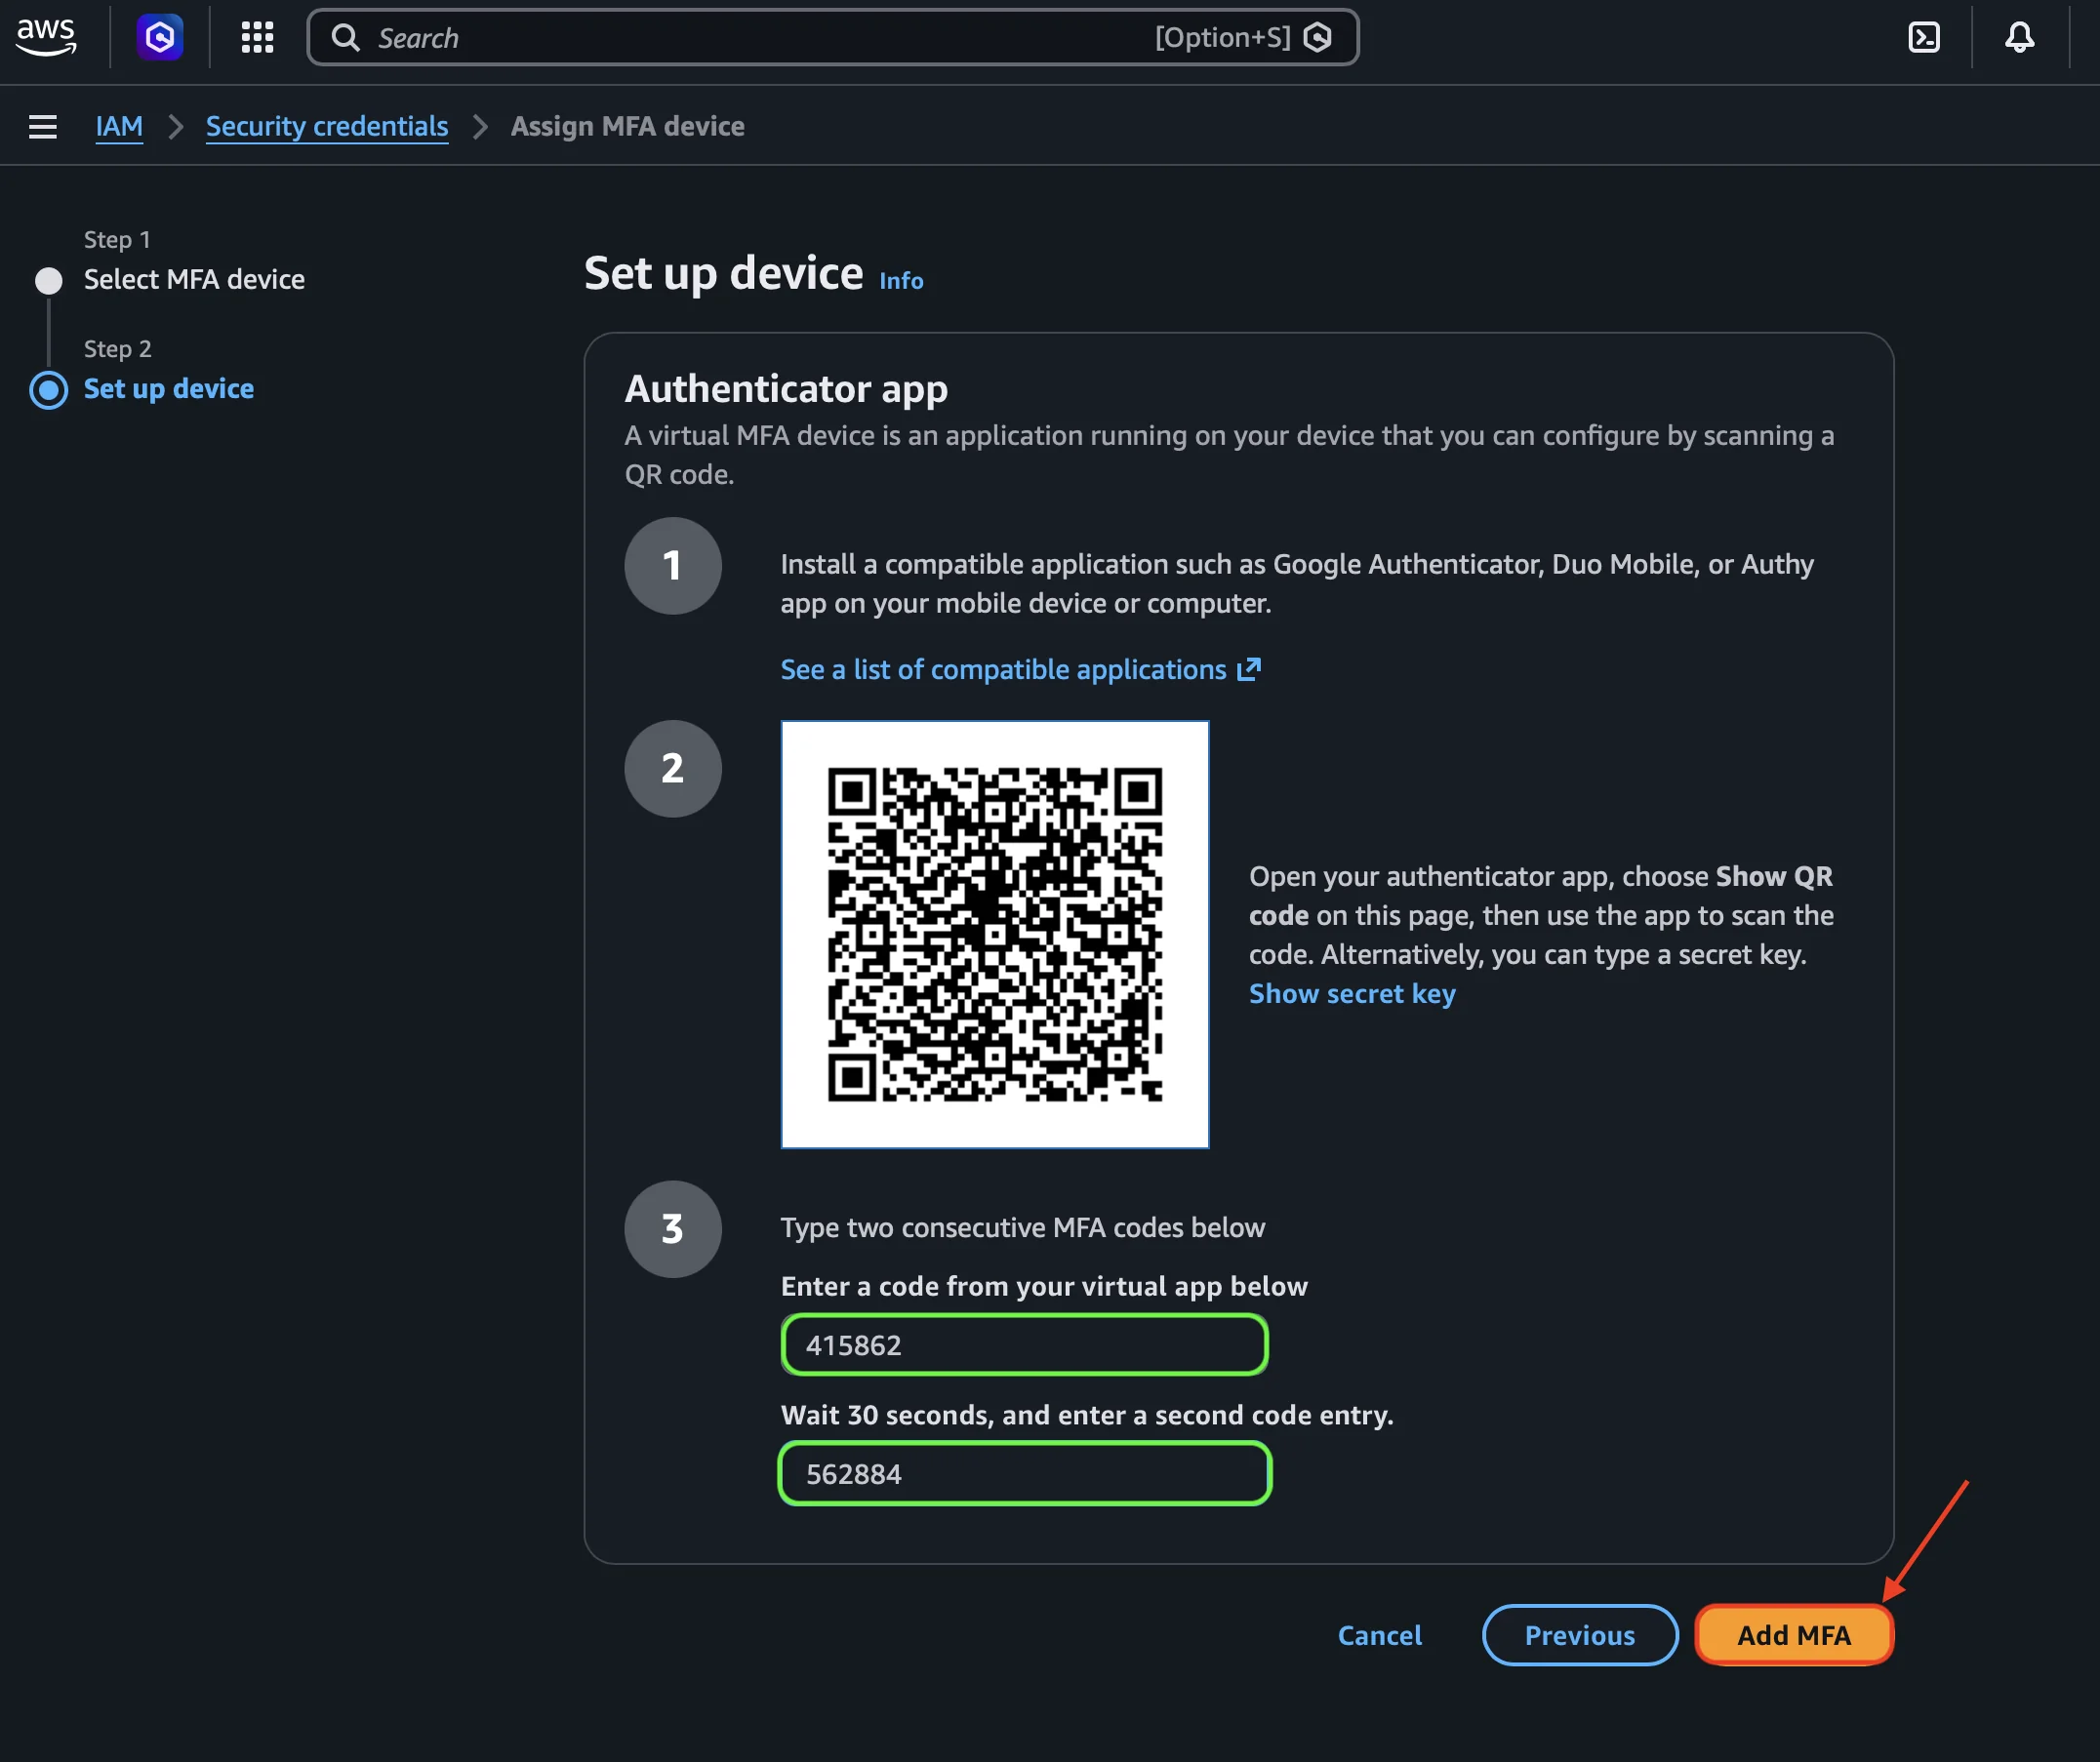
AWS shows us a QR code that we need to scan from our authenticator app. If you don’t have one yet, you can install Microsoft Authenticator, Google Authenticator, Duo Mobile, or Authy from your phone’s app store. In my case, I used Microsoft Authenticator.
Once we scan the QR, the app will start generating 6-digit codes that refresh every 30 seconds. AWS asks us to enter two consecutive codes to verify the device is synced correctly. We enter the first code, wait for the app to generate the next one (about 30 seconds), enter it, and click Add MFA.
Tip: Keep the MFA device (or the phone with the app) in a safe place. If you lose access to the authenticator app and the root email, recovering the account can be a very long process.
Step 5: Verify that MFA is active
AWS redirects us to the My security credentials section of the root user, and we can see that under Multi-factor authentication (MFA) our virtual device root-mfa now appears with its corresponding ARN. Done, MFA is active.
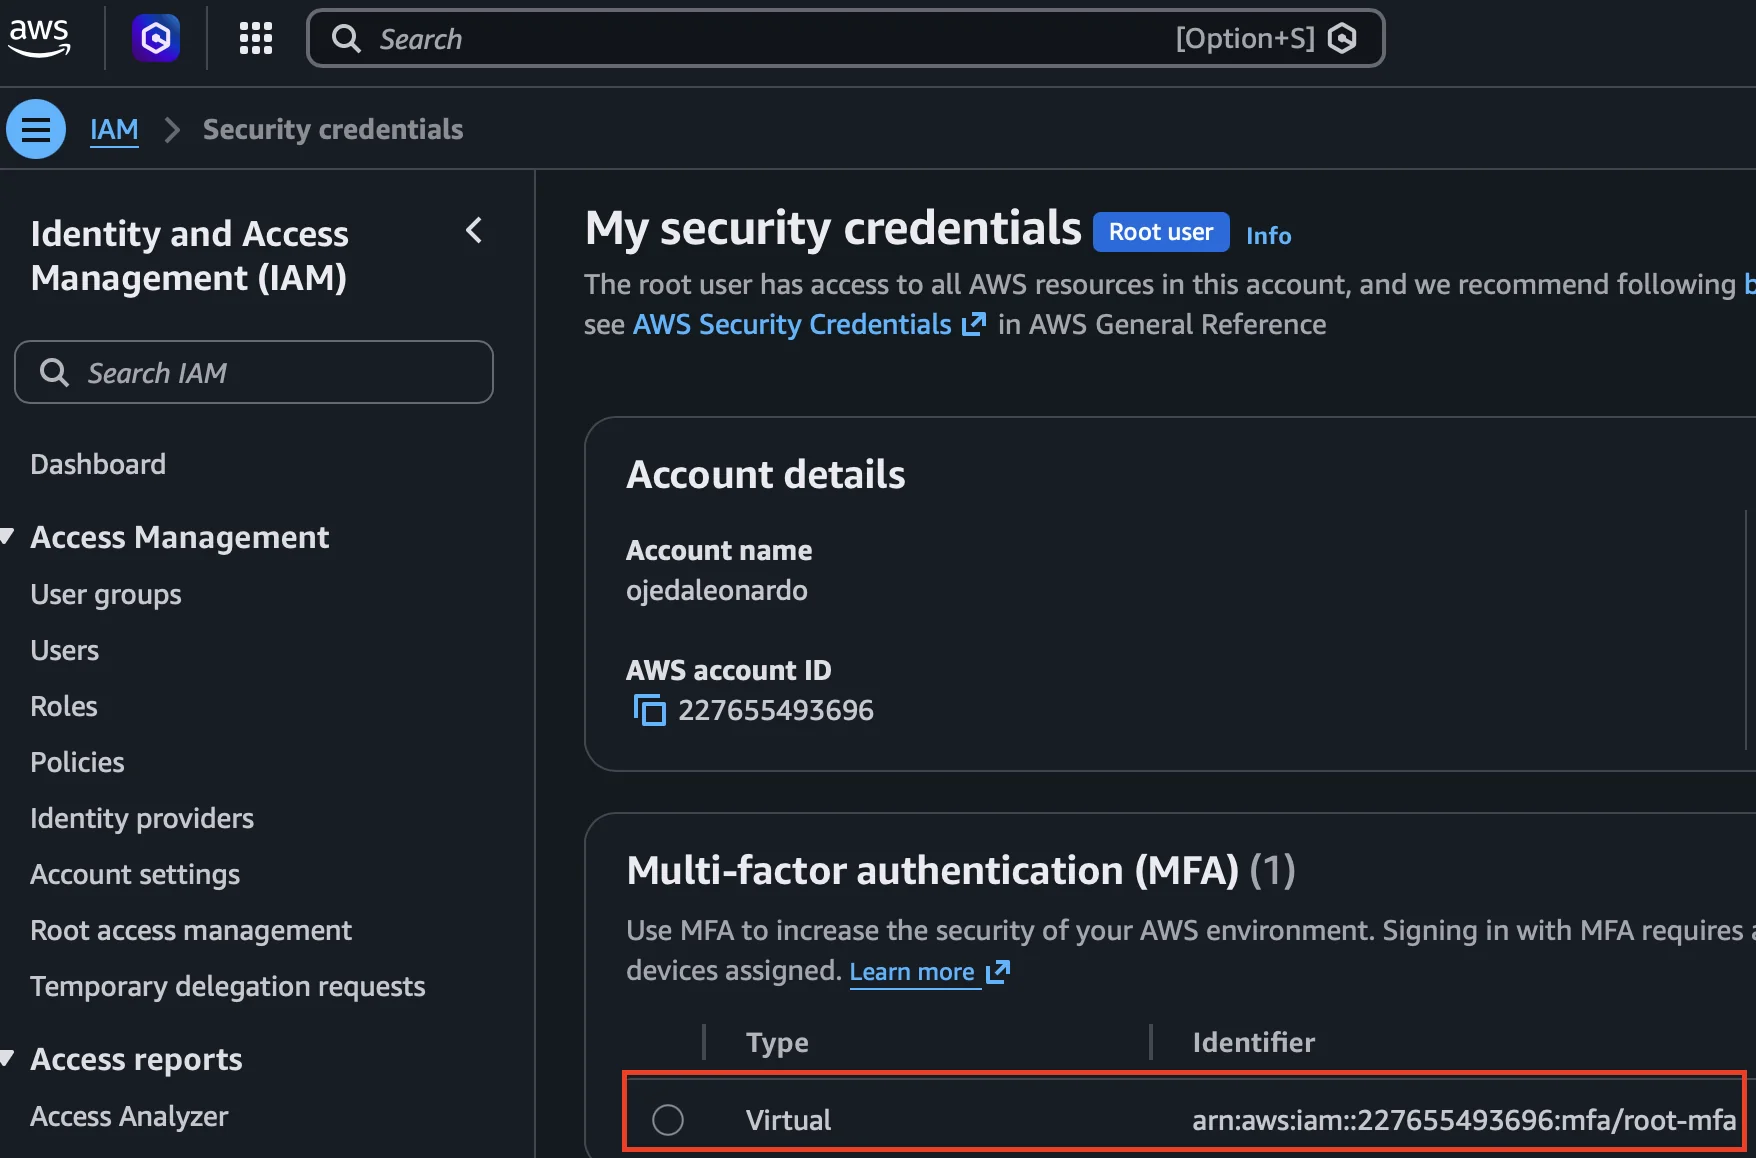
From now on, every time someone tries to log in with root, they’ll need both the password and the 6-digit code generated by the app.
Step 6: Go to the Users section
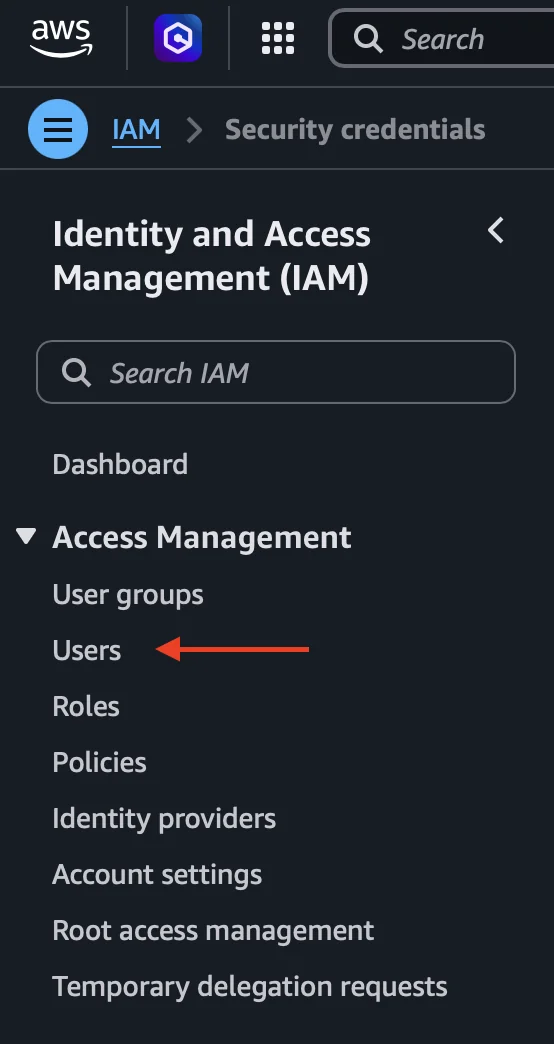
With the root now protected, let’s create the user we’ll use day to day. In the left sidebar of IAM, under Access Management, we click on Users.
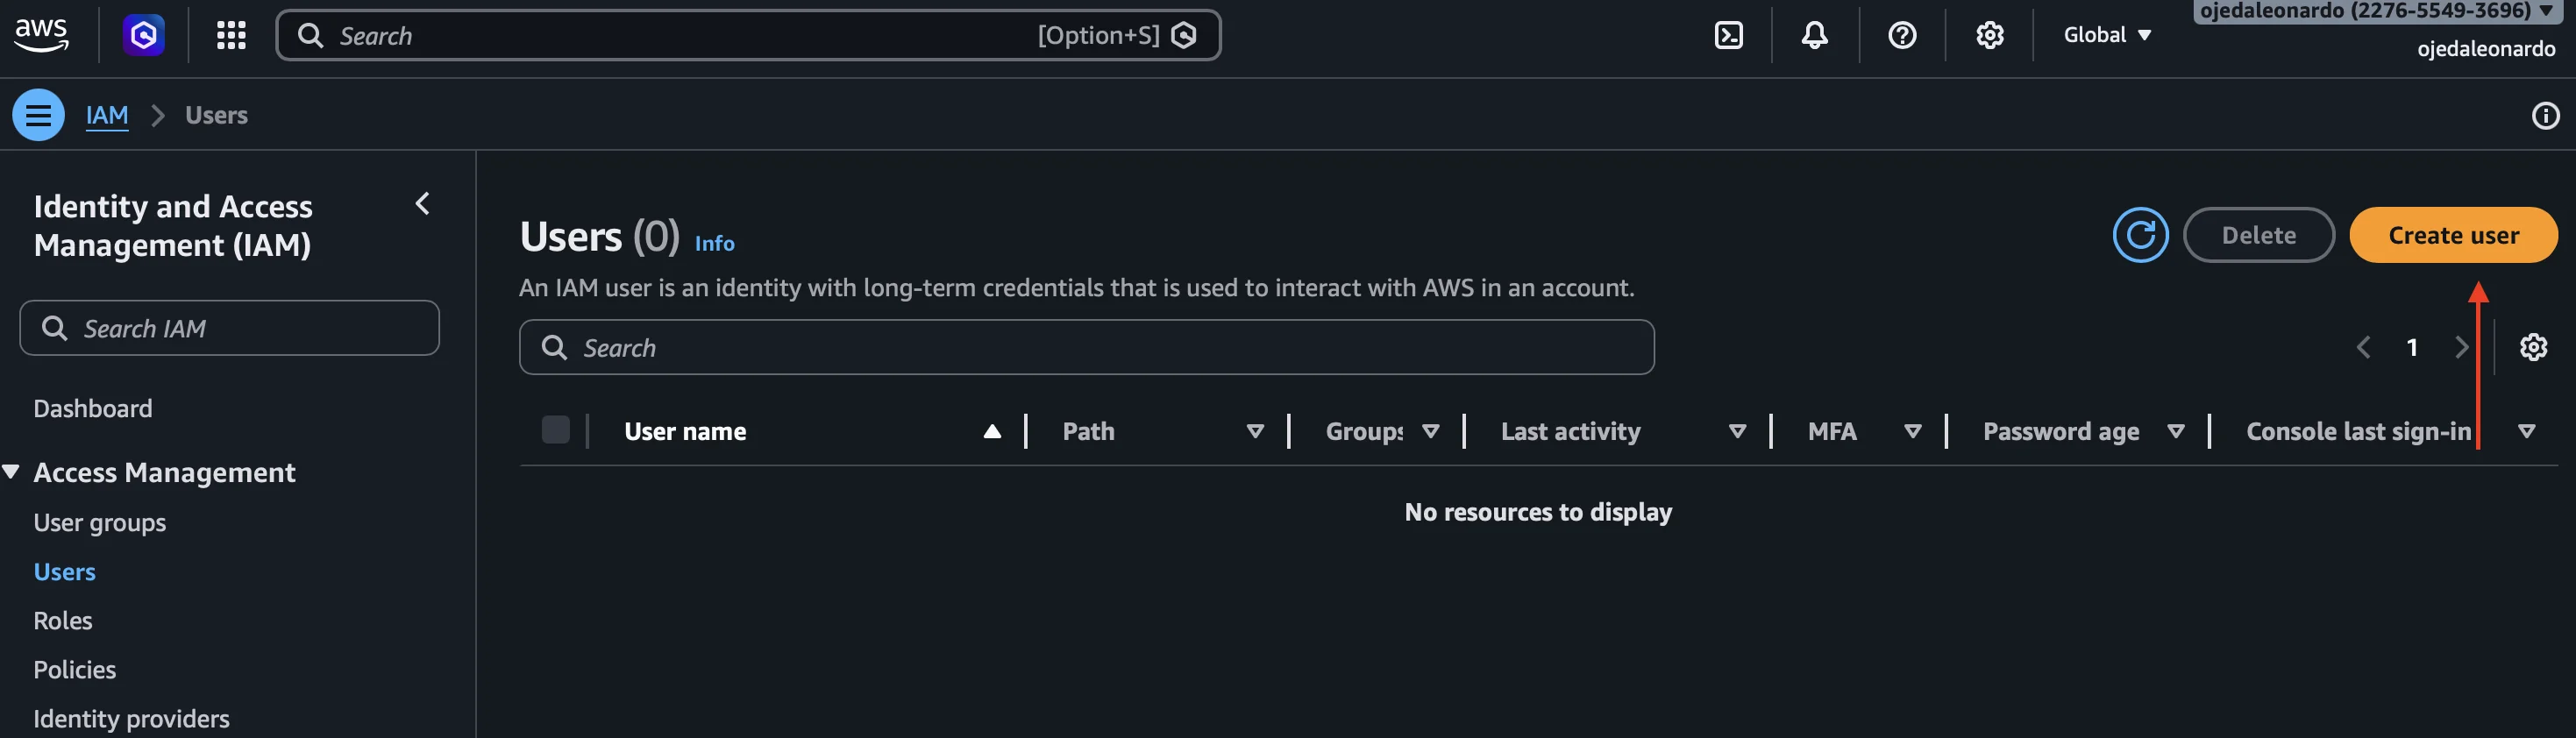
Step 7: Create a new user
On the Users screen, we see the list of existing users (on a new account it will be empty). We click the Create user button in the upper right.
Step 8: Specify user details
AWS asks for the new user’s details. We fill out the form as follows:
- User name: a descriptive name. In the example, I use
admin. - Provide user access to the AWS Management Console: we check this because we want console access.
- Console password: we select Autogenerated password so AWS generates a secure password automatically (we can also choose Custom password if we want to define it ourselves).
- Users must create a new password at next sign-in: we leave it checked (AWS marks it as Recommended) so the user changes the password on first login.
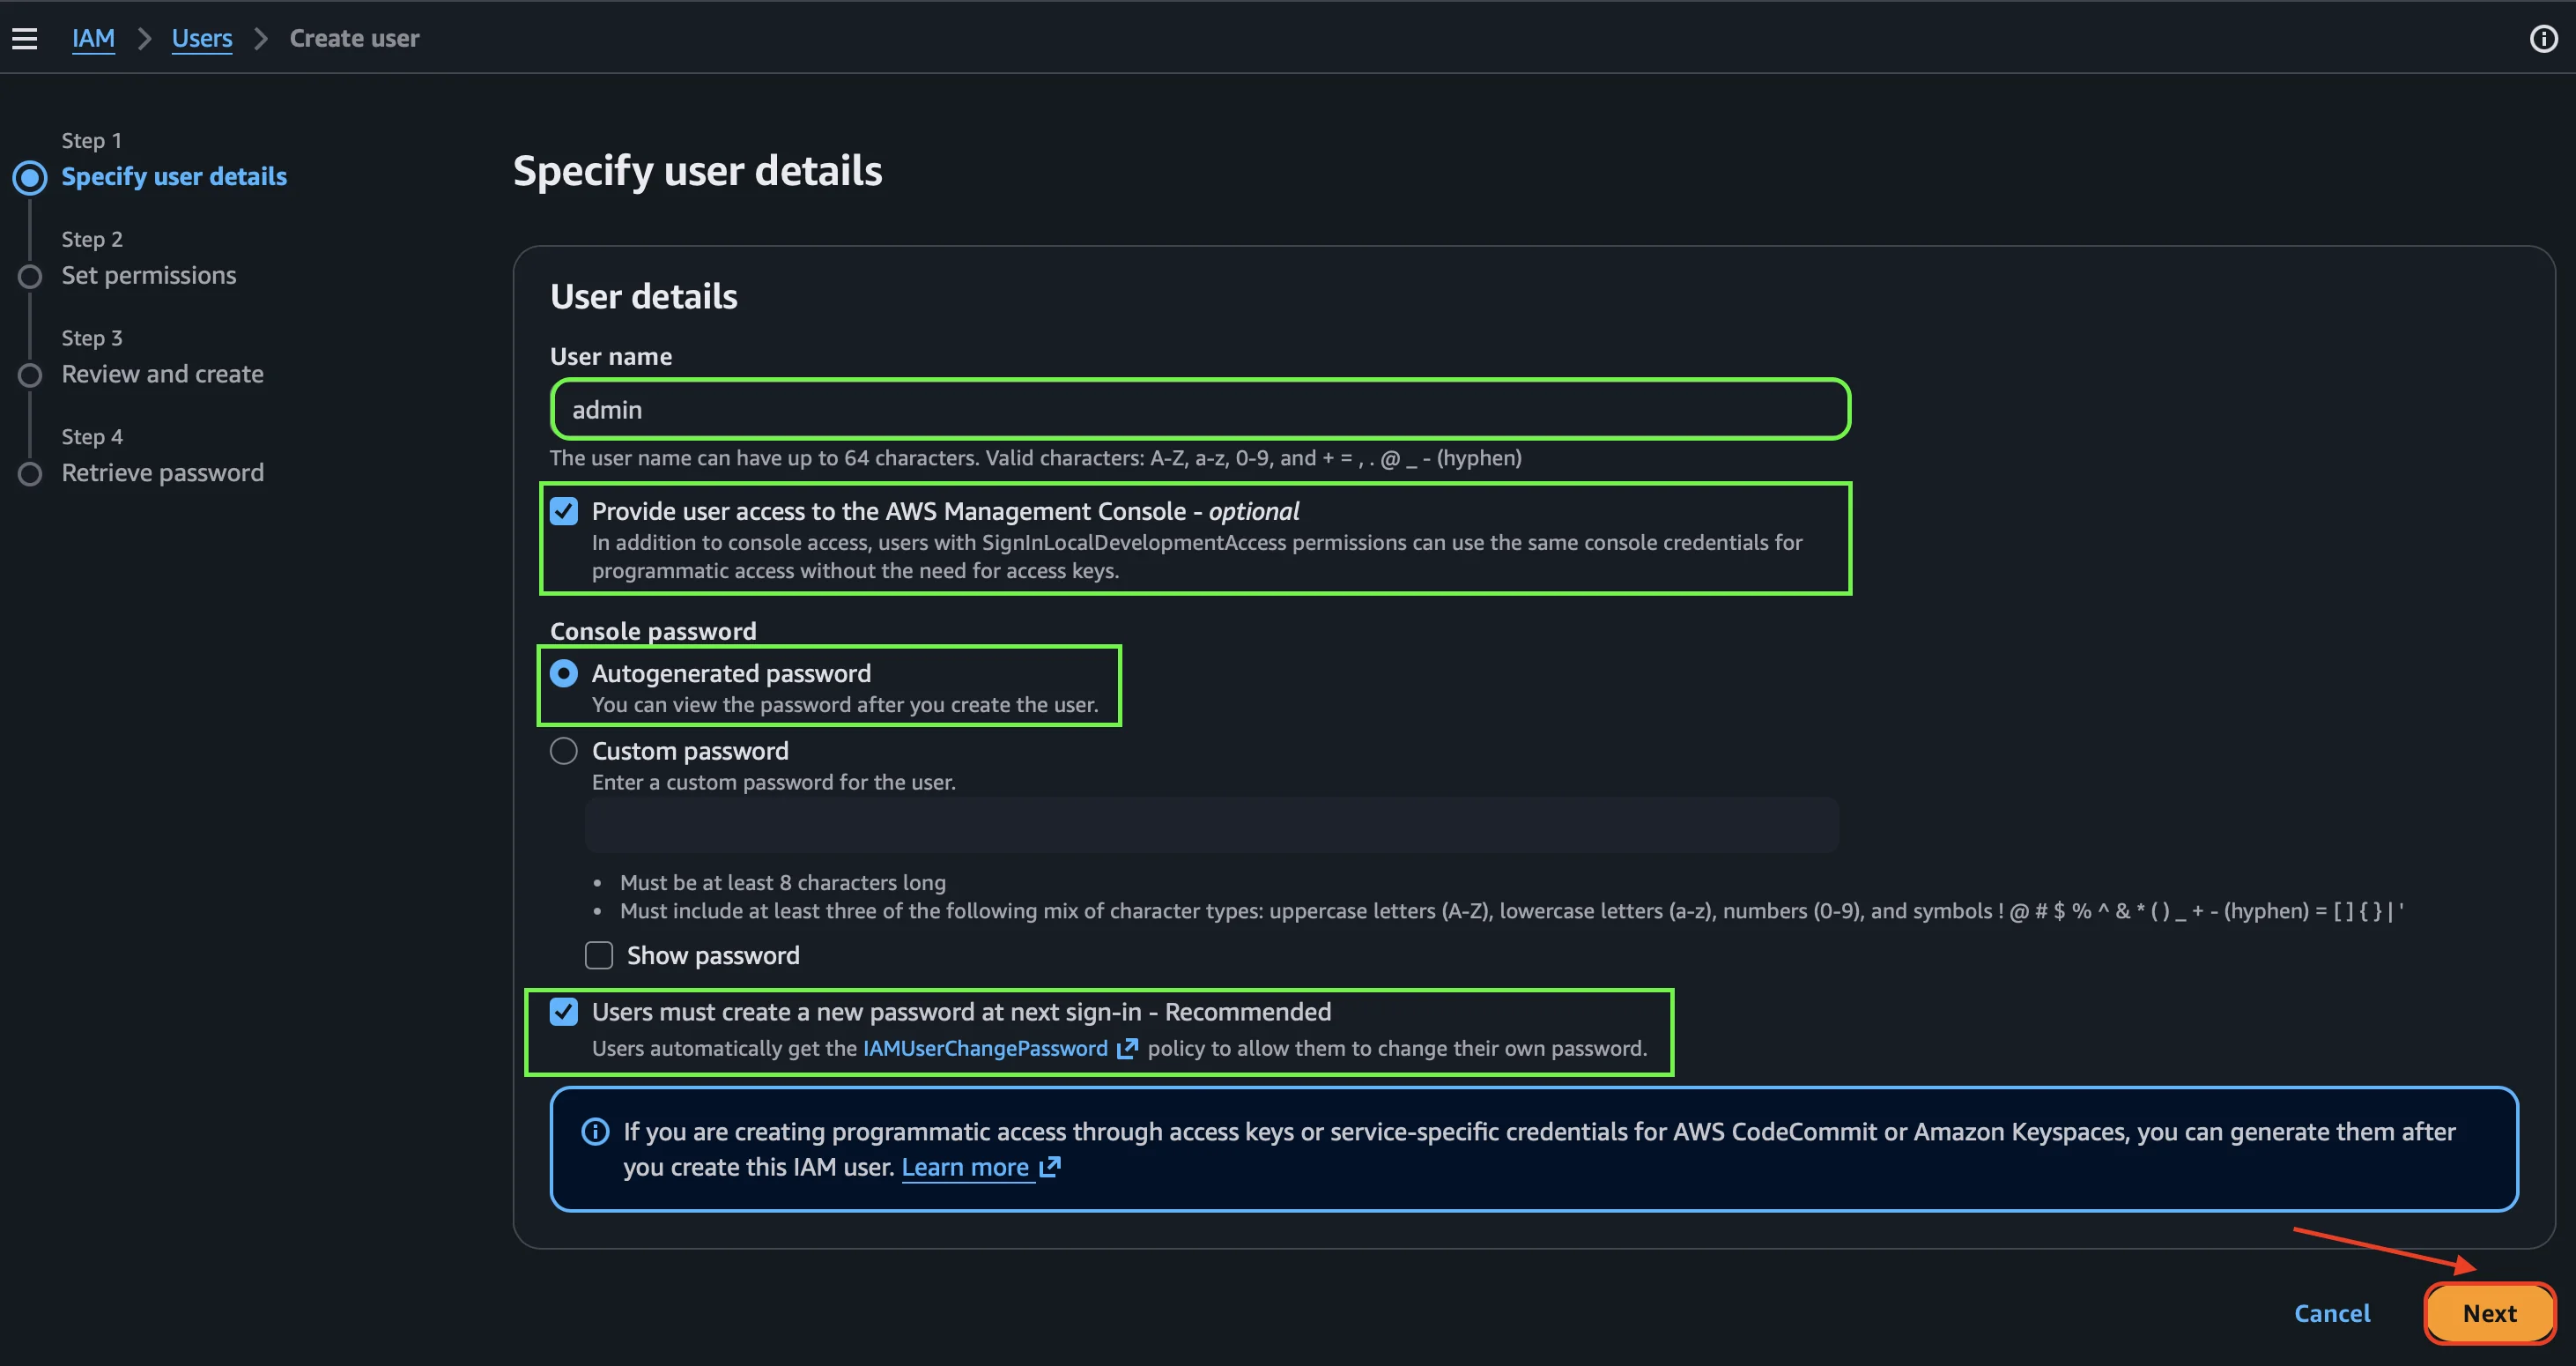
We click Next to move to permissions.
Step 9: Assign permissions to the user
On the Set permissions screen, AWS offers three options: add the user to a group, copy permissions from another user, or Attach policies directly.
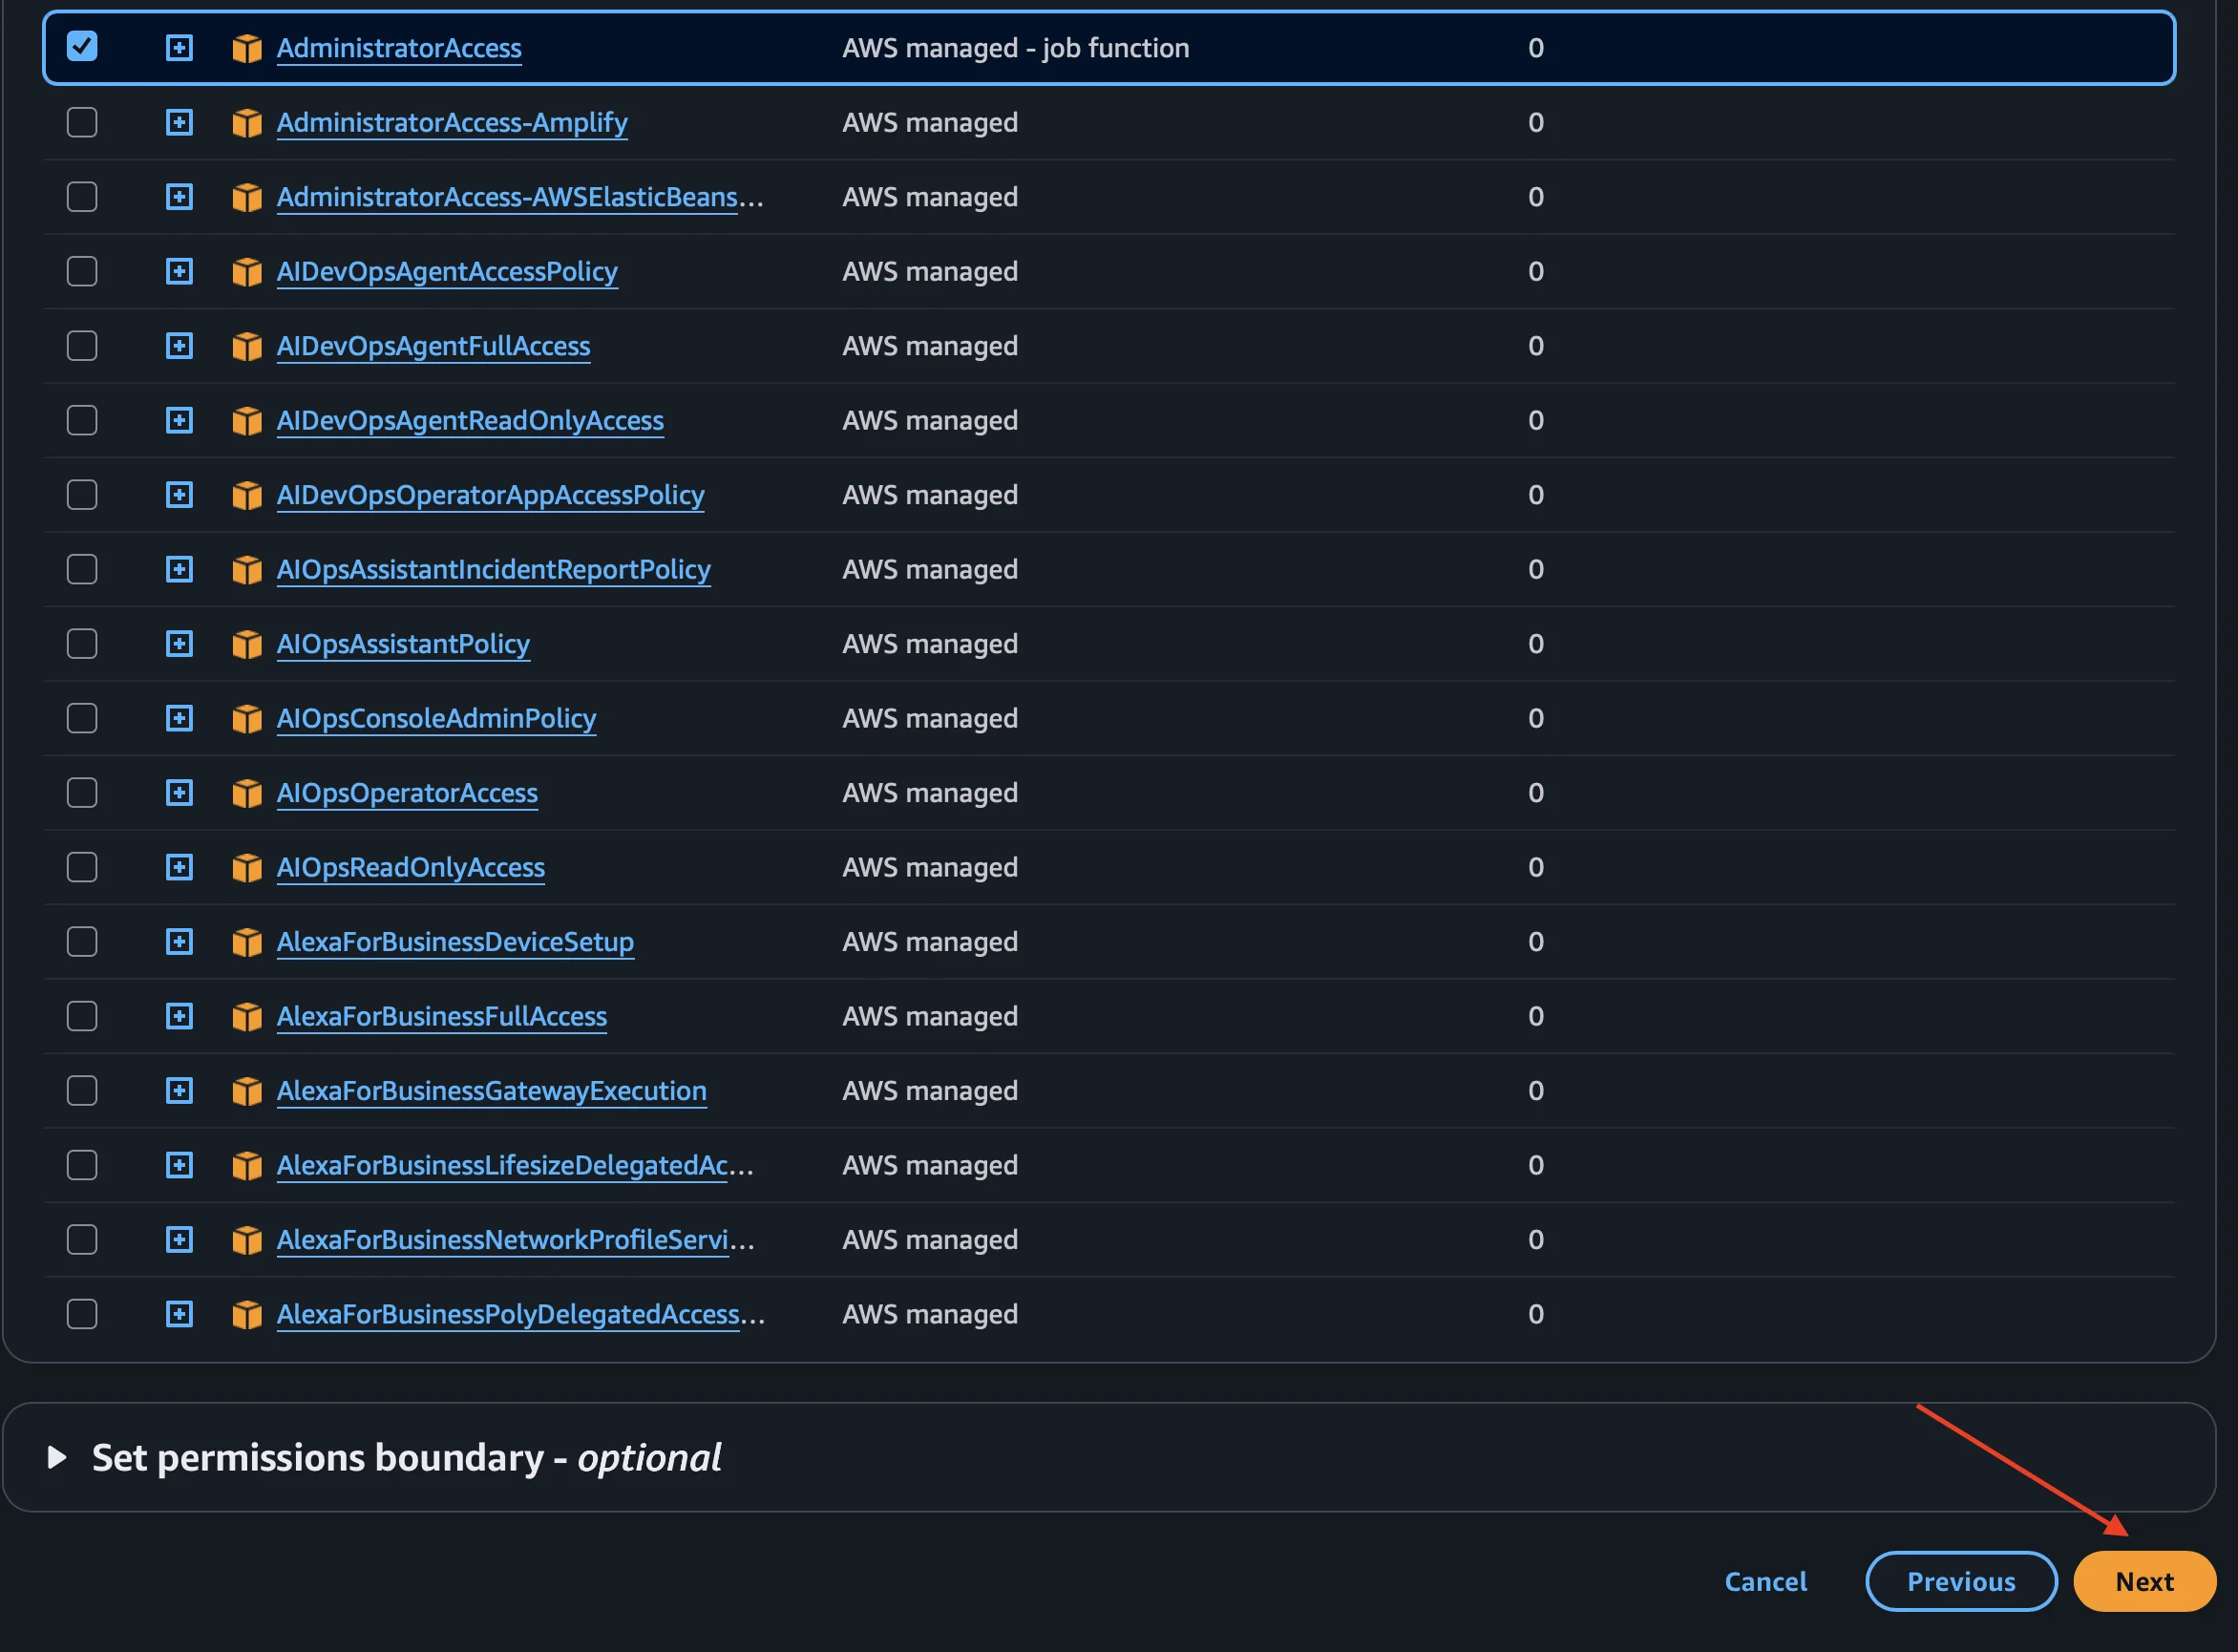
We select Attach policies directly and in the Permissions policies list, we search for and check the managed policy AdministratorAccess, which grants full permissions over all AWS services.
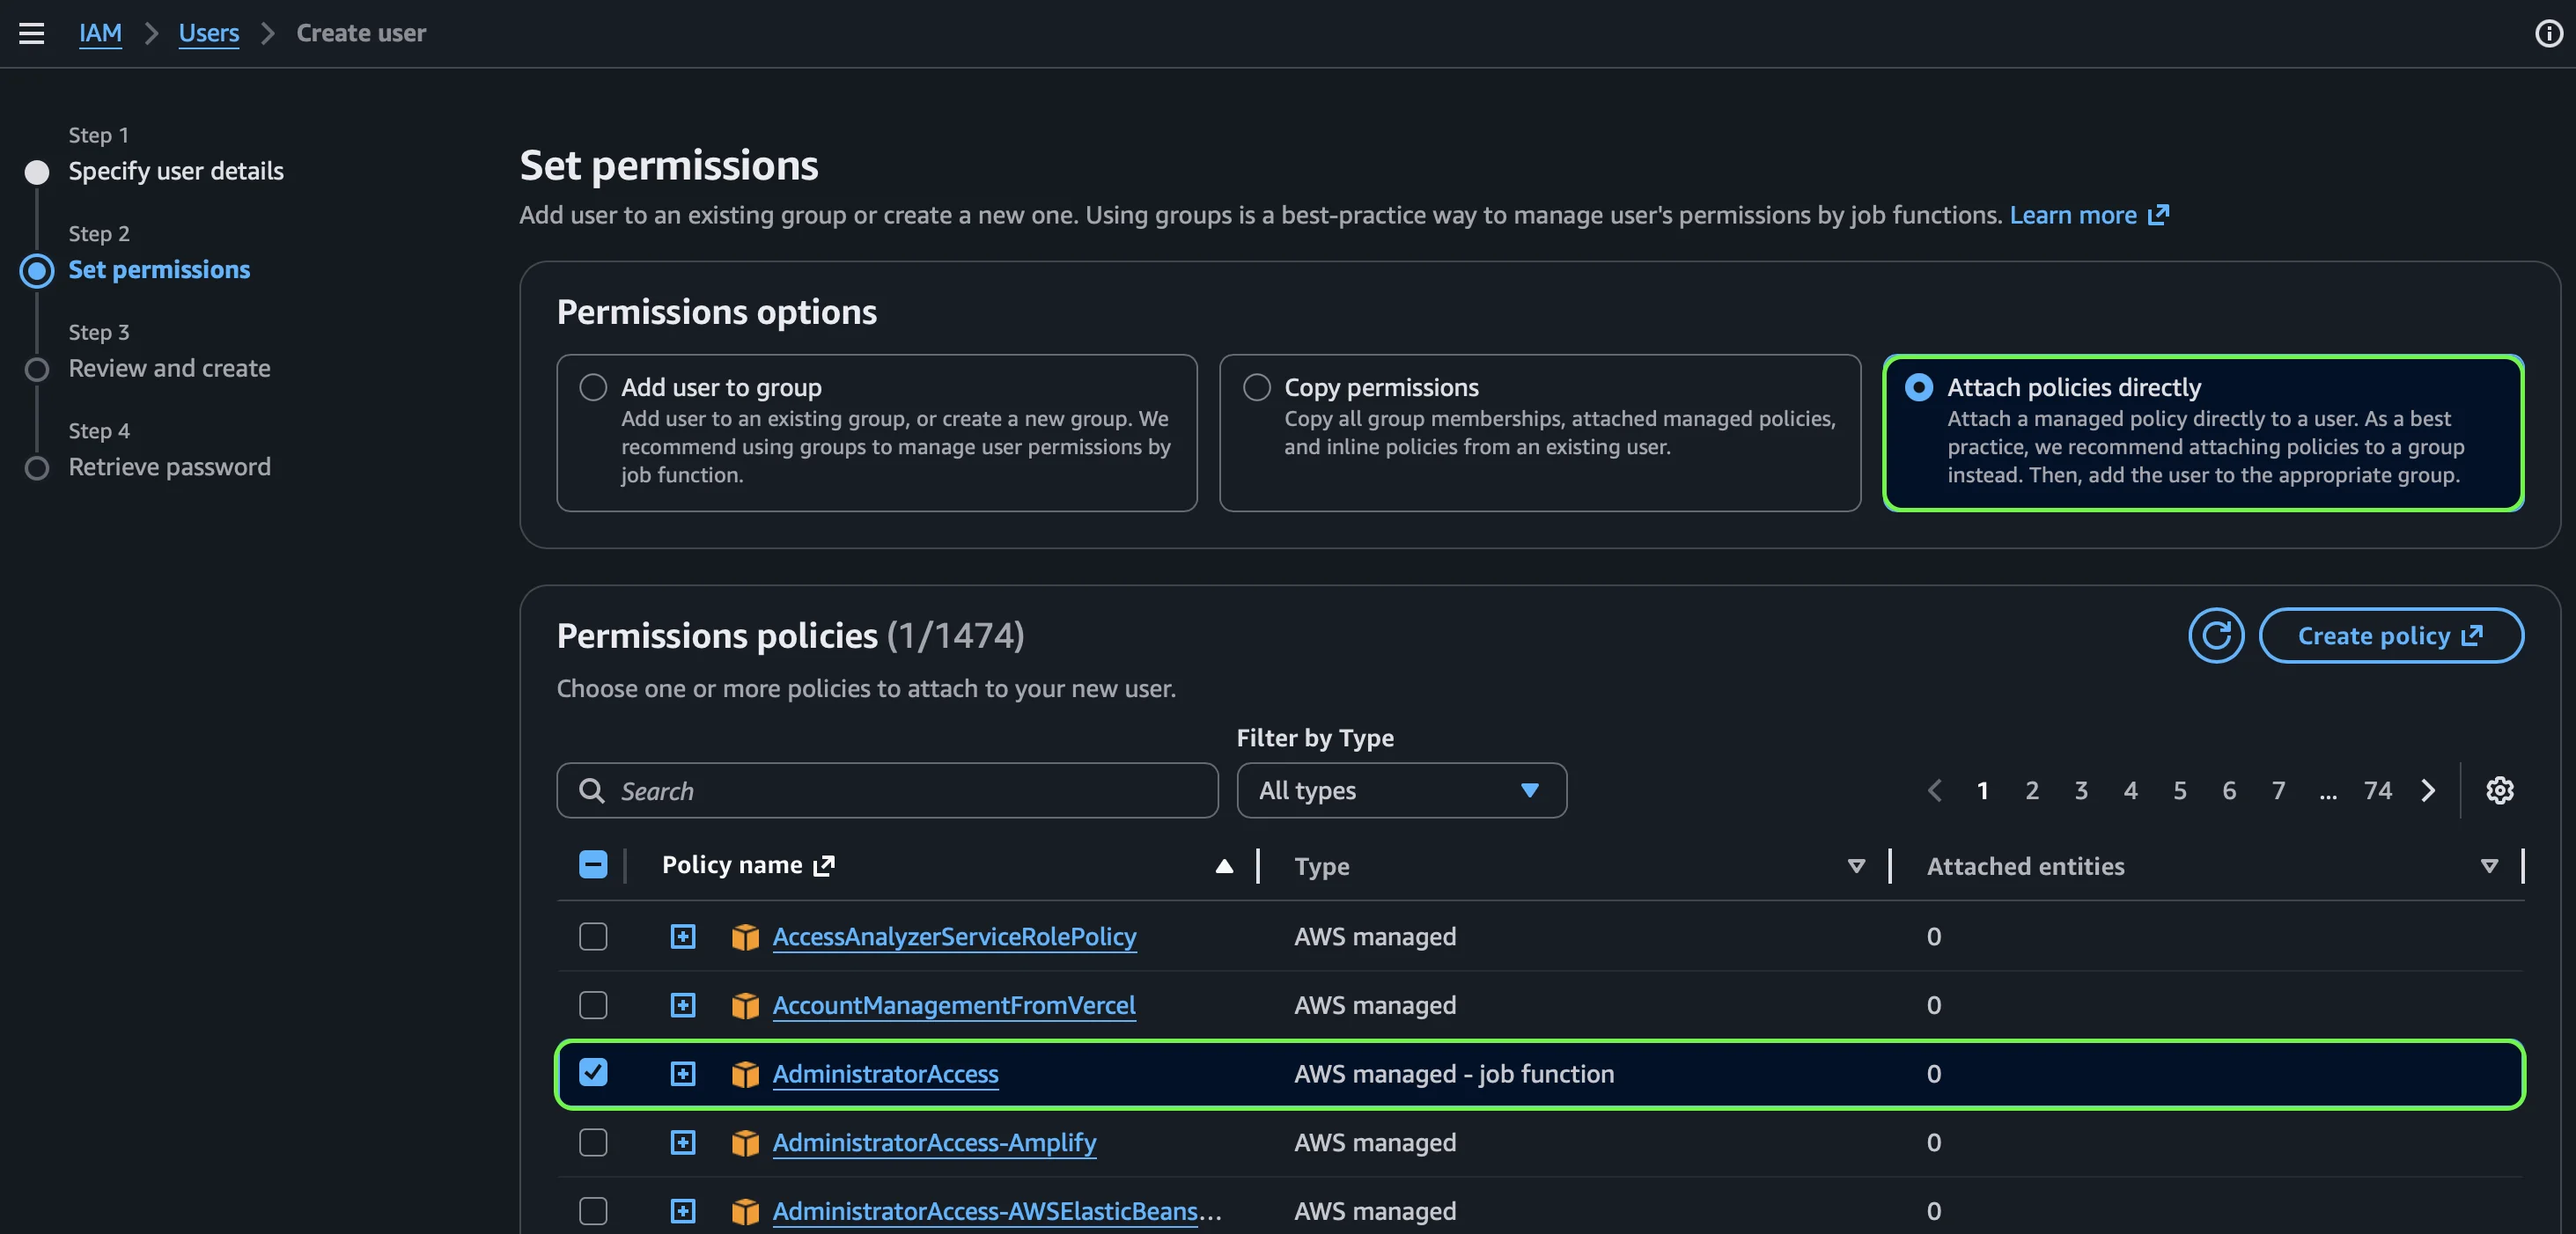
Note on strategy: Historically, the best practice was to manage permissions through groups. However, AWS now recommends using IAM Identity Center with Permission Sets to manage human access, instead of creating IAM users and groups manually. Since the plan is to migrate to that model in the future, it’s not worth investing time now building groups that we’ll later replace. That’s why we attach the policy directly to the user: it’s the simplest approach for a personal account at this initial stage.
Security note:
AdministratorAccessis a very permissive policy. For production environments or with multiple people, the ideal is to follow the principle of least privilege and grant only the strictly necessary permissions. While we’re learning and it’s a personal account, it’s fine to use this policy.
We scroll to the bottom and click Next to continue.
Step 10: Review and create the user
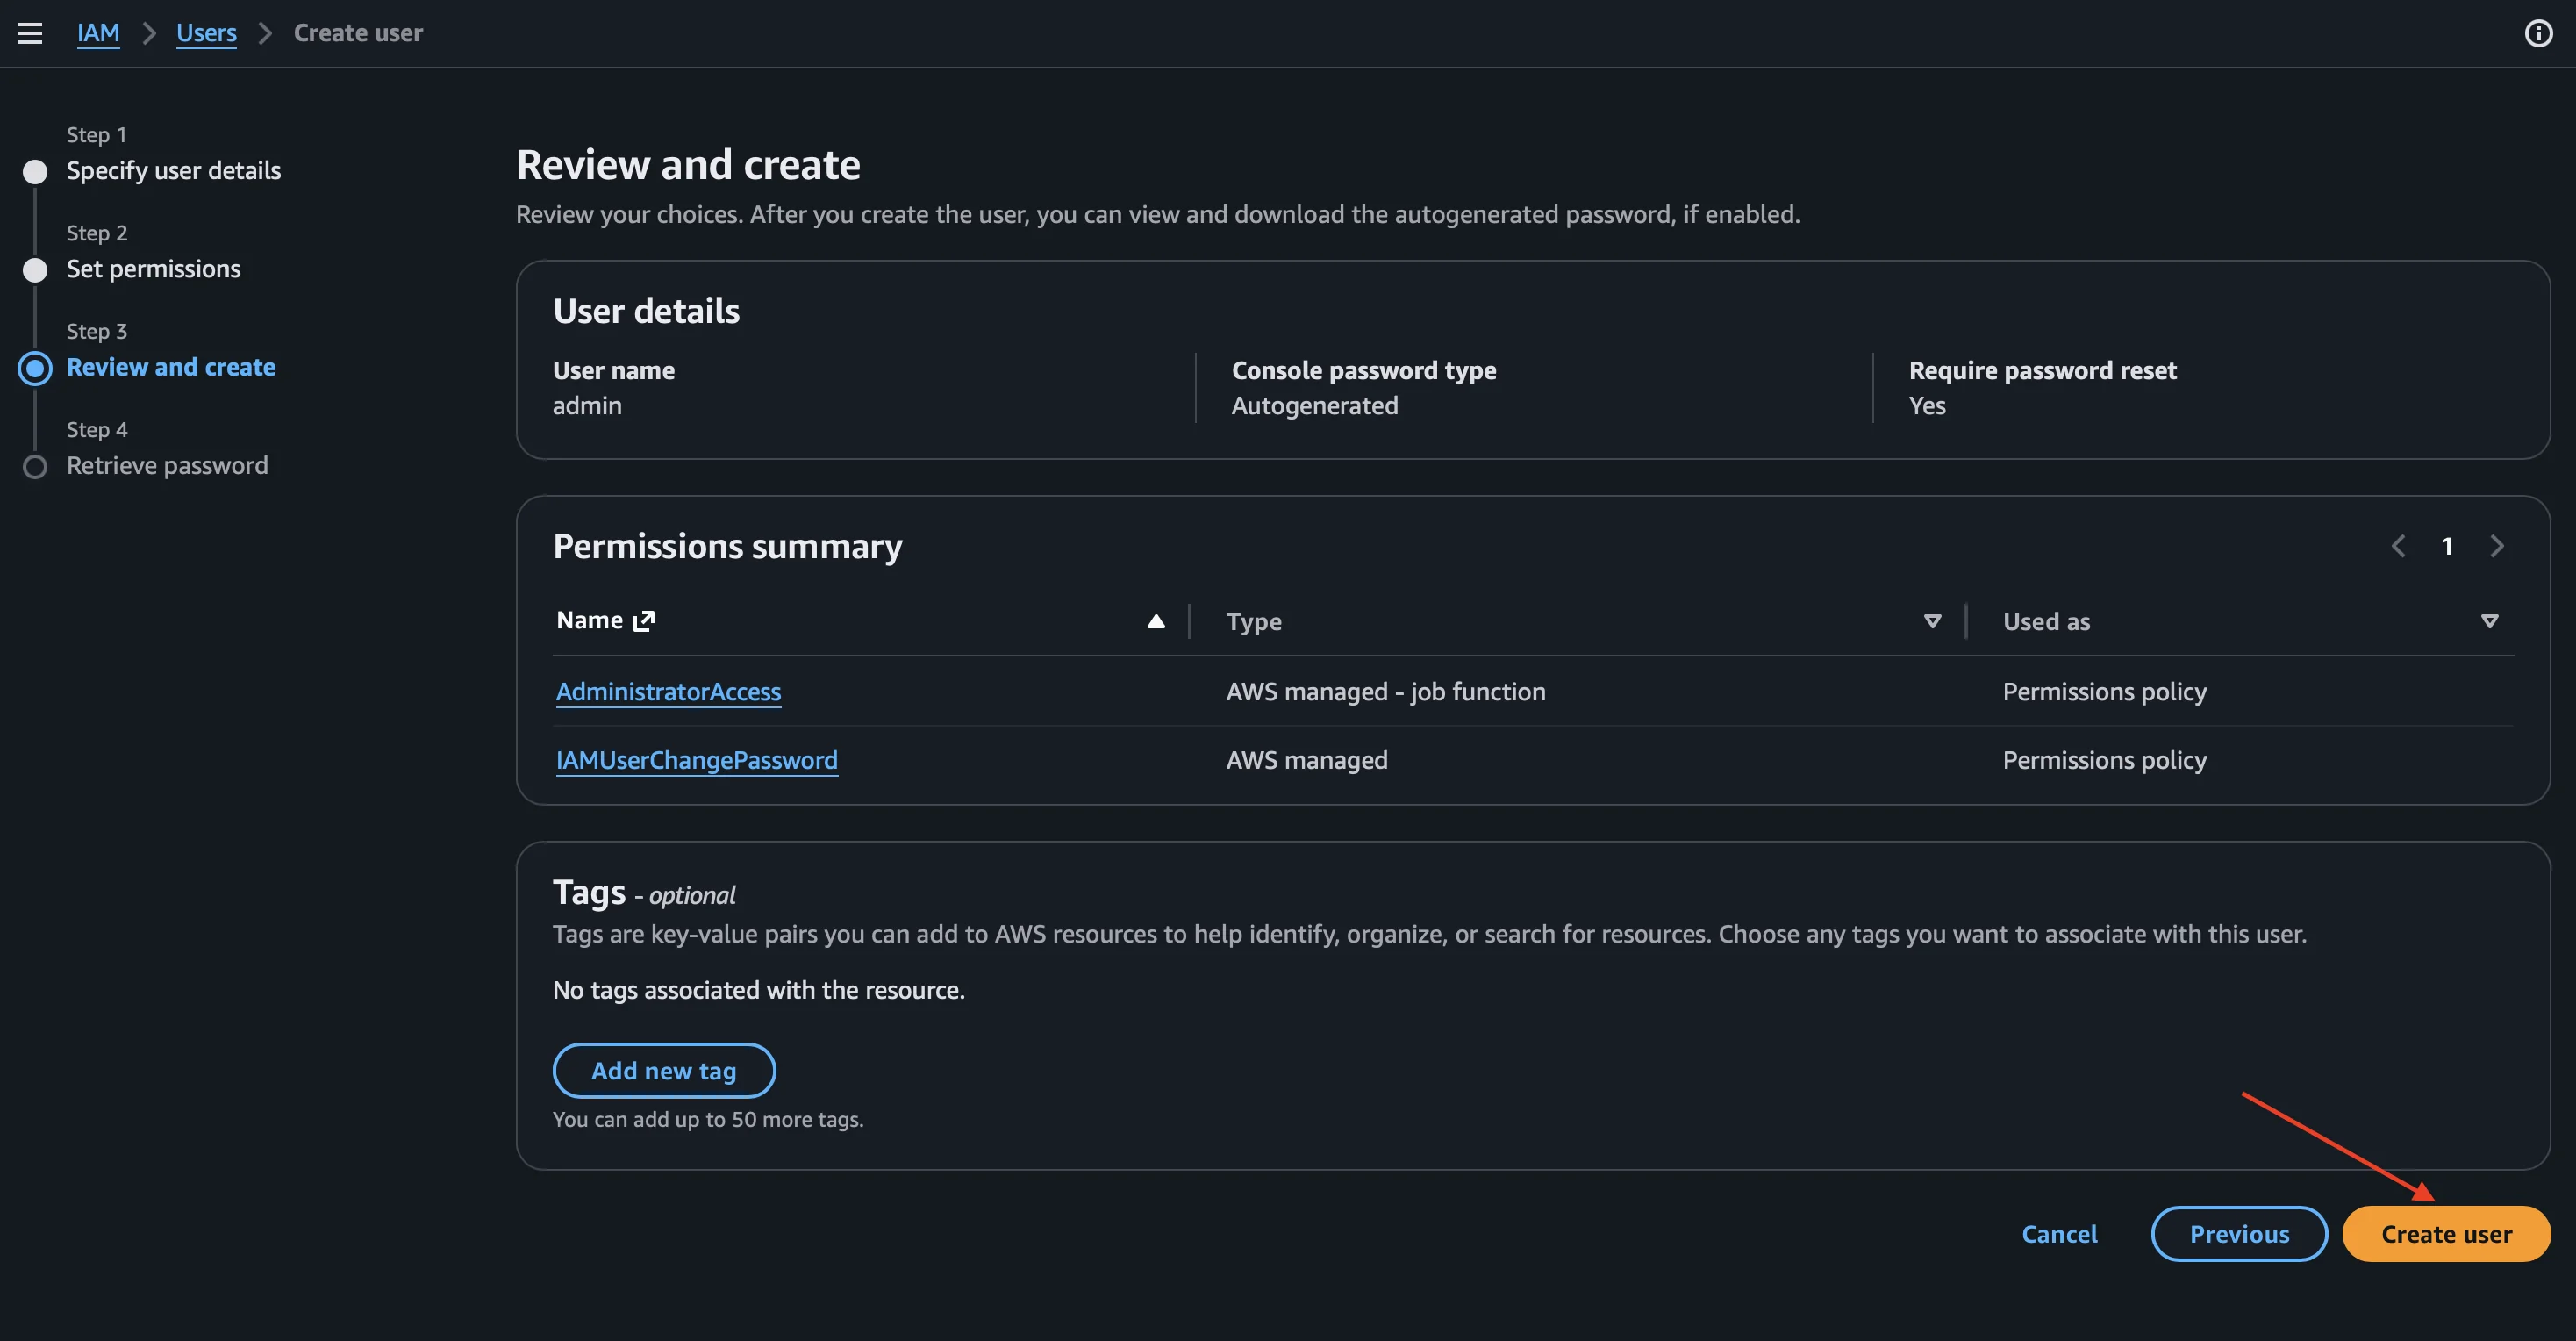
AWS shows us the Review and create screen with a complete summary: user name (admin), password type (Autogenerated), Require password reset set to Yes, and the Permissions summary. You’ll notice that, in addition to AdministratorAccess, IAMUserChangePassword also appears: AWS attaches it automatically because we checked the “change password on first sign-in” option, and this policy allows the user to change their own password.
If everything looks correct, we click Create user.
Step 11: Retrieve user credentials
After creating the user, AWS shows the Retrieve password screen with a success message and the Console sign-in details:
- Console sign-in URL: the specific URL for our account to log in with IAM users.
- User name: the user name (
admin). - Console password: the autogenerated password, which we can see by clicking Show.
We can download a .csv file with all the data or copy them directly. This is the only time AWS will show us this password, so it’s very important to save it in a safe place.
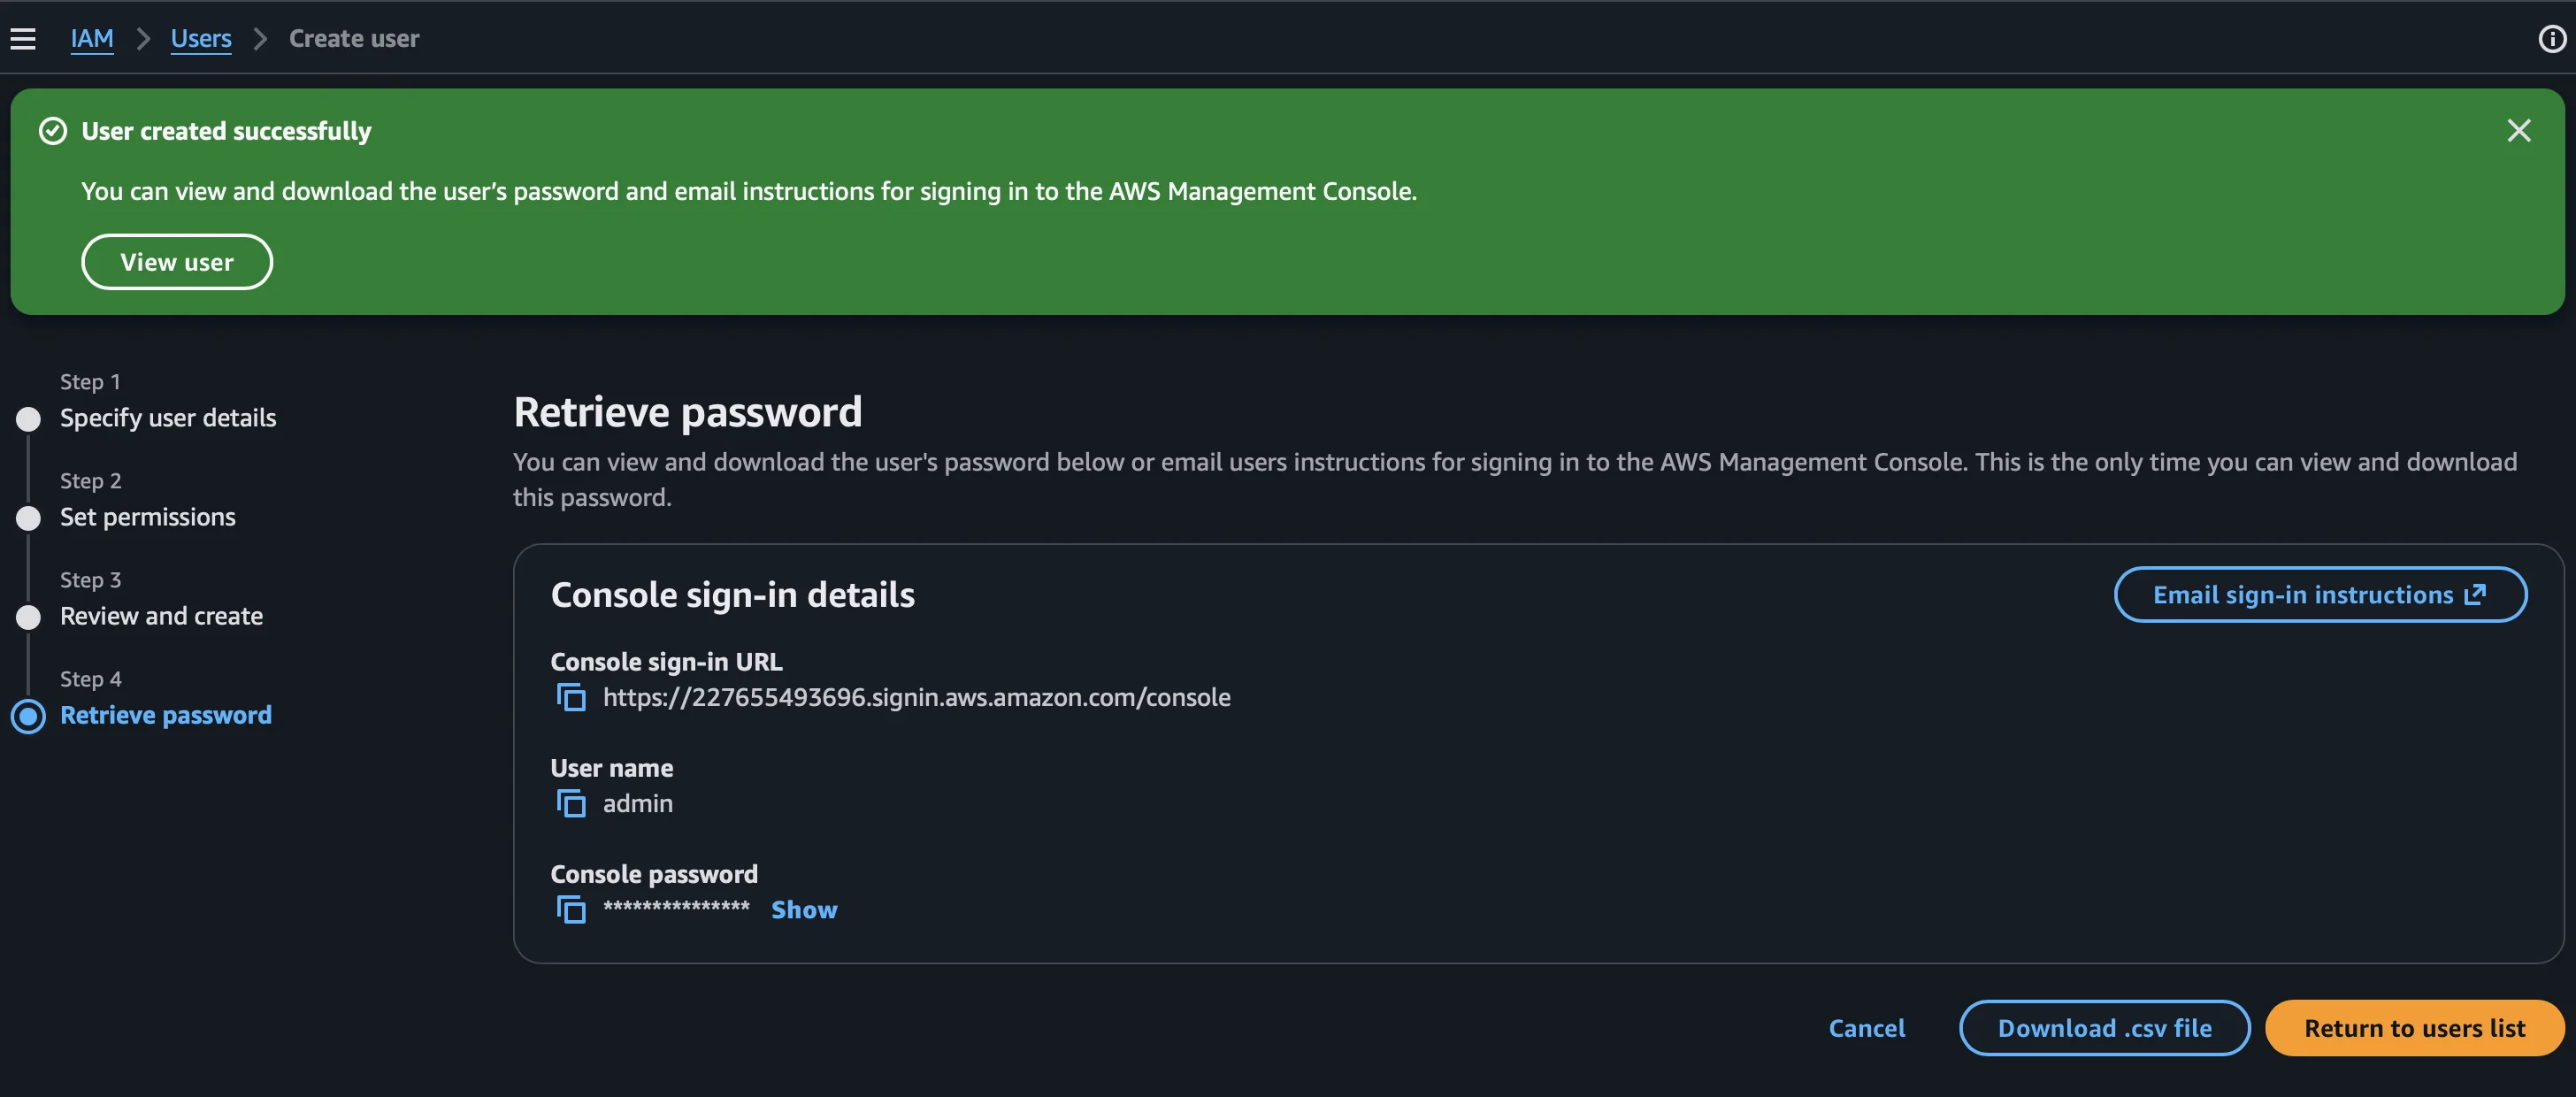
Important: Save the sign-in URL in your bookmarks. It’s the URL you’ll always use to log in with your IAM user, and it’s different from the root login. Also save the password in a secure password manager.
Step 12: Sign out of root and log in with the IAM user
To test that everything works, we click on our name in the upper right corner of the console and select Sign out. Then we open the sign-in URL we saved in the previous step and log in with the admin user and the autogenerated password.
Since we checked that the user must change the password on first login, AWS will ask us to reset it. We enter the autogenerated password as Old Password, define a new one in New Password, and repeat it in Confirm New Password. We click Confirm Password Change.
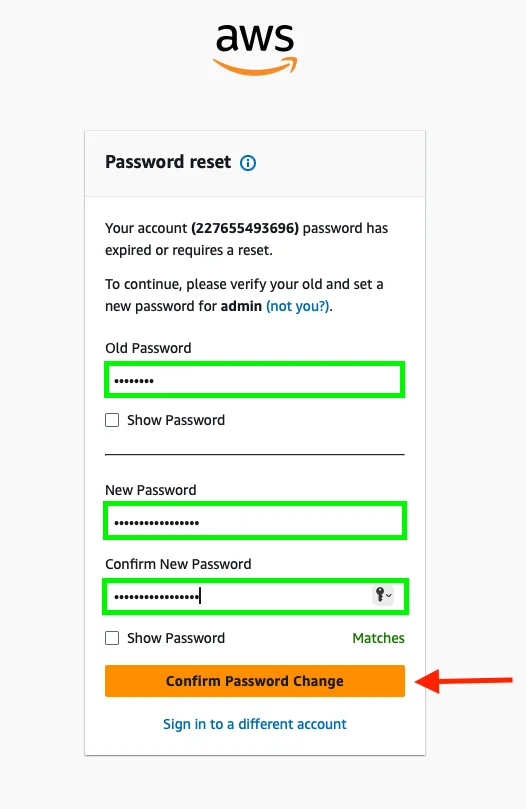
And that’s it, we’re now inside the console with our IAM user admin and a new password that only we know. We can see in the upper right that we’re logged in as admin and not as root.
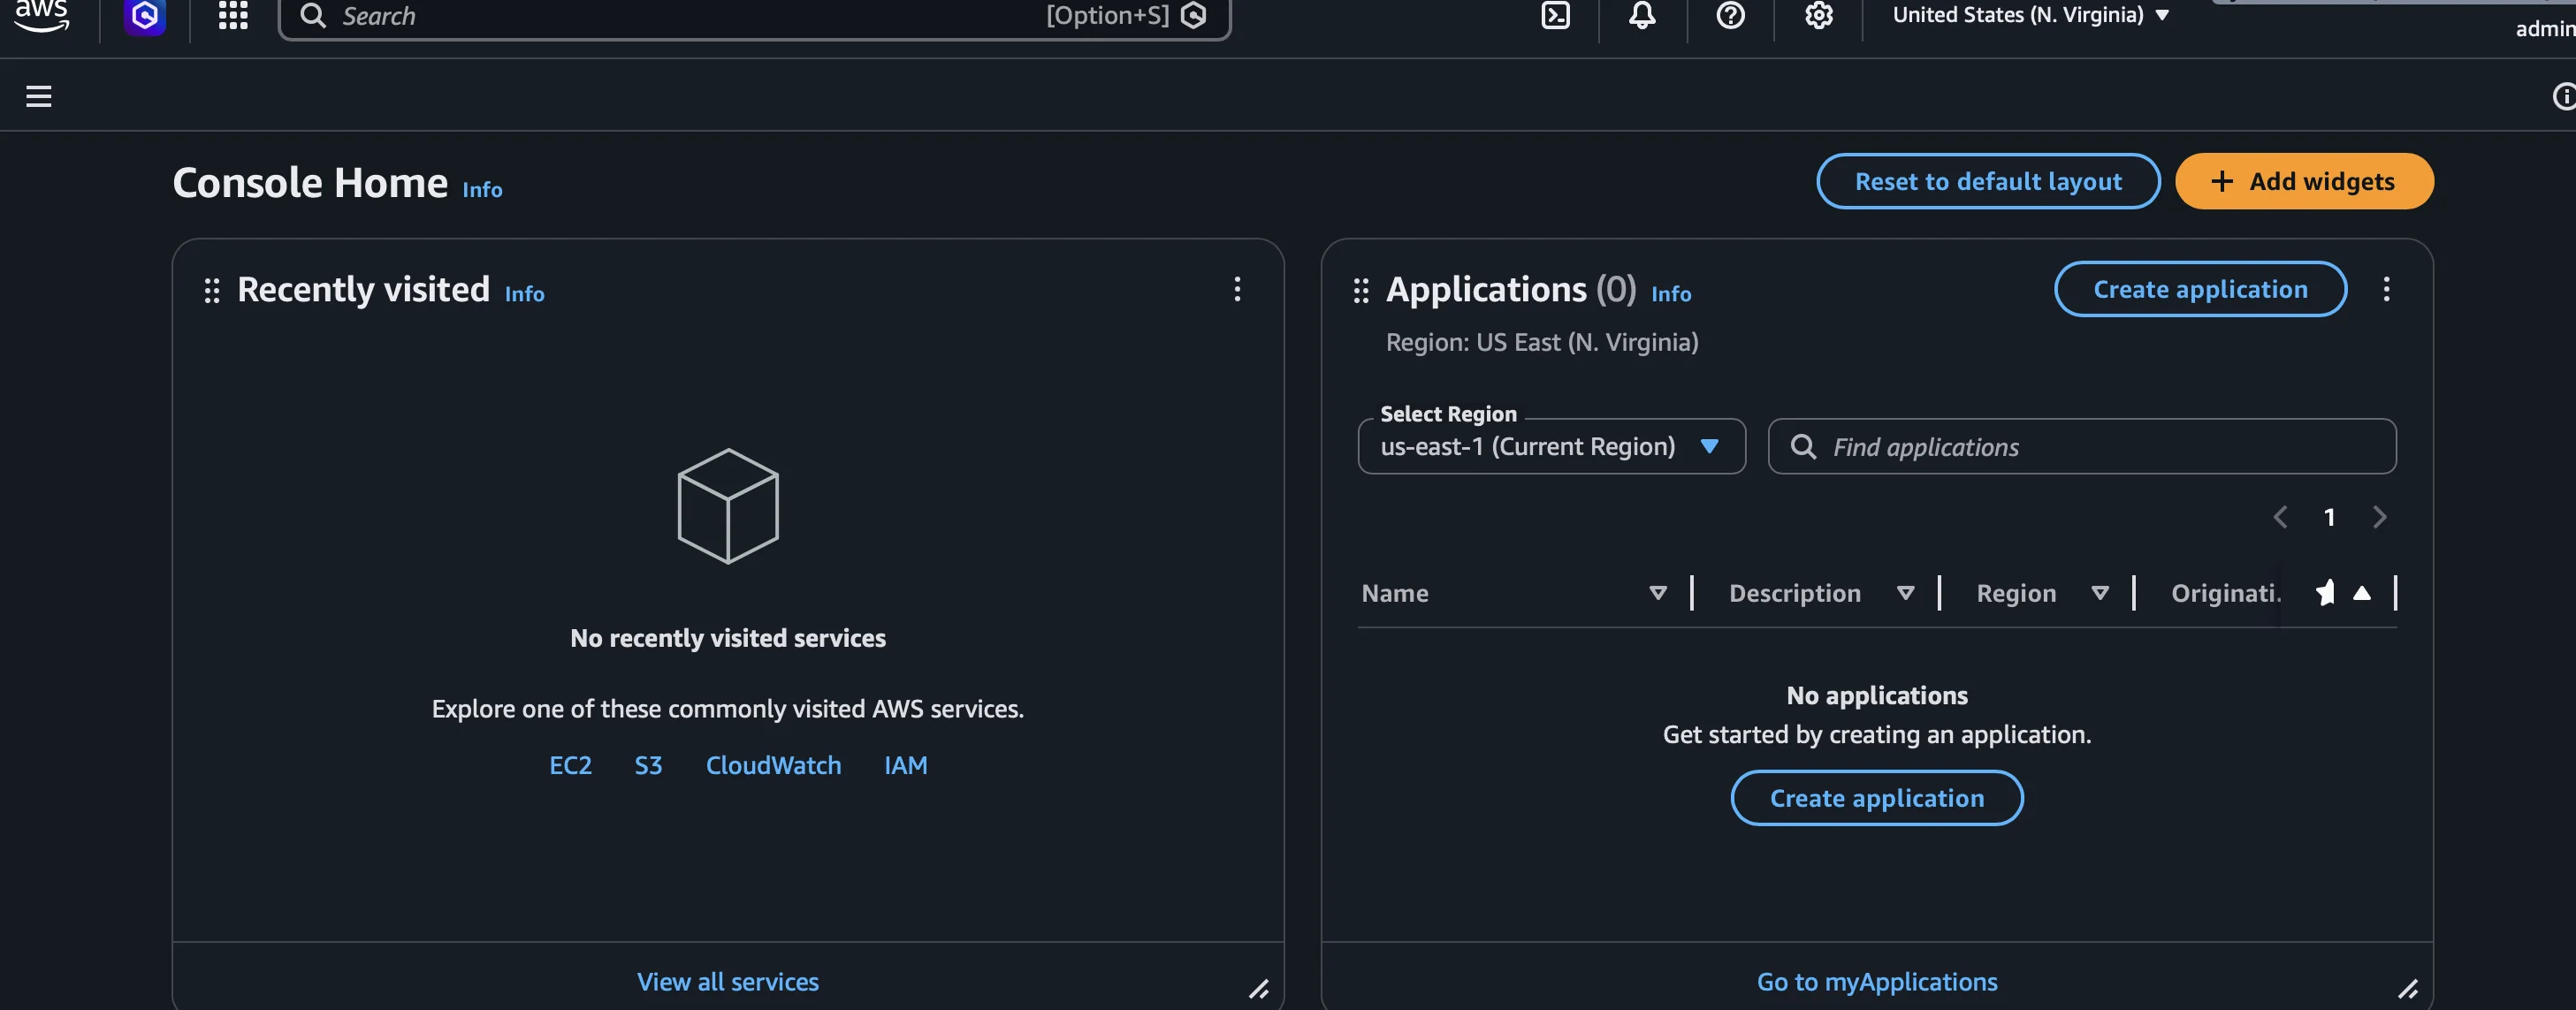
From now on, this is the user we’ll use for all daily tasks.
Recommended next step: Enable MFA on your IAM user too (from IAM → Users → your user → Security credentials → Assign MFA device). Security is never too much, and we ensure that all access to the account is protected with two-factor authentication.
Conclusions
In this post, we took two fundamental steps for our account’s security: we enabled MFA on the root user and created an IAM user with administrative permissions for daily use. With this, we comply with one of the most important AWS best practices: don’t use root except for very specific tasks that truly require it.
In upcoming posts, we’ll continue diving deeper into IAM: we’ll see how policies and roles work, how to apply the principle of least privilege, and later how to migrate to IAM Identity Center with Permission Sets to manage human access in a more modern and scalable way. We’ll also see how to set up billing alerts (Budgets) to keep everything under control from day one.