In the previous posts, we created our account, secured the root with MFA, and created an IAM user with AdministratorAccess. But what exactly does “AdministratorAccess” mean? How does AWS decide what a user or service can and cannot do? The answer lies in two fundamental concepts: Policies and Roles. In this post, we’ll understand how they work, what they’re for, and why they’re so important.
What is a Policy?
A Policy is a JSON document that defines permissions: what actions are allowed or denied, on what resources, and under what conditions. It’s the way AWS controls access to absolutely everything.
Each policy has a structure like this:
{
  "Version": "2012-10-17",
  "Statement": [
    {
      "Effect": "Allow",
      "Action": "s3:GetObject",
      "Resource": "arn:aws:s3:::mi-bucket-010791/*"
    }
  ]
}
Let’s break down each part:
- Version: always
"2012-10-17"(it’s the current version of the policy language, not the date of our policy). - Statement: an array of “statements” or rules. Each one defines a permission.
- Effect: can be
"Allow"or"Deny". - Action: the action(s) we’re allowing or denying. Written as
service:action(for example,s3:GetObjectto read S3 objects,ec2:StartInstancesto start EC2 instances). - Resource: the ARN (Amazon Resource Name) of the specific resource the rule applies to. If we want it to apply to everything, we use
"*".
Tip: Think of a policy as a sign that says “this person can do X thing in Y place.” Without a policy explicitly allowing it, everything is denied by default in AWS.
Types of Policies
AWS has several types of policies, but the most important ones to start with are:
AWS Managed Policies: policies created and maintained by AWS. You can recognize them because they have an AWS icon next to them. The one we used in the previous post, AdministratorAccess, is one of these. There are hundreds available for the most common use cases (ReadOnlyAccess, AmazonS3FullAccess, AmazonEC2ReadOnlyAccess, etc.).
Customer Managed Policies: policies we create ourselves. They give us full control to define custom permissions, following the principle of least privilege.
Inline Policies: policies created directly within a user, group, or role (they don’t exist independently). Used for very specific cases, but in general it’s better to use managed policies because they’re reusable.
To see the available policies, we go to IAM → Policies in the left sidebar.
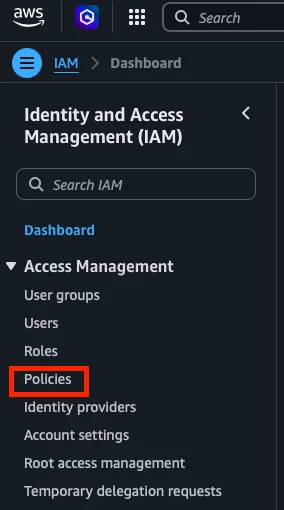
Our current policy: AdministratorAccess
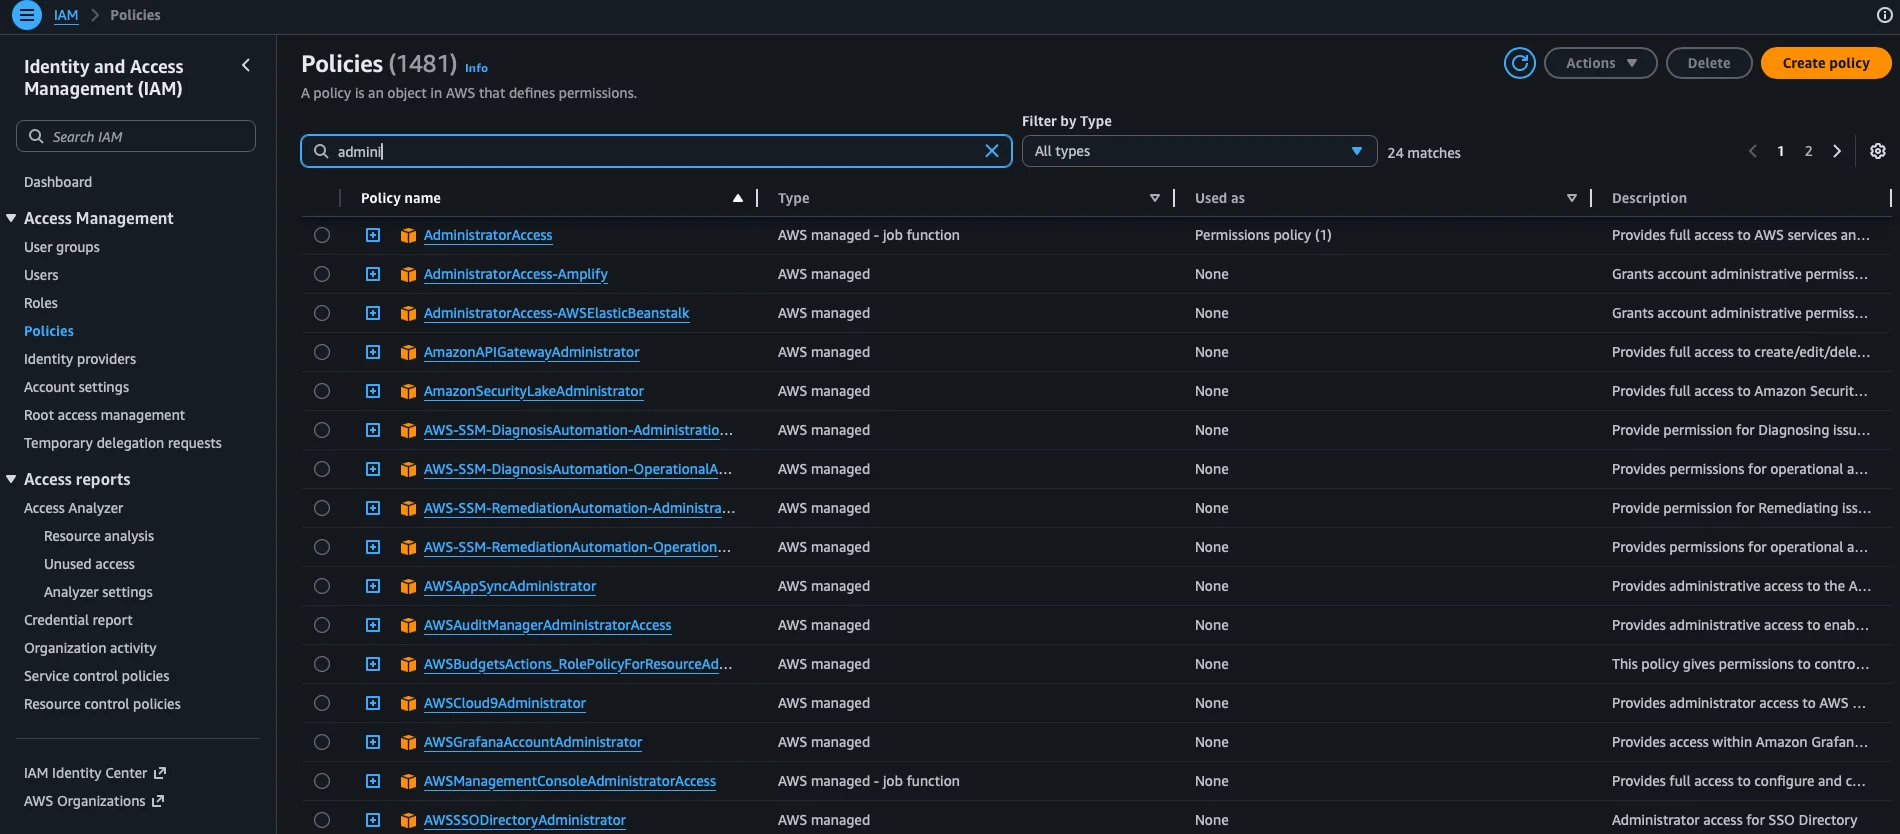
Before creating new policies, let’s see what’s inside the policy we’re already using. In the policies list, we use the search bar and filter by admin. We’ll see several policies starting with “Administrator,” including AdministratorAccess which is the one attached to our user. We click on it to see its contents.
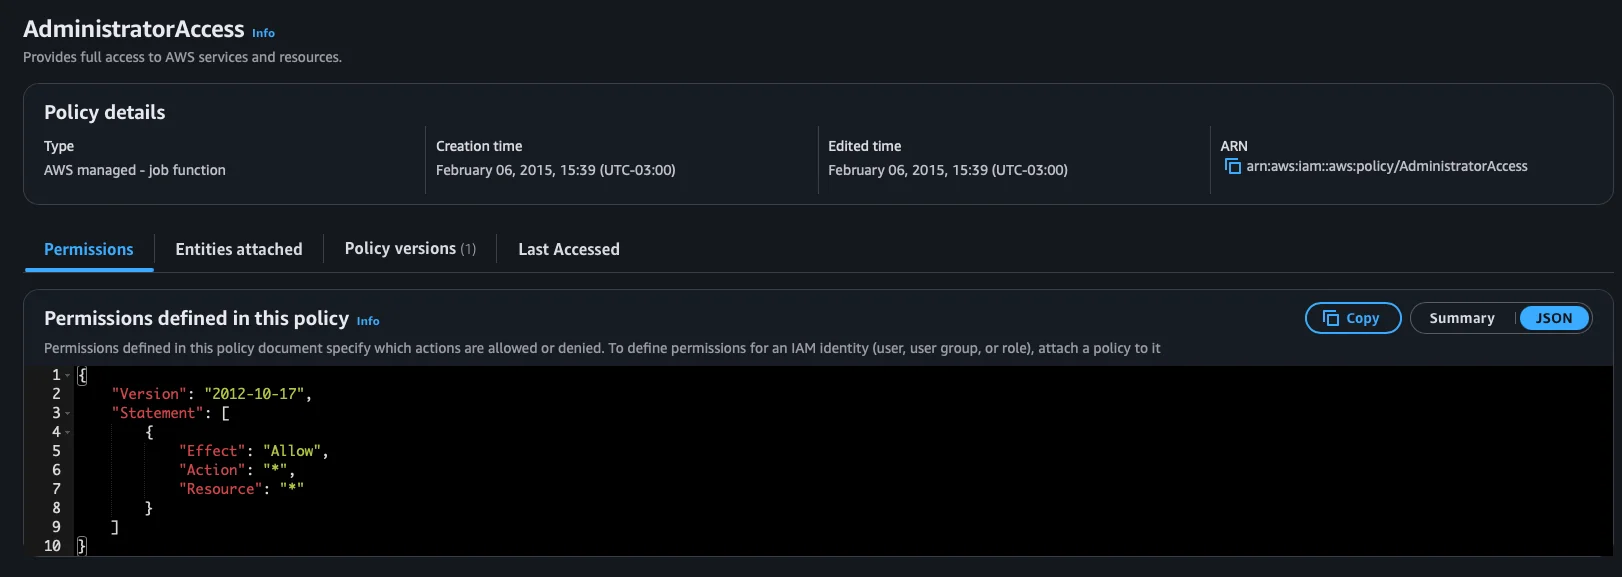
The JSON of AdministratorAccess is simply:
{
  "Version": "2012-10-17",
  "Statement": [
    {
      "Effect": "Allow",
      "Action": "*",
      "Resource": "*"
    }
  ]
}
It basically says: “allow all actions on all resources.” That’s why we said it’s a very permissive policy — it’s the equivalent of being root but as an IAM user.
Important: In a production environment, you should never use
AdministratorAccessfor daily tasks. The ideal is to create specific policies with only the permissions you really need. This is known as the principle of least privilege.
Creating a custom Policy
Let’s create our own policy to understand the process. We want a policy that allows only reading objects from a specific S3 bucket (for example, for a user or service that only needs to query files).
Note: For this example, I previously created a bucket called
mi-bucket-010791. Since S3 bucket names are globally unique, you’ll need to use your own (with an available name). Later, in another post, we’ll dive deeper into how to create and configure S3 buckets step by step.
In IAM → Policies, we click Create policy.

AWS offers two ways to create the policy: the Visual editor (a guided form) and the JSON editor (where we write the JSON directly). We’ll use the JSON editor to understand the structure well.
We select the JSON tab in the editor and paste the following JSON:
{
  "Version": "2012-10-17",
  "Statement": [
    {
      "Effect": "Allow",
      "Action": [
        "s3:GetObject",
        "s3:ListBucket"
      ],
      "Resource": [
        "arn:aws:s3:::mi-bucket-010791",
        "arn:aws:s3:::mi-bucket-010791/*"
      ]
    }
  ]
}
This policy allows two actions: s3:ListBucket (list bucket objects) and s3:GetObject (download/read objects). And it only applies to the bucket mi-bucket-010791 and all its objects (mi-bucket-010791/*).
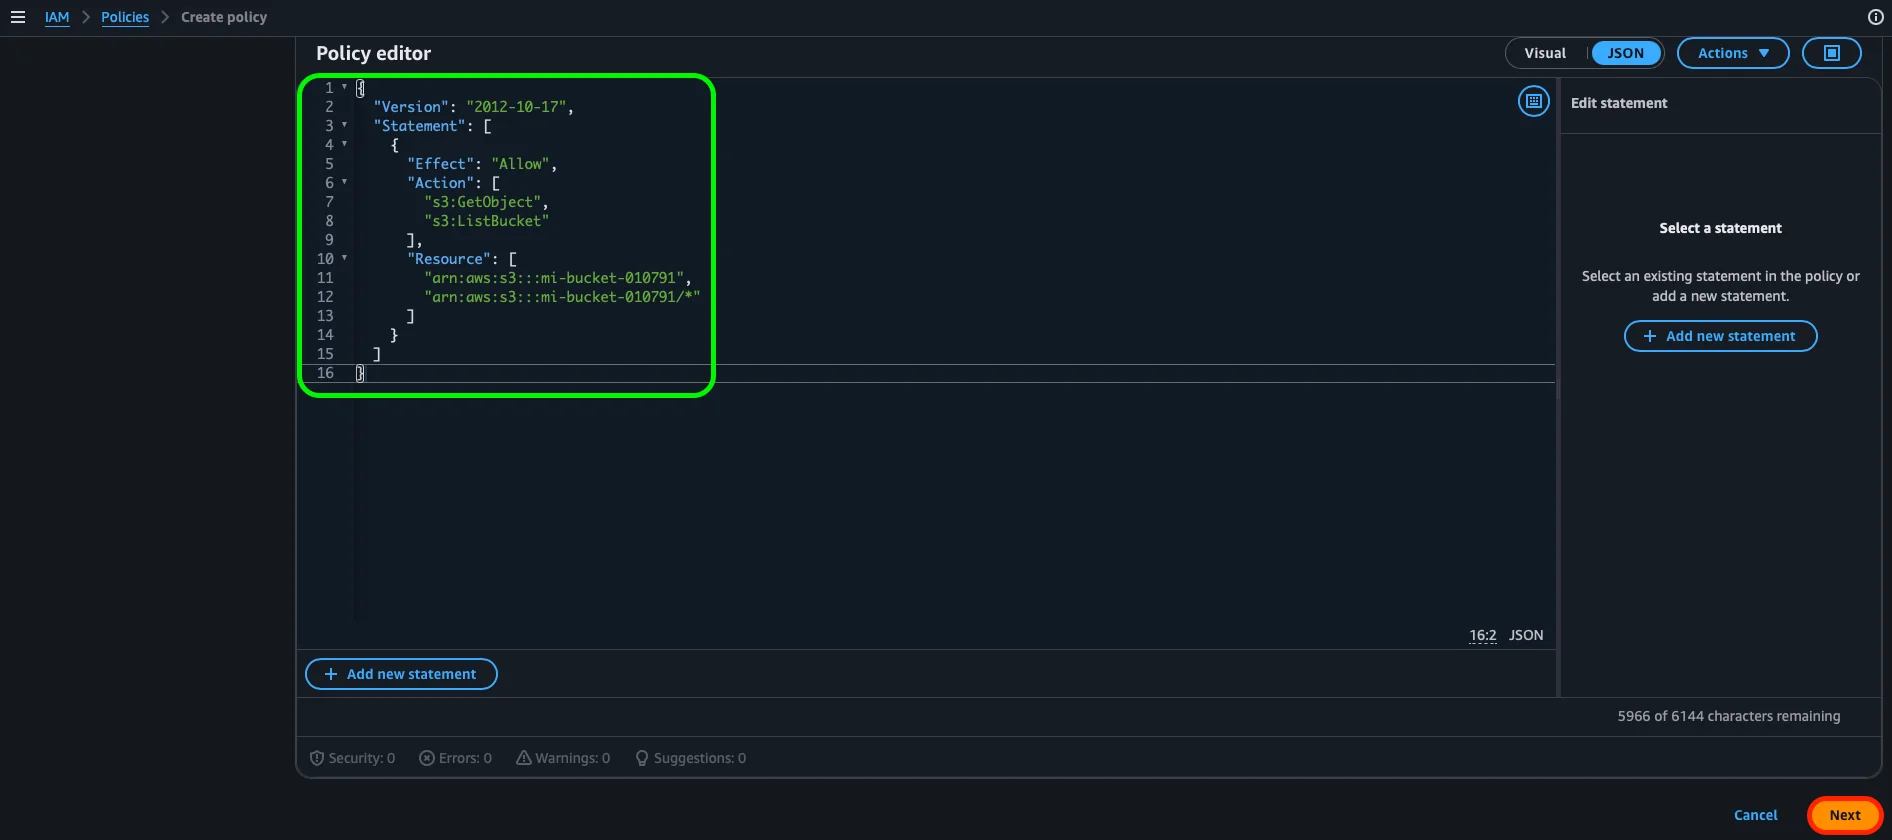
Why two Resources? Because in S3, the bucket and the objects inside it are different resources.
s3:ListBucketoperates on the bucket (arn:aws:s3:::mi-bucket-010791), whiles3:GetObjectoperates on the objects inside the bucket (arn:aws:s3:::mi-bucket-010791/*).
We click Next. AWS shows us the Review and create screen where we give the policy a descriptive name (for example, s3-mi-bucket-read), a description, and we can see a summary of the permissions we defined.
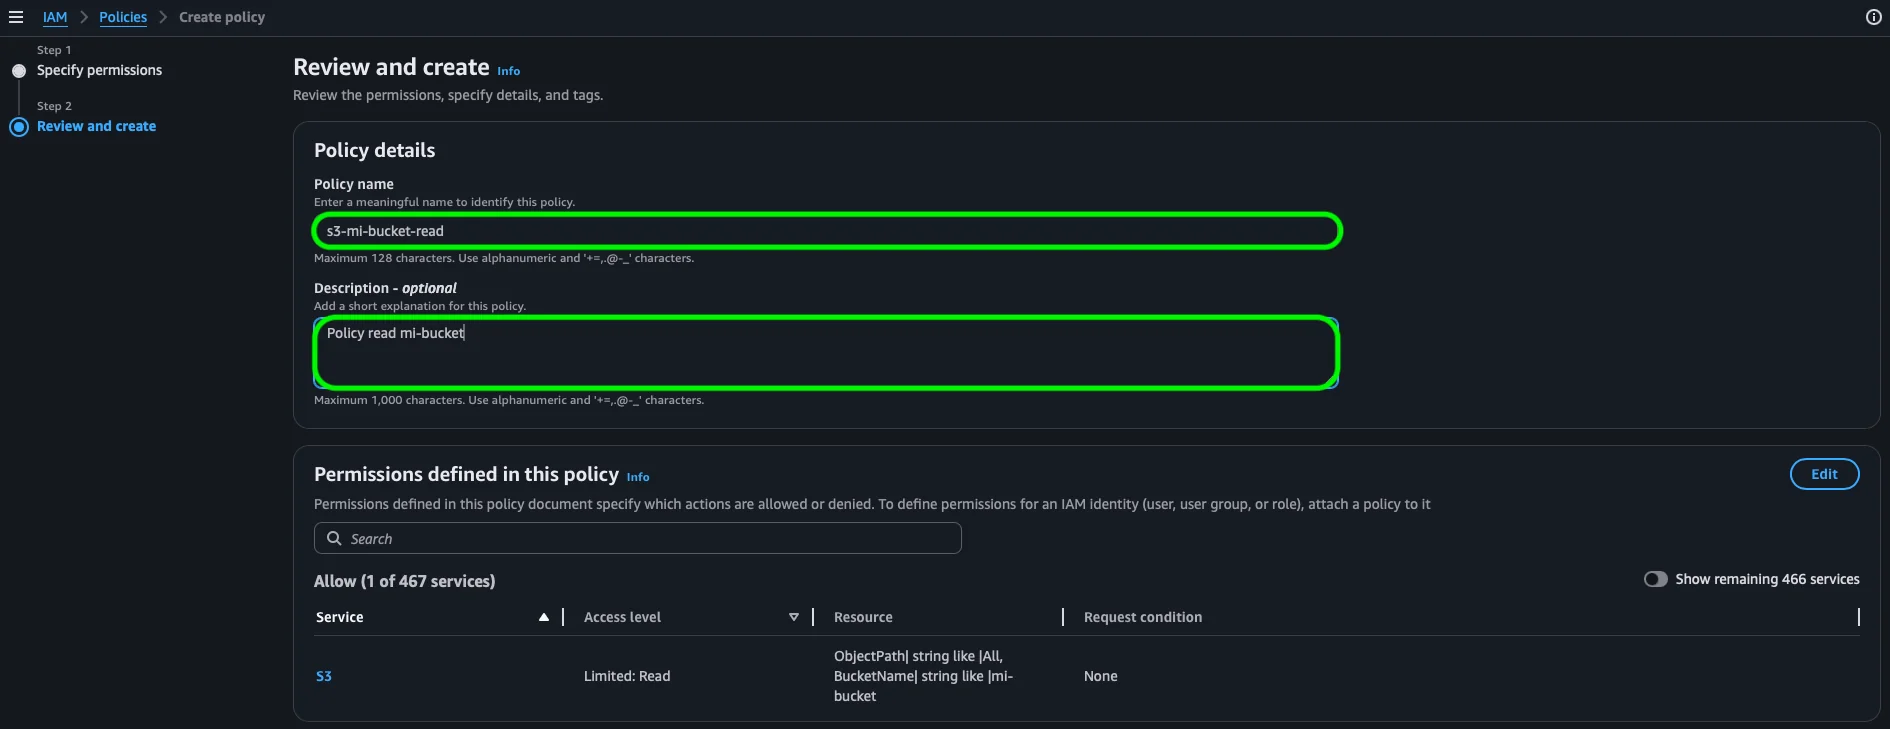

We leave the Tags section empty (it’s optional) and click Create policy.
Done, we now have our first custom policy. We can attach it to any user, group, or role that needs read-only access to that specific bucket.
What is a Role?
Now let’s move on to the second key concept. A Role is an IAM identity that, unlike a user, has no permanent credentials (no password or access keys of its own). Instead, anyone who “assumes” a role receives temporary credentials that expire automatically.
And who can “assume” a role? Three types of entities:
- AWS services: for example, an EC2 instance that needs to access S3, or a Lambda function that needs to write to DynamoDB. Instead of putting access keys inside the code (a huge security risk), we assign a role to the service.
- IAM users: a user can assume a role to get temporary permissions different from what they normally have (for example, elevated permissions for a specific task).
- External accounts or Identity Providers: for cross-account access (between AWS accounts) or federation with external services.
Analogy: If a policy is a “permission card,” a role is a “vest you put on temporarily.” While you’re wearing it, you can do certain things. When you take it off (or it expires), you can’t anymore.
How does a Role work internally?
A role has two fundamental parts:
1. Trust Policy: defines who can assume the role. It’s a JSON that specifies the authorized entities.
{
  "Version": "2012-10-17",
  "Statement": [
    {
      "Effect": "Allow",
      "Principal": {
        "Service": "ec2.amazonaws.com"
      },
      "Action": "sts:AssumeRole"
    }
  ]
}
In this example, only the EC2 service can assume this role.
2. Permissions: the policies attached to the role that define what whoever assumes it can do. They can be managed policies or inline policies, just like with a user.
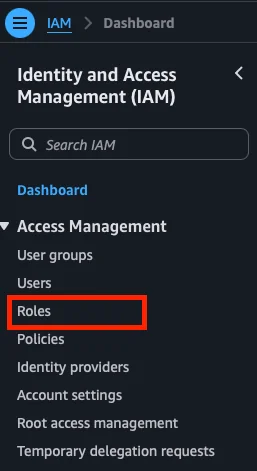
To see the existing roles in our account, we go to IAM → Roles in the sidebar.
Practical example: a Role for EC2
To better understand how a role works, let’s look at a very common use case: an EC2 instance (a virtual server in AWS) that needs to read files from an S3 bucket.
Without a role, we’d have to store access keys inside the server so it can communicate with S3. This is a huge security risk: if someone gains access to the server, they have the keys. With a role, on the other hand, EC2 receives temporary credentials automatically — without us having to store anything.
Let’s create a role to see it in action. On the Roles screen, we click Create role.

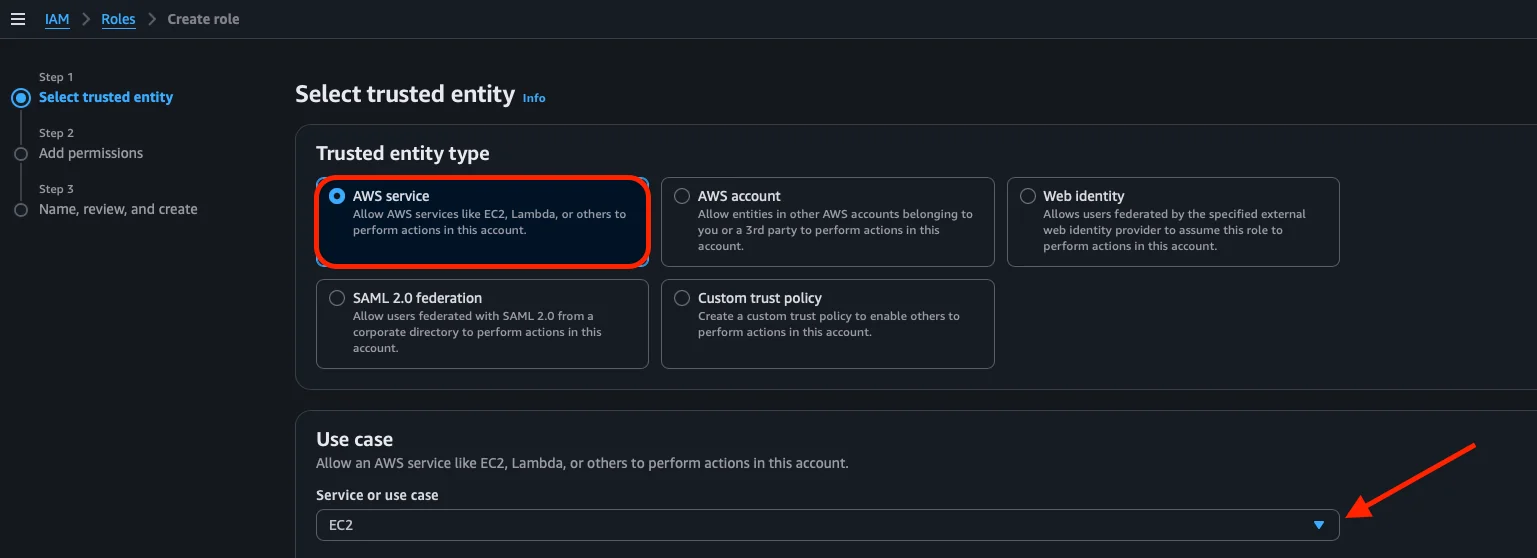
AWS asks us to select the trusted entity type. Since we want an AWS service to use this role, we select AWS service. Below, in the Use case section, we open the Service or use case dropdown and choose EC2.
Next, AWS shows us the different use case options for EC2. We select the first one, EC2 (Allows EC2 instances to call AWS services on your behalf), which is the basic option to allow an EC2 instance to use AWS APIs. We click Next.
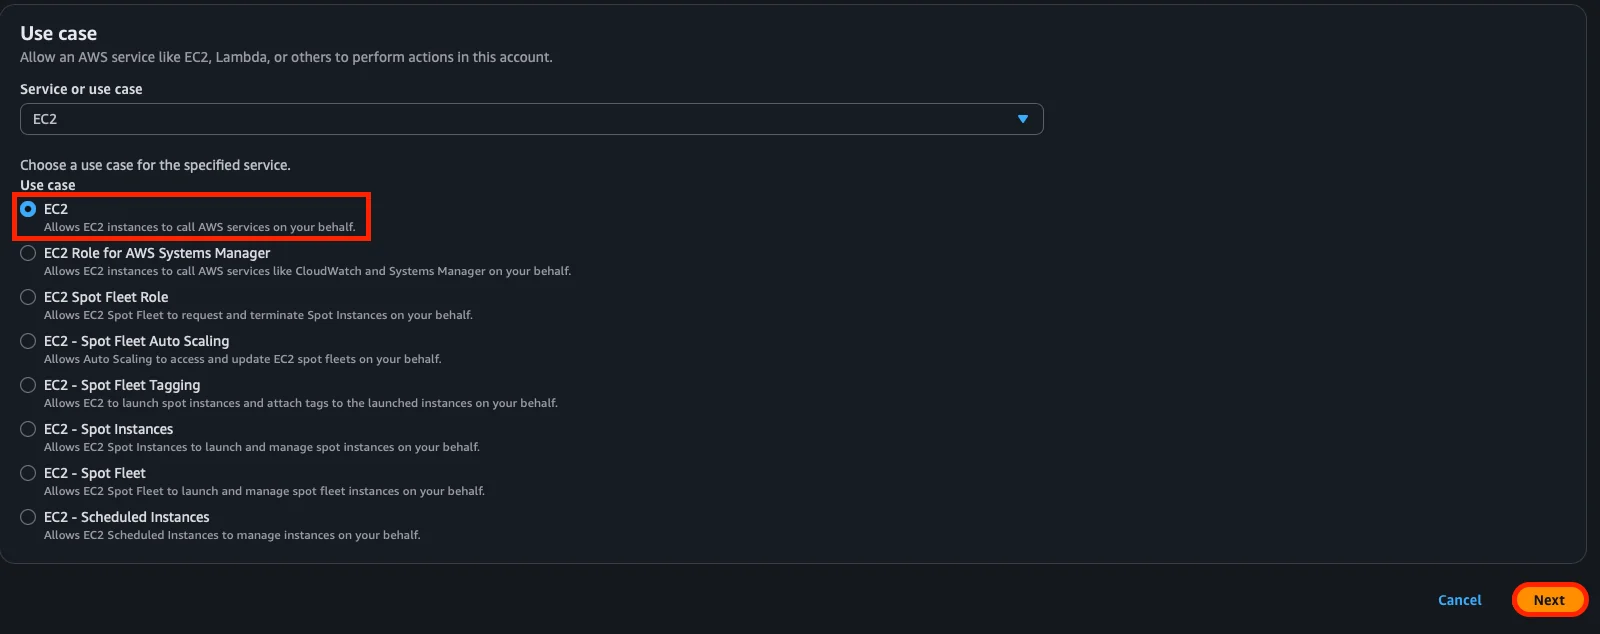
What does this selection do? AWS automatically generates the role’s Trust Policy that we saw earlier (the one with
"Service": "ec2.amazonaws.com"), so we don’t have to write it manually.
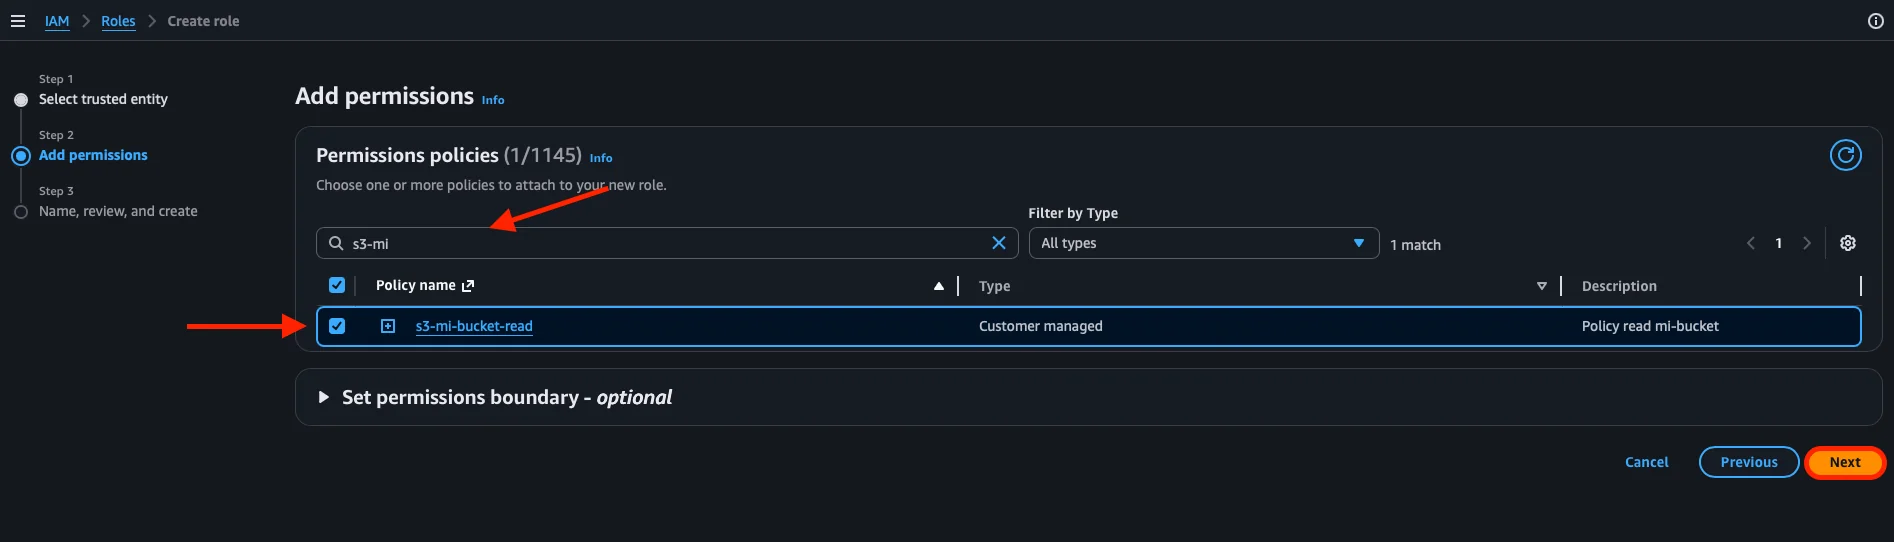
Now it’s time to assign permissions to the role. In the search bar, we type s3-mi-bucket-read (the policy we created earlier) and check it. We click Next.
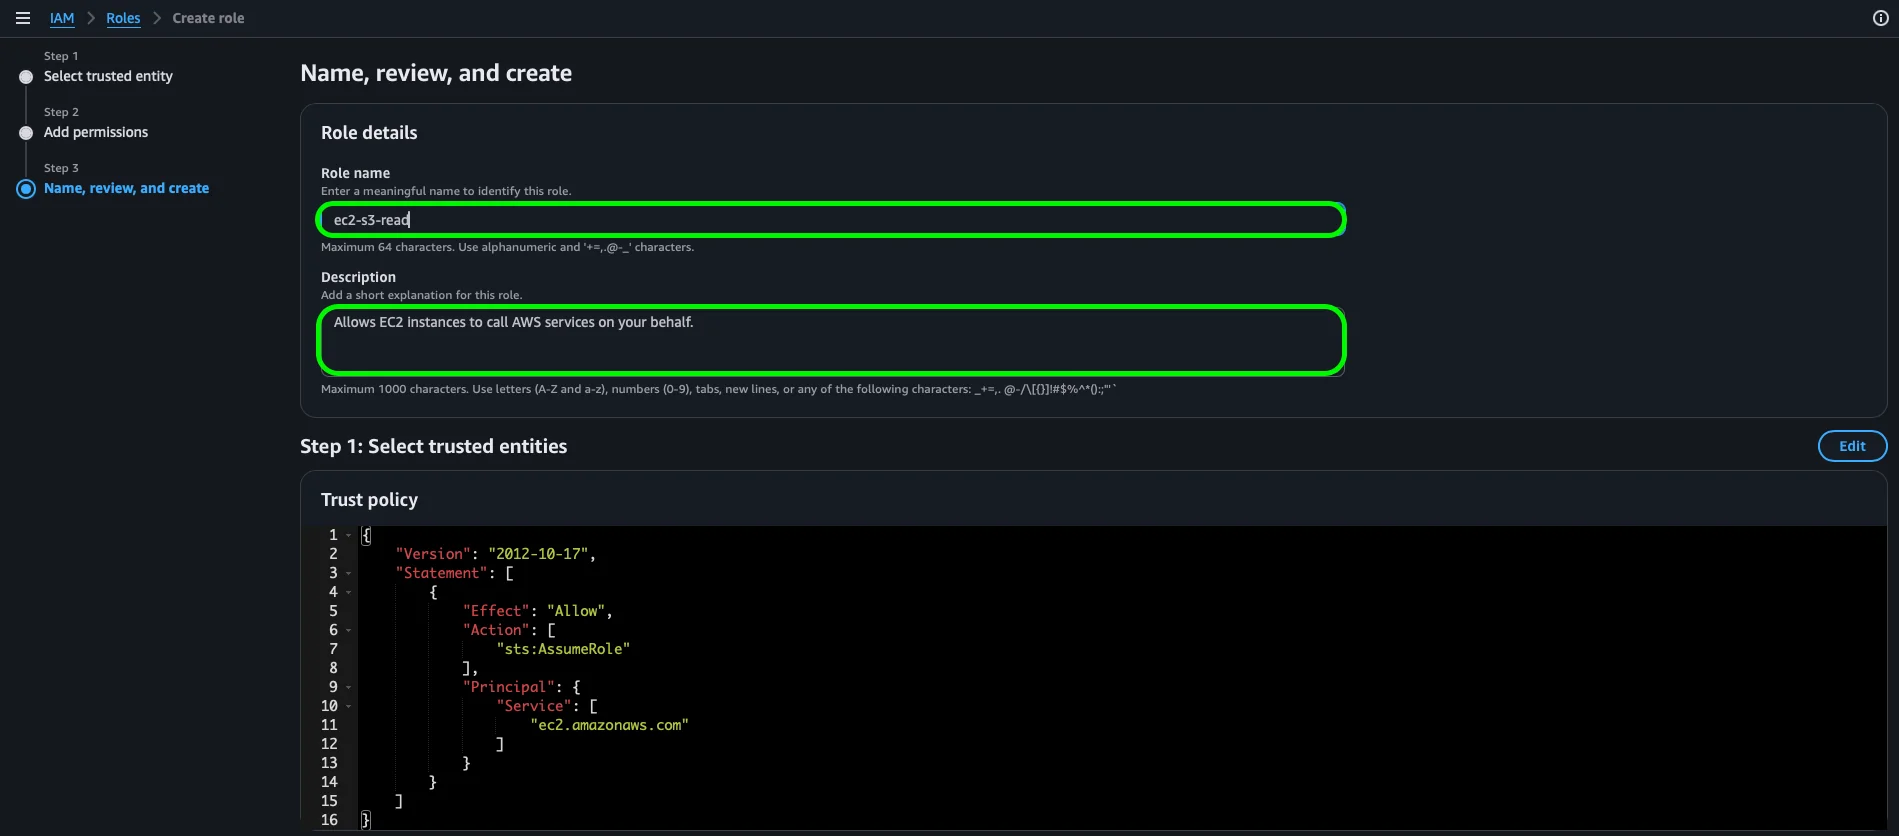
On the Name, review, and create screen, we give the role a descriptive name (for example, ec2-s3-read) and a description. Below, we can review the Trust policy that AWS generated automatically when we chose EC2 as the trusted entity.
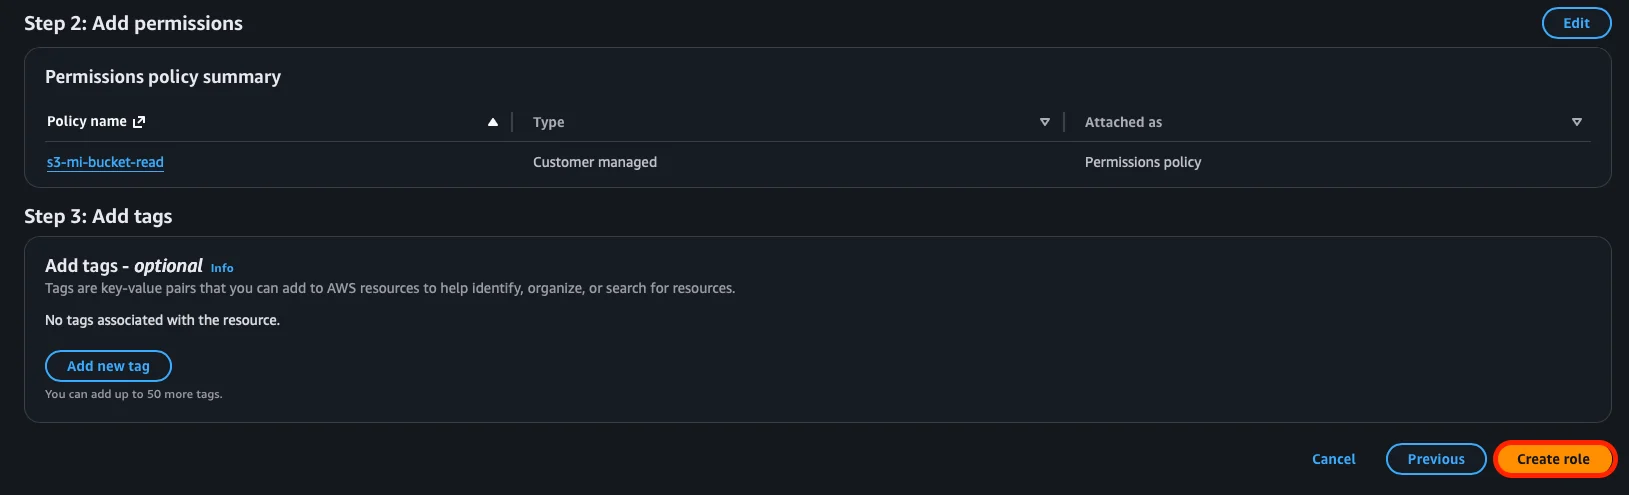
If we scroll down a bit more, we see the permissions summary (the s3-mi-bucket-read policy) and the Tags section (optional). We click Create role.
This is how a role works in practice: when we launch an EC2 instance and assign this role to it, the instance will be able to read S3 objects automatically, without access keys, without hardcoded credentials. AWS takes care of rotating the temporary credentials transparently. More secure, cleaner.
Policies vs Roles: what’s the difference?
To summarize the relationship between both:
- A Policy defines what can be done (the permissions).
- A Role defines who can do it temporarily (through the Trust Policy) and what they can do (by attaching permission policies).
In other words: roles contain policies. A role without policies has no permissions, and a policy without being attached to something (user, group, or role) doesn’t do anything on its own.
The principle of least privilege
Now that we understand how policies and roles work, there’s a key security concept: the principle of least privilege. The idea is simple: every user, service, or role should have only the permissions they need to do their job, and nothing more.
In practice, this means:
- Avoid using
AdministratorAccessor"Action": "*"unless truly necessary. - Create specific policies for each use case (like the S3 policy we created above).
- Periodically review permissions and remove those no longer in use. IAM has a tool called Access Analyzer that helps with this.
- Prefer roles with temporary credentials instead of permanent access keys.
Tip: AWS recommends starting with minimal permissions and adding what’s needed as real needs arise, rather than starting with full access and restricting later.
Conclusions
In this post, we saw the two fundamental pillars of IAM: Policies define the permissions (what can be done and on which resources) and Roles allow services and users to assume those permissions temporarily and securely. We put it into practice by creating an S3 bucket (mi-bucket-010791), a custom policy for that bucket (s3-mi-bucket-read), and a role for EC2 (ec2-s3-read) that allows an instance to read that bucket without needing access keys.
With these concepts clear, in the next post we’ll get hands-on with our first real AWS service: Amazon S3. We’ll create a bucket, upload files, and understand how permissions work in practice — applying everything we learned about policies and roles.