We’re making good progress: we secured the root account, we understood IAM with its users, policies, and roles, we used S3, we set up alerts with Budgets, and in the previous post we created our first Organization with AWS Organizations. Now that we know the professional approach is to work with multiple accounts, an uncomfortable question comes up: how do we sign in to all those accounts without going crazy creating an IAM user in each one? That’s what IAM Identity Center (formerly known as AWS SSO) is for. In this post, we’ll see what it is, why it’s the recommended way to access AWS, and how to set it up step by step.
The problem of managing multiple accounts
Imagine you have three accounts: one for administration, one for development, and one for production. If we used traditional IAM users, each person would need:
- A different username and password in each account.
- To configure MFA separately in each one.
- To remember which account has what and constantly switch sessions.
And when someone joins or leaves the team, you’d have to create or delete their user in every account, one by one. It’s tedious, error-prone, and a security nightmare. IAM Identity Center solves exactly this.
What is IAM Identity Center?
IAM Identity Center is a free service that gives us a single access point (Single Sign-On) to all the accounts in our Organization and, if we want, to external applications too. With a single user, a single password, and a single MFA, each person can access the accounts they’ve been assigned.
The most important thing from a security standpoint: it doesn’t create permanent IAM users in each account. Instead, when someone accesses an account, IAM Identity Center hands them temporary credentials through a role. Fewer long-lived secrets floating around means a smaller attack surface.
A note on cost: IAM Identity Center has no additional cost. The internal directory, users, groups, permission sets, and even the built-in MFA are all included at no charge. You’d only pay extra if you connected a paid external identity provider, but that’s entirely optional.
Key concepts
Before setting it up, let’s understand the main pieces:
Identity Source
This is where our users “live”. We have three options:
- Identity Center directory: an internal directory provided by the service itself. It’s the simplest and free option, and the one we’ll use.
- Active Directory: connect an existing Microsoft corporate directory.
- External identity provider (External IdP): integrate an IdP like Okta or Microsoft Entra ID via SAML.
Users and Groups
Users are the people who will access. Groups let us group them together (for example, Administrators or Developers) to assign permissions collectively, instead of one by one.
Permission sets
These are permission templates that define what someone can do within an account. A permission set is basically a collection of IAM policies (for example, AdministratorAccess or ReadOnlyAccess). When we assign it to an account, IAM Identity Center automatically creates an IAM role behind the scenes with those permissions.
Account assignments
This is the relationship that ties the three things together: who (user or group) has what permissions (permission set) in which account. This is the magic that lets us govern access to the entire Organization from a single place.
AWS access portal
This is the single URL where each person signs in. Once inside, they see the accounts and roles they’ve been assigned and access any of them with one click, without managing per-account credentials.
Prerequisite: to follow this post you need to have an Organization created (we did this in the previous post) and to be operating from the Management Account.
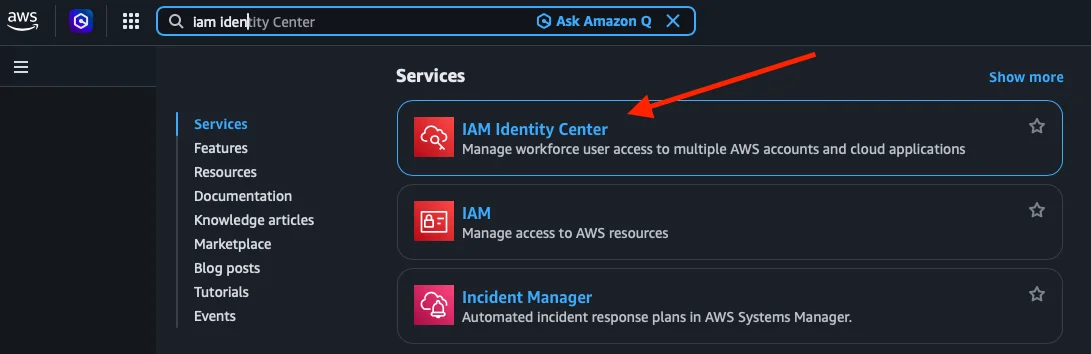
Step 1: Search for IAM Identity Center
From the AWS console, we search for IAM Identity Center in the search bar and click on the result.
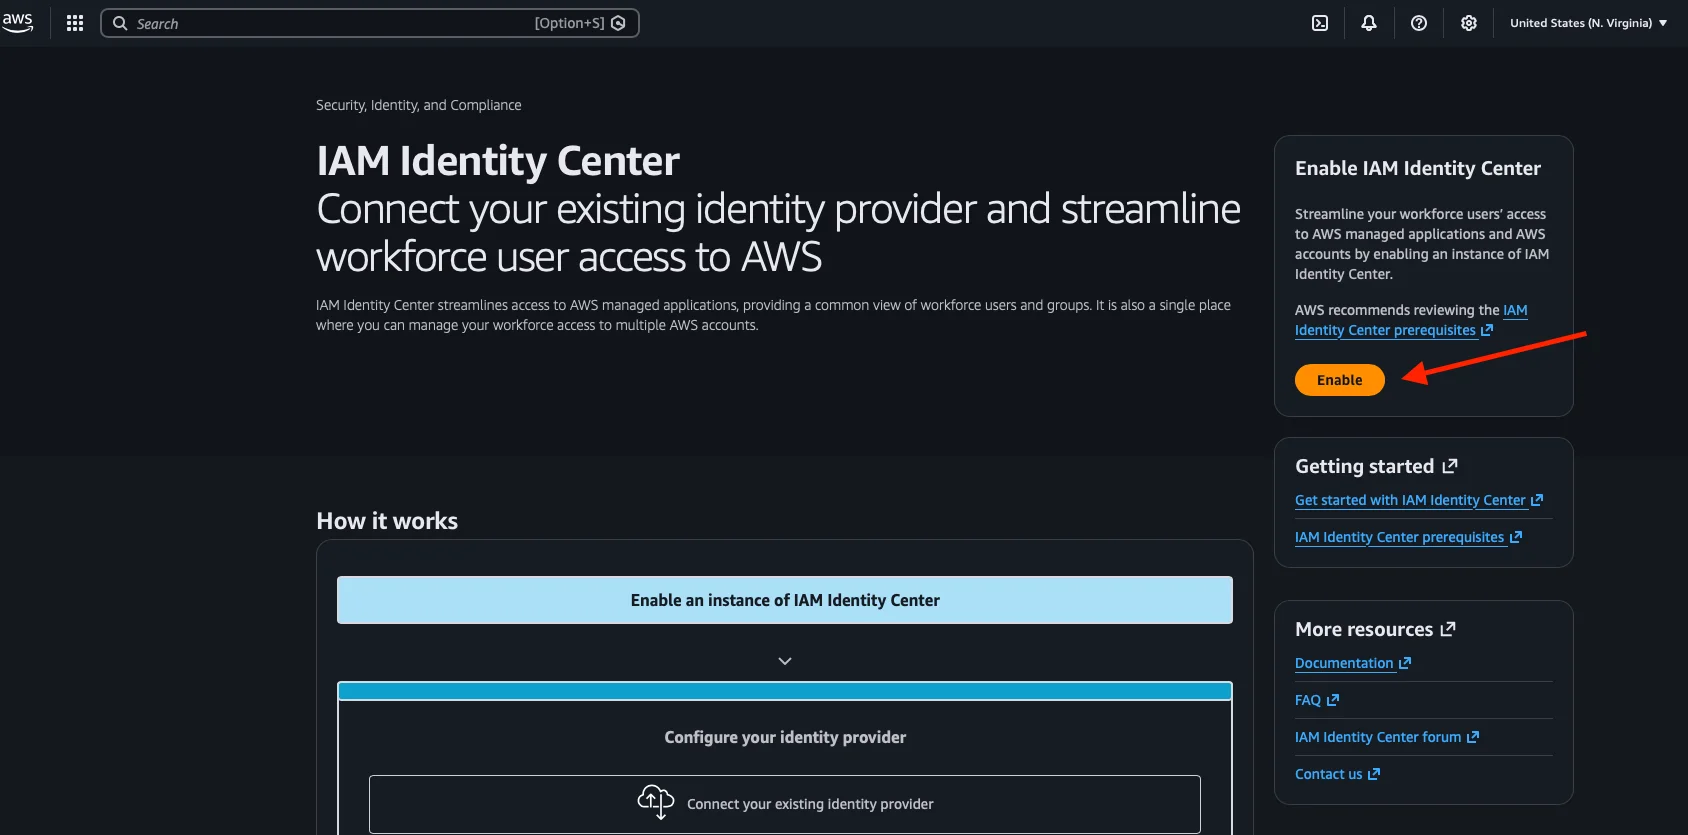
Step 2: Enable the service
On the service page, AWS explains that IAM Identity Center is used to centralize user access to multiple AWS accounts and applications. On the right, we see the Enable button. An important detail: IAM Identity Center is a regional service, so make sure the region where you want to host it is selected in the top right (in the example, US East / N. Virginia). Choose it carefully, because moving it later means reconfiguring everything. We click Enable.
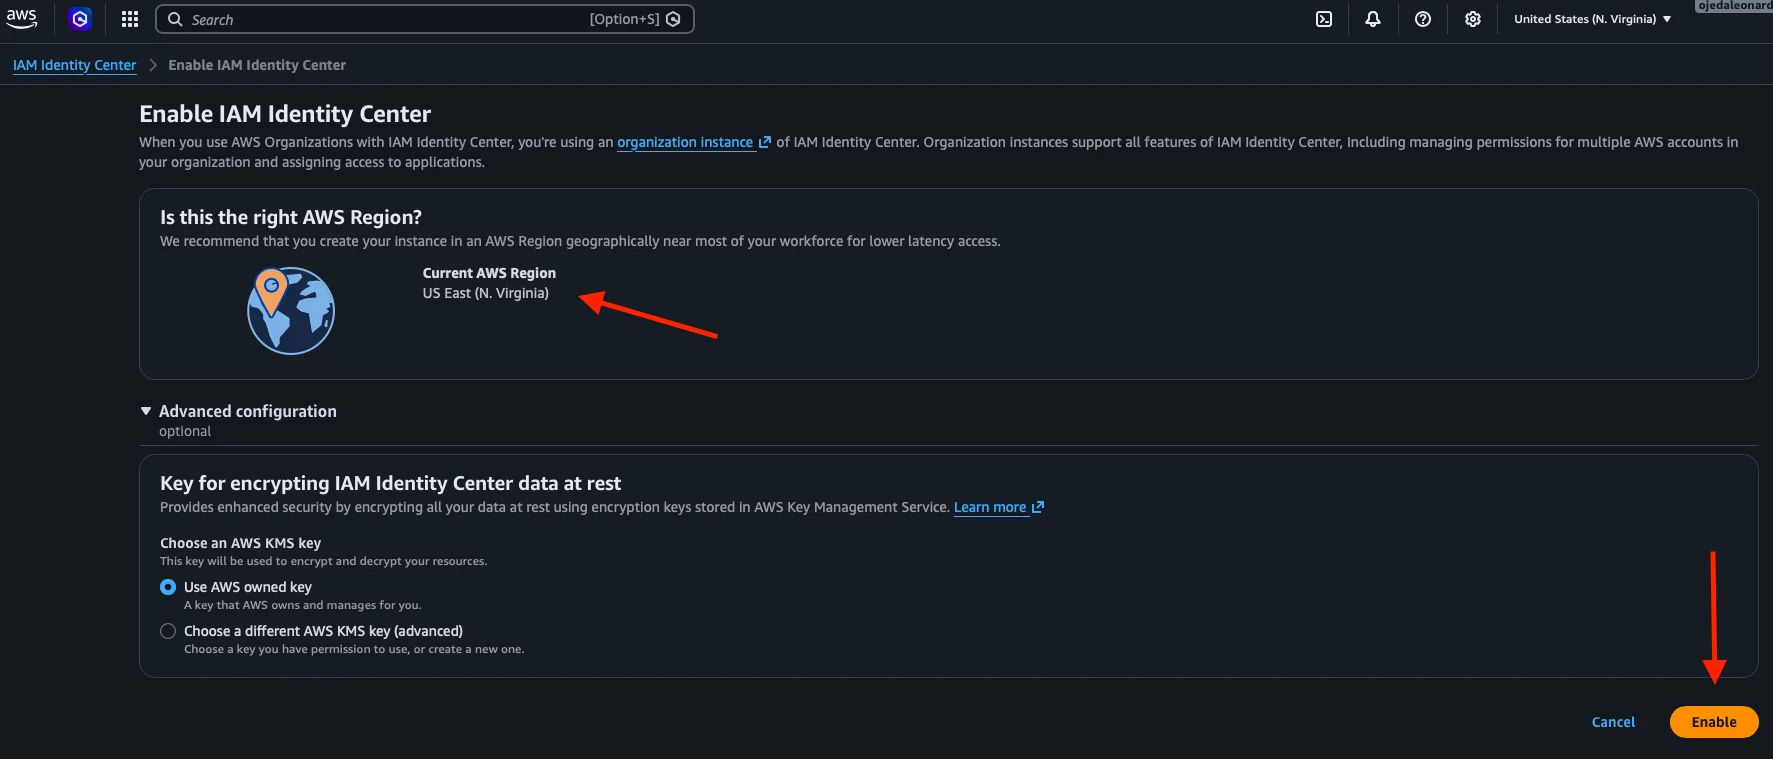
Step 3: Confirm the region and the organization instance
AWS takes us to the confirmation screen, where a key detail appears: since we already have an Organization (we created it in the previous post), we’ll be using an organization instance of IAM Identity Center. This type of instance supports all features, including managing permissions for multiple accounts in the Organization.
It also asks us to confirm the region (in our case, US East N. Virginia) and, under Advanced configuration, the key for encrypting data at rest. We leave the default option, Use AWS owned key (a key managed by AWS itself), which is enough to get started. We click Enable.
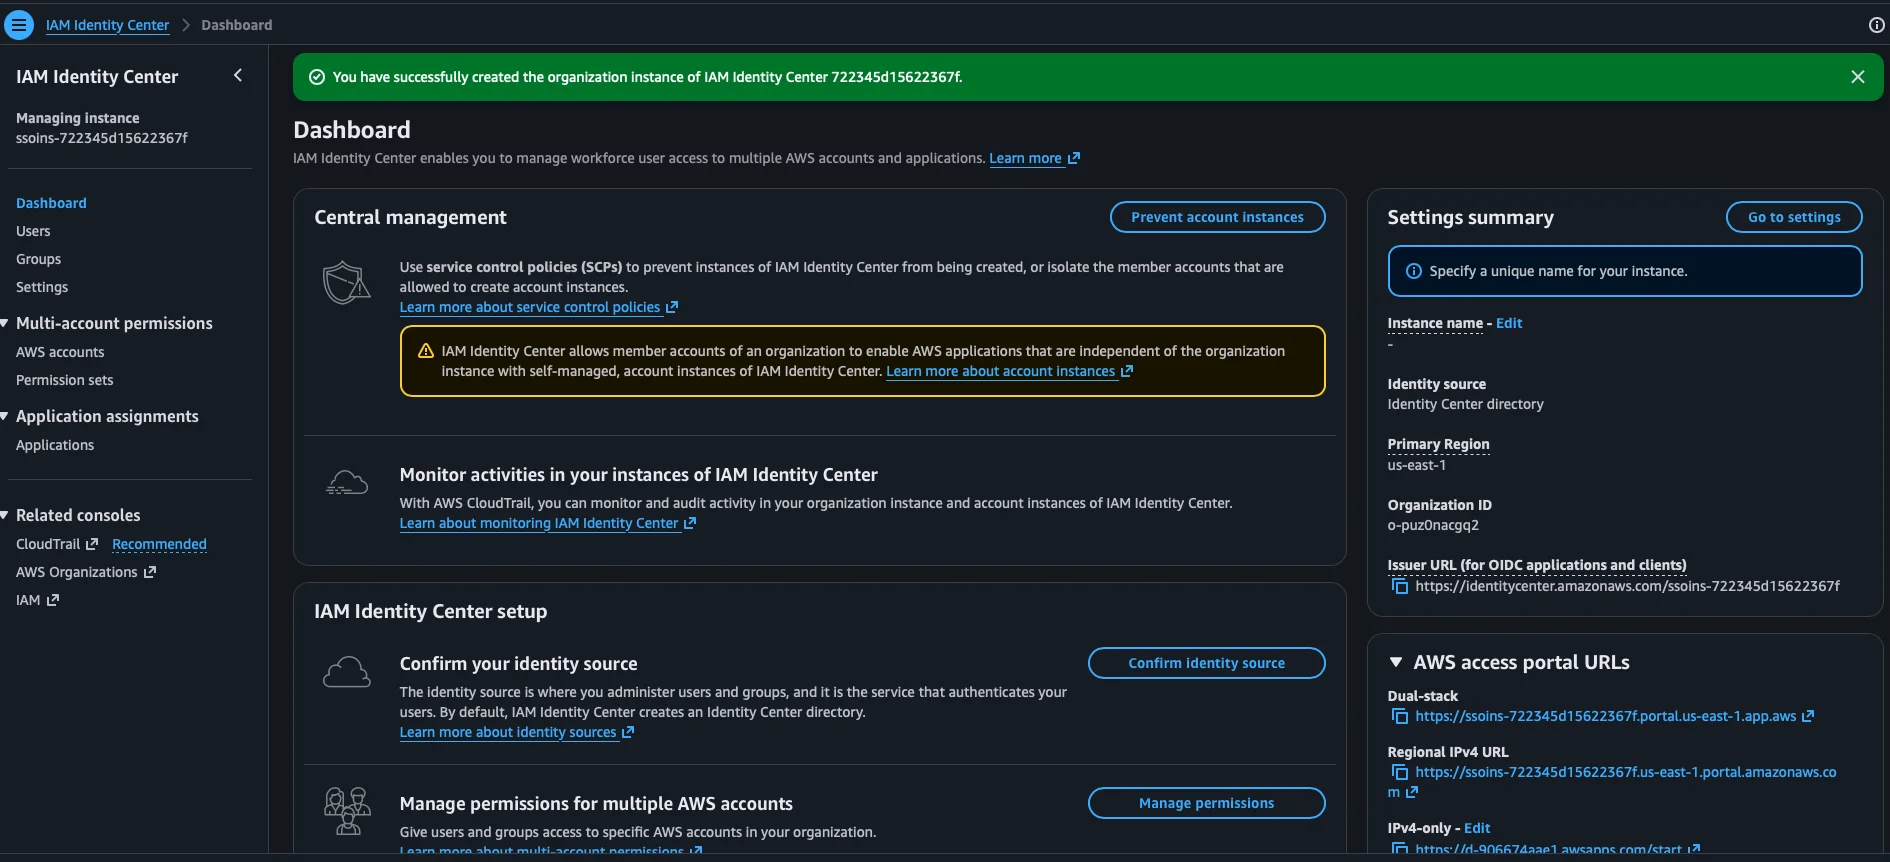
Step 4: Dashboard and access portal
Once enabled, AWS confirms with a green banner that the organization instance was created and takes us to the service dashboard. In the IAM Identity Center setup section we have the recommended steps to finish the configuration: confirm the identity source and assign permissions to the accounts. On the right, under Settings summary, there’s a very useful overview: the identity source (Identity Center directory), the Primary Region (us-east-1), the Organization ID, and, importantly, the access portal URLs (something like https://d-xxxxxxxxxx.awsapps.com/start). That’s the address users will use to sign in, and we can customize it later.
Step 5: Confirm the identity source
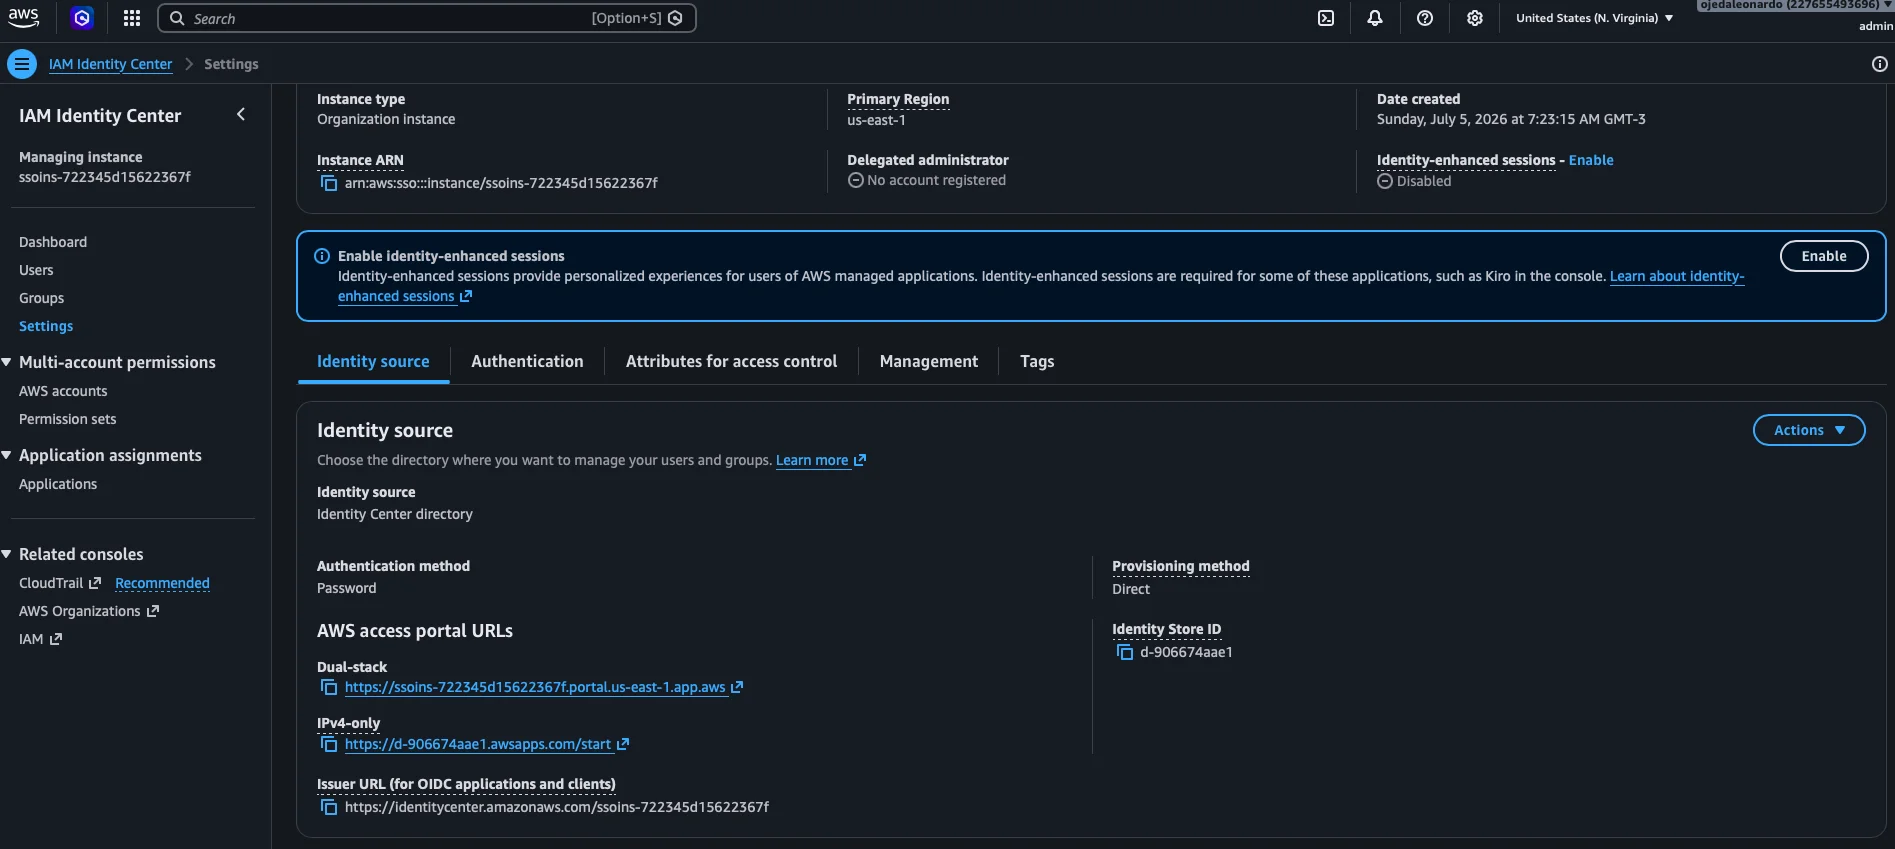
We go to Settings and open the Identity source tab. By default it’s set to Identity Center directory, the service’s internal directory, with Authentication method: Password and Provisioning method: Direct. For our case it’s perfect: we don’t need to connect Active Directory or an external IdP, so we leave it as is. If we ever wanted to change it, that’s done from the Actions button.
Step 6: Create a user
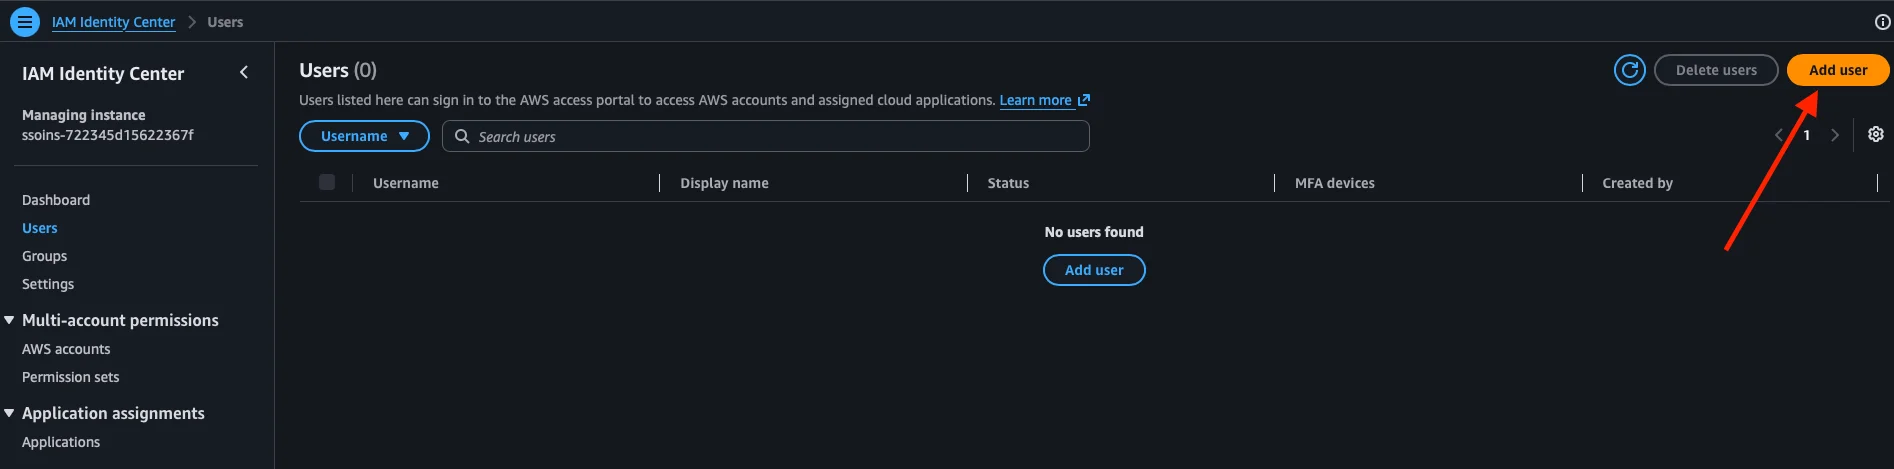
In the left menu we go to Users. Since we don’t have any yet, the list appears empty. We click Add user.
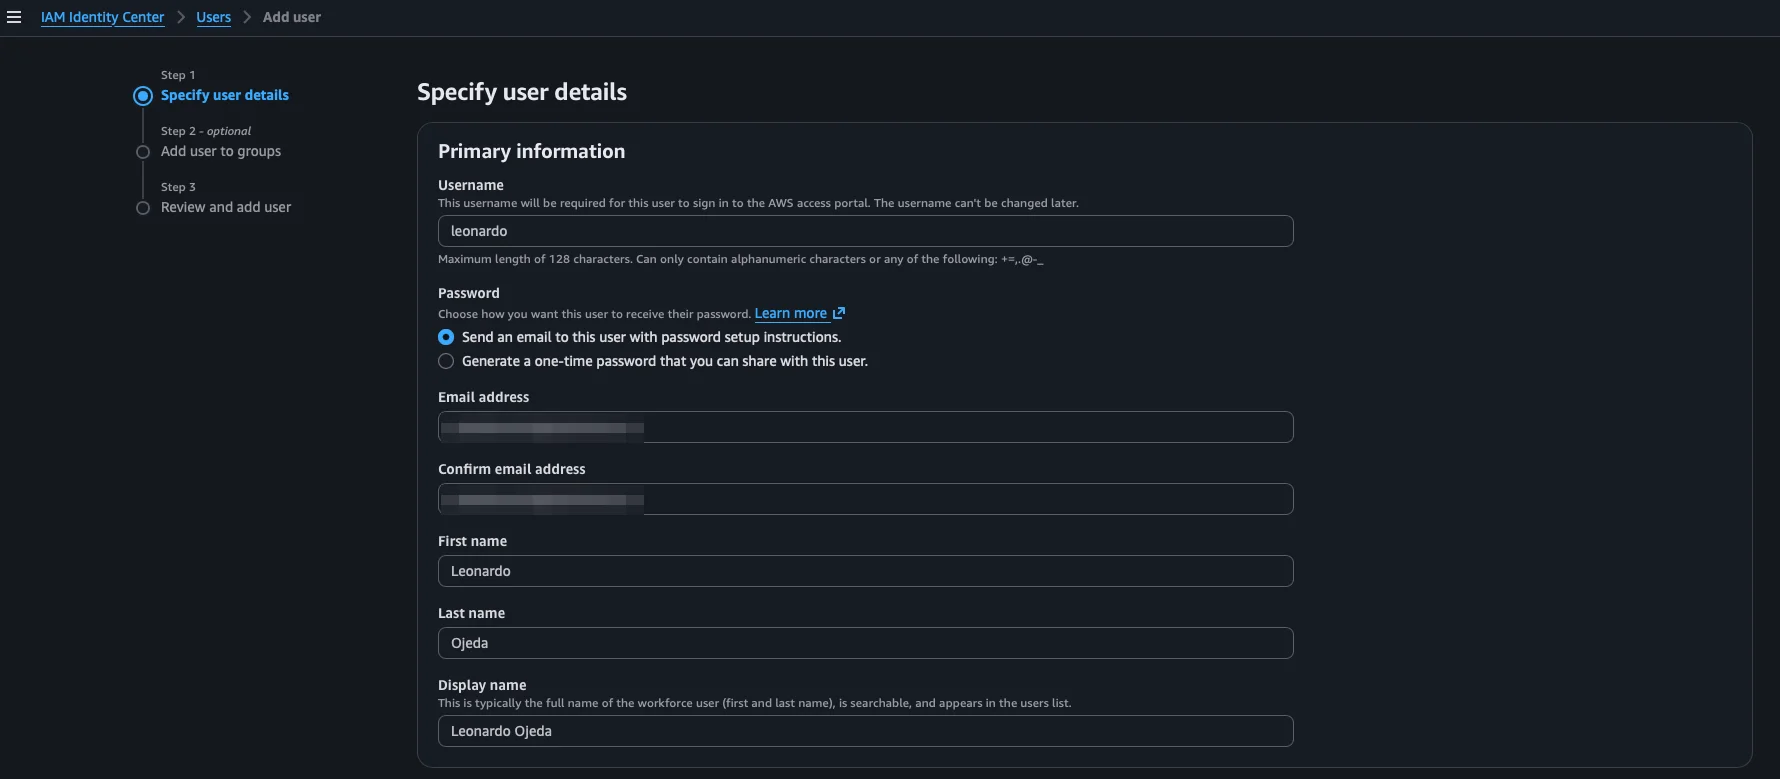
A three-step wizard opens. In Step 1 (Specify user details) we fill in the primary information: the Username (careful, it can’t be changed later and it’s what the person will use to sign in to the portal). Under Password we keep the option Send an email to this user with password setup instructions, so the user defines their own password and we never handle it. Then we enter the email, the First name, the Last name, and the Display name.
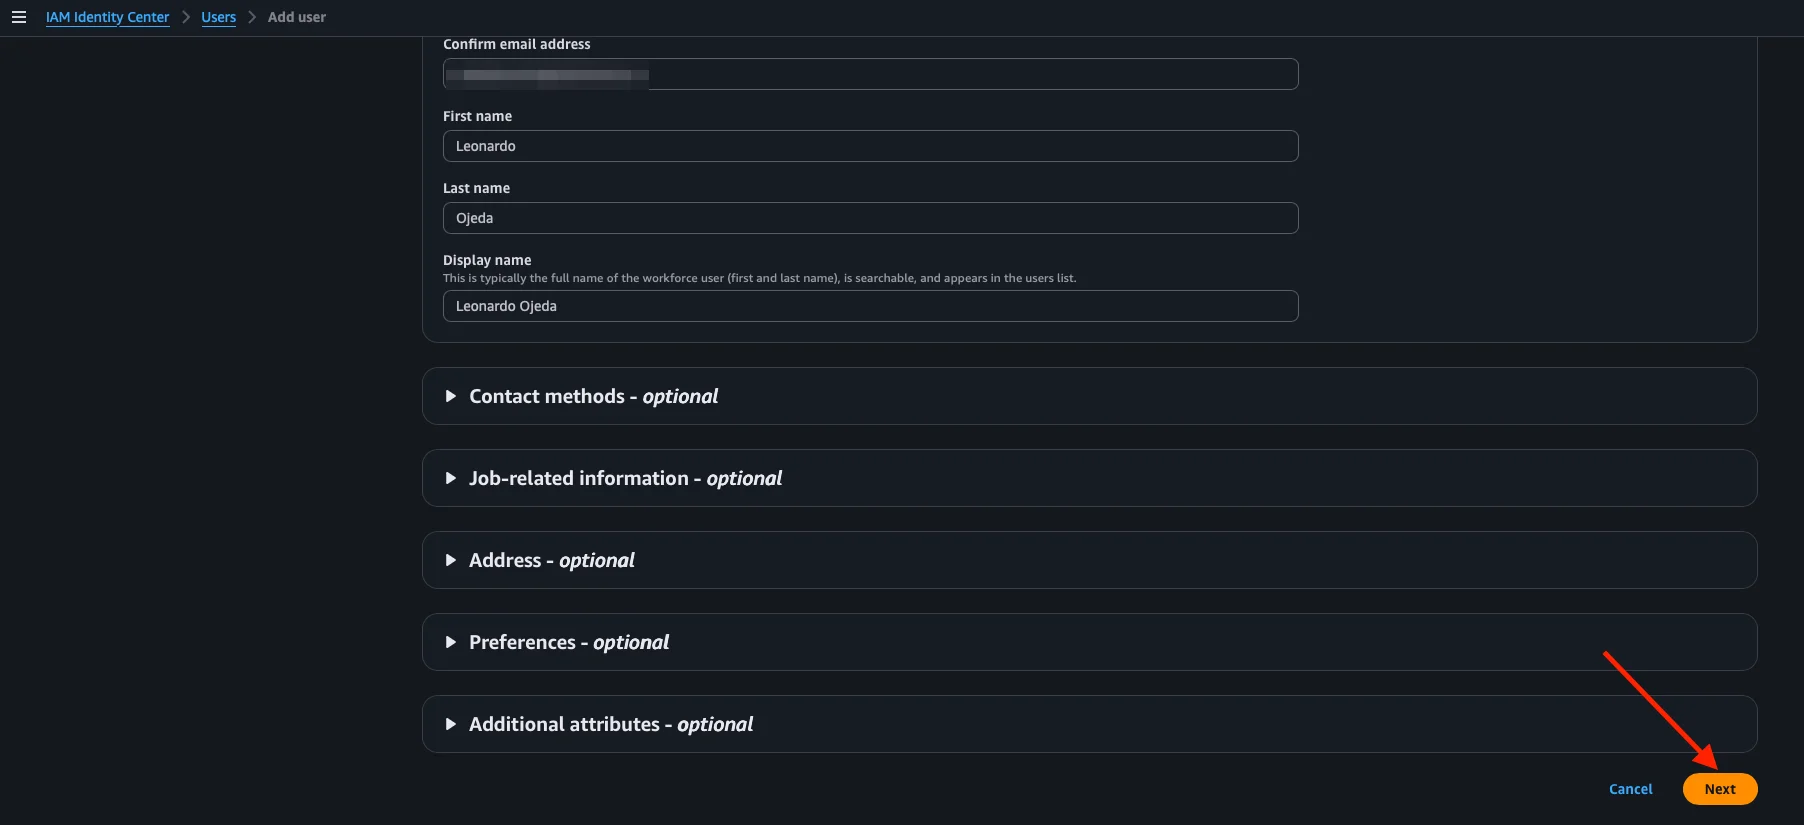
Further down there are several optional sections (Contact methods, Job-related information, Address, etc.) that we can ignore for now. We click Next.
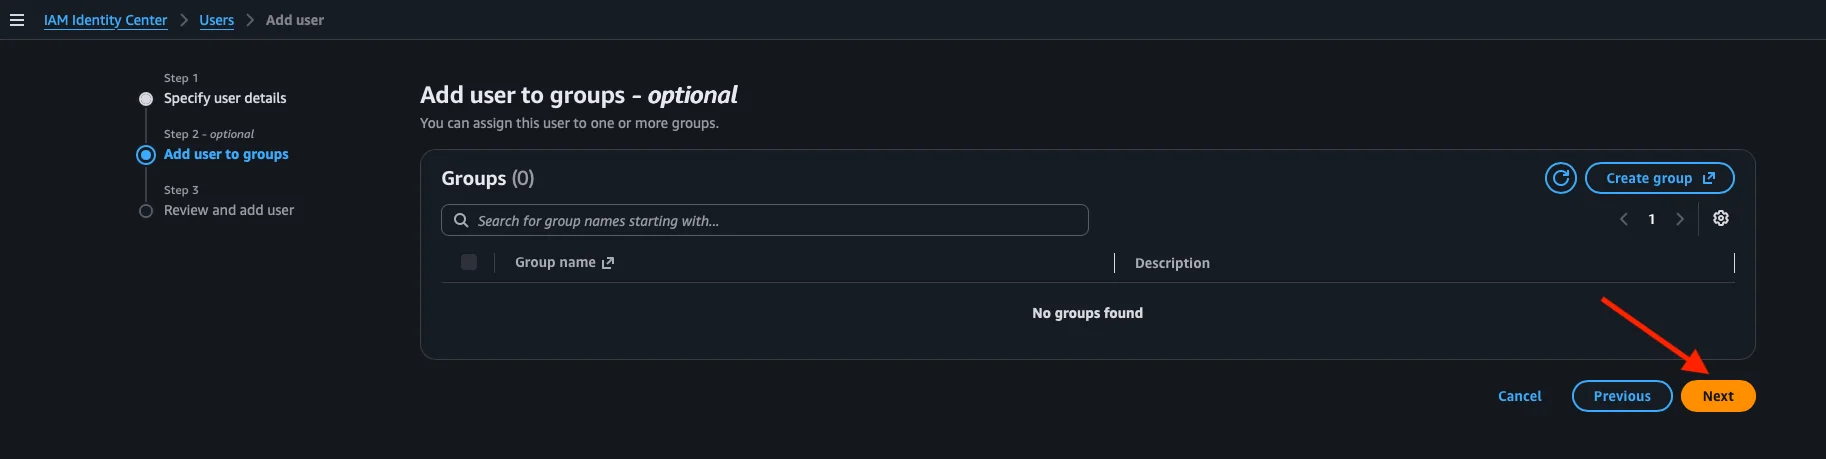
In Step 2 (Add user to groups) we could add the user to a group, but since we haven’t created any yet, the list appears empty. We leave it like that and click Next.
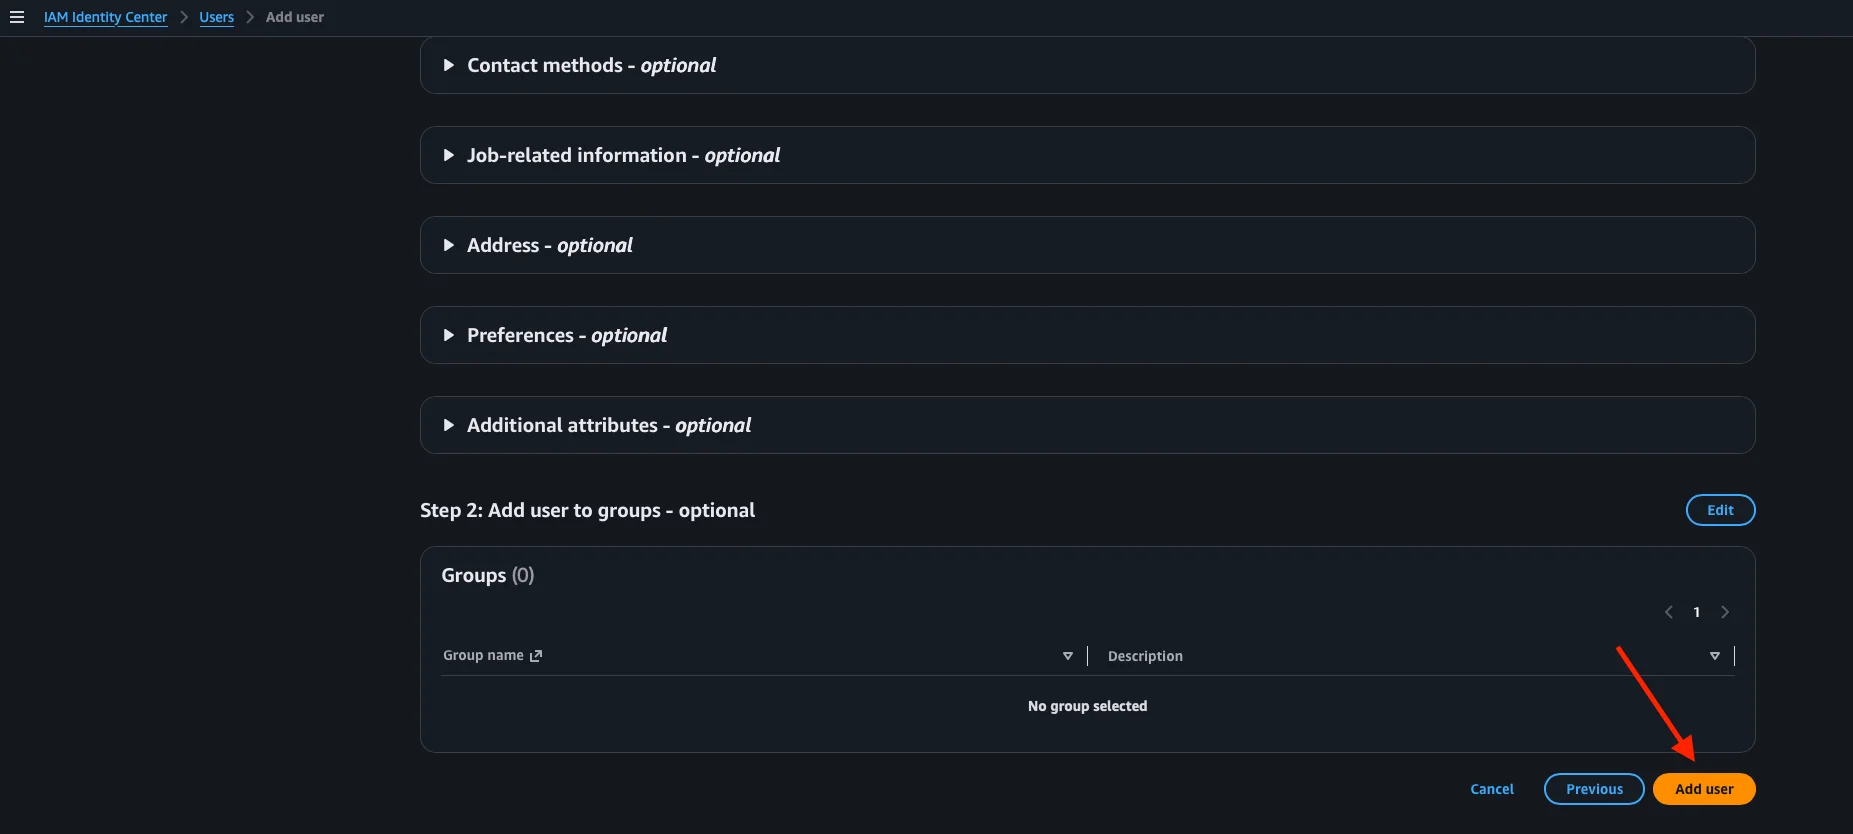
Finally, in Step 3 (Review and add user) we review that everything is correct and click Add user to create the user.
With the user created, in the next step we’ll build a group and add them to it.
Step 7: Create a group
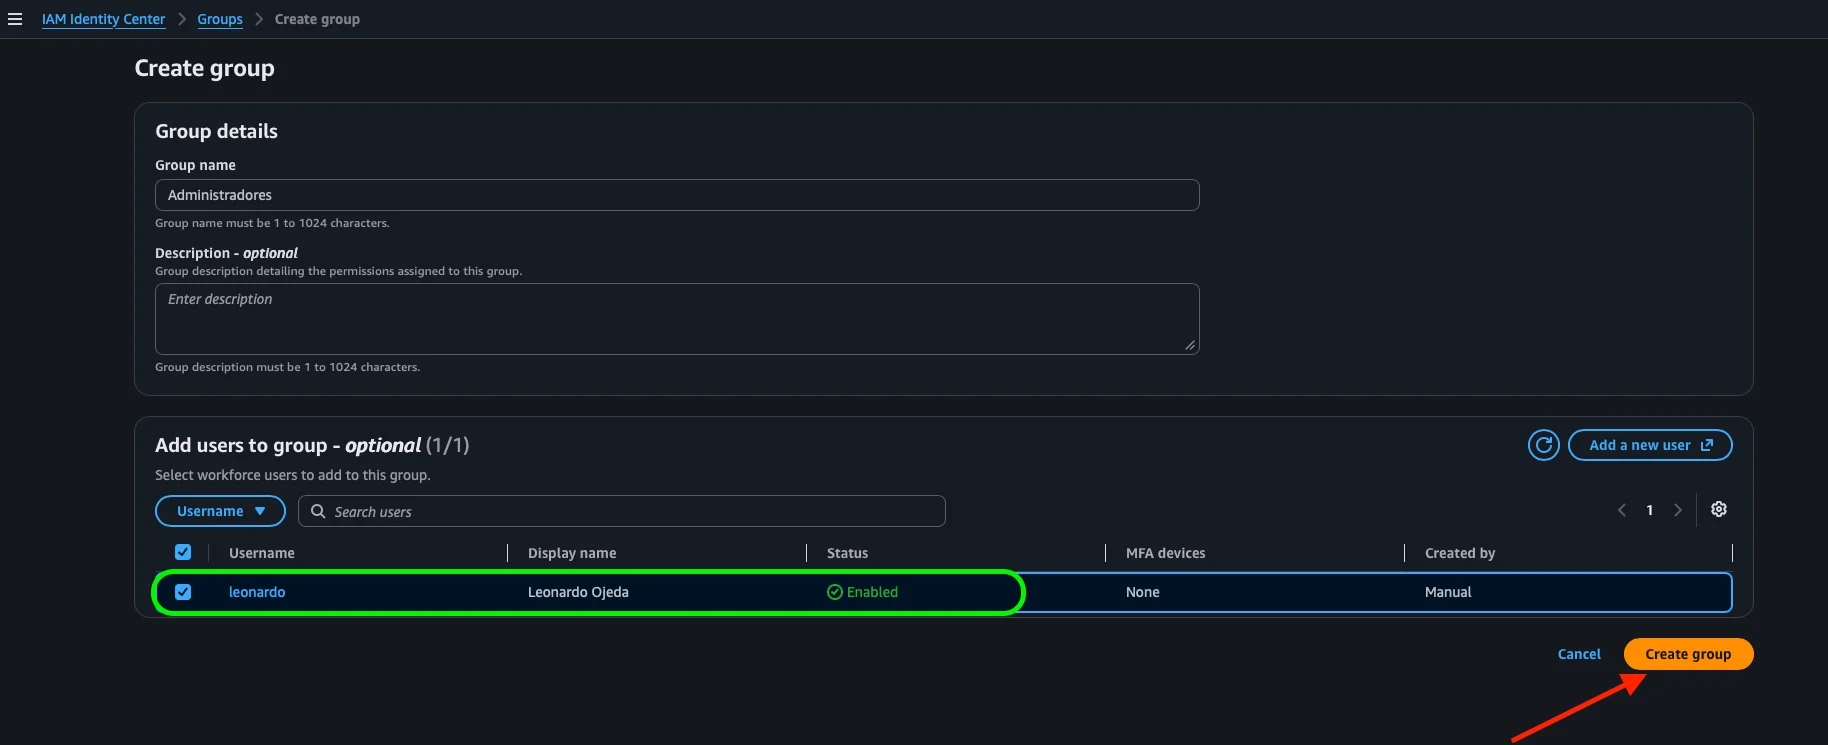
Even though we only have one user for now, the best practice is to assign permissions to groups, not to individual people. We go to Groups and, since there aren’t any yet, we click Create group.

In the form we give it a Group name (in our case Administradores) and, in the Add users to group section, we select the user we created earlier (leonardo). We confirm with Create group. This way, any permission we give the group is automatically inherited by the user. Down the road, adding someone new is as simple as putting them in the group.
Step 8: Create a permission set
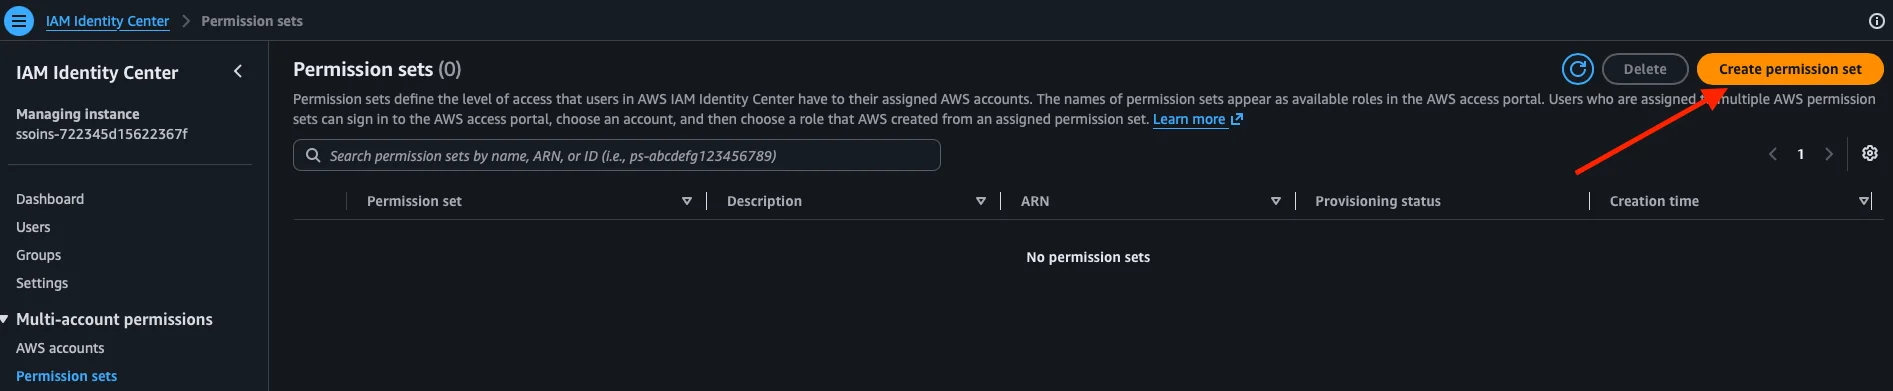
Now we define what they’ll be able to do. We go to Permission sets and, since there aren’t any yet, we click Create permission set.
In Step 1 we choose the type. AWS offers two options: Predefined permission set (a ready-made template, based on an AWS managed policy) or Custom permission set (tailor-made). We choose Predefined and, in the list of policies, we select AdministratorAccess, which grants full access.
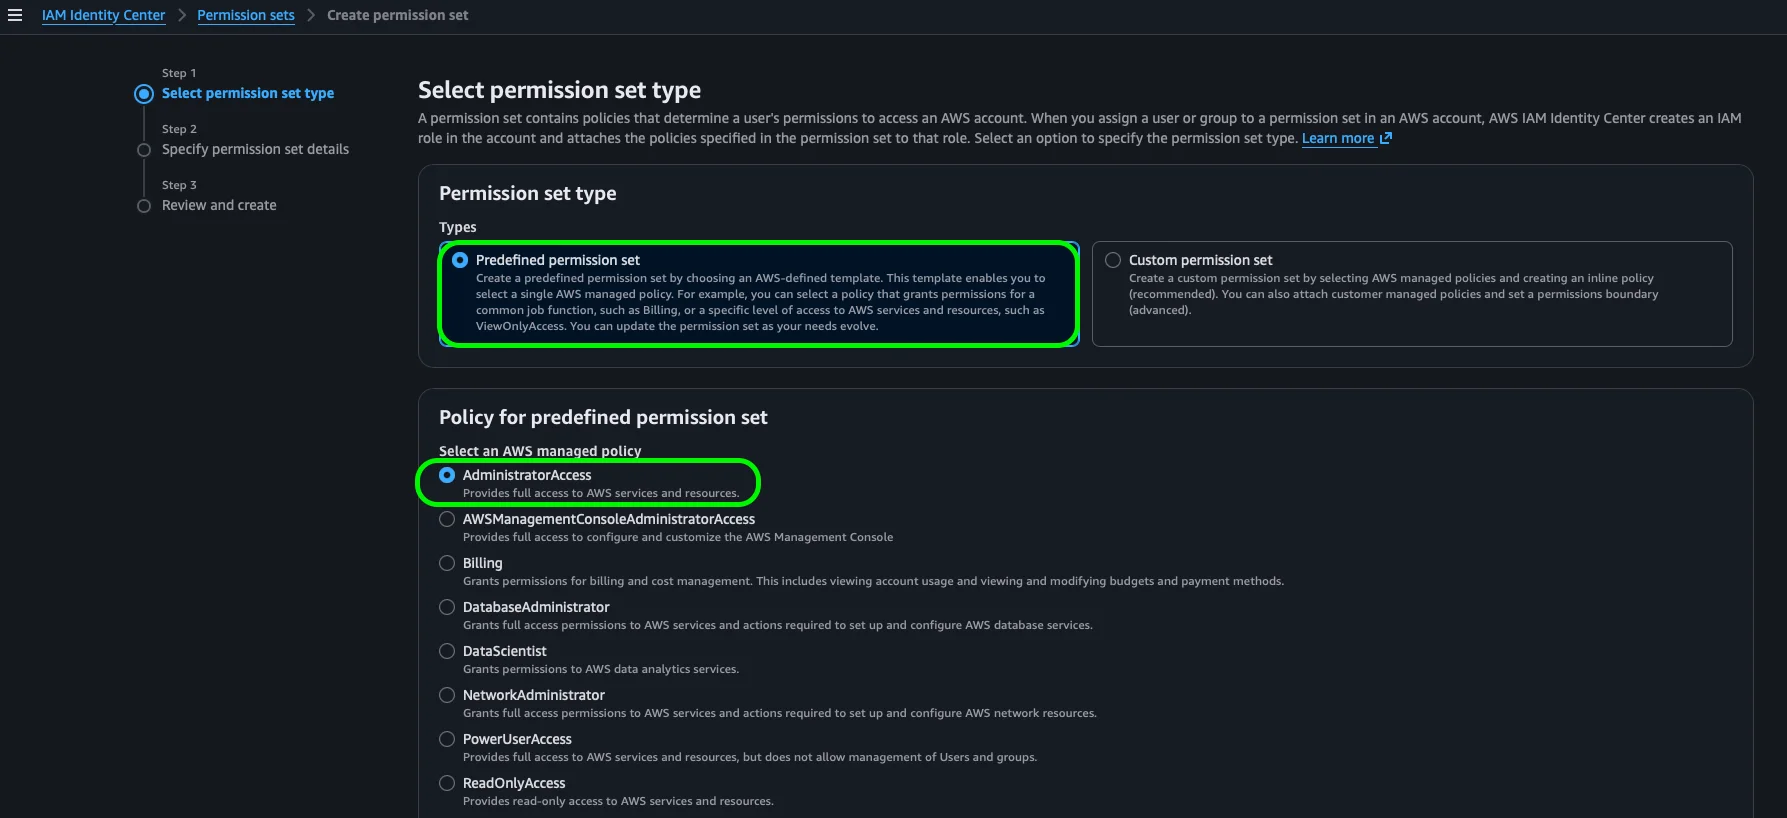
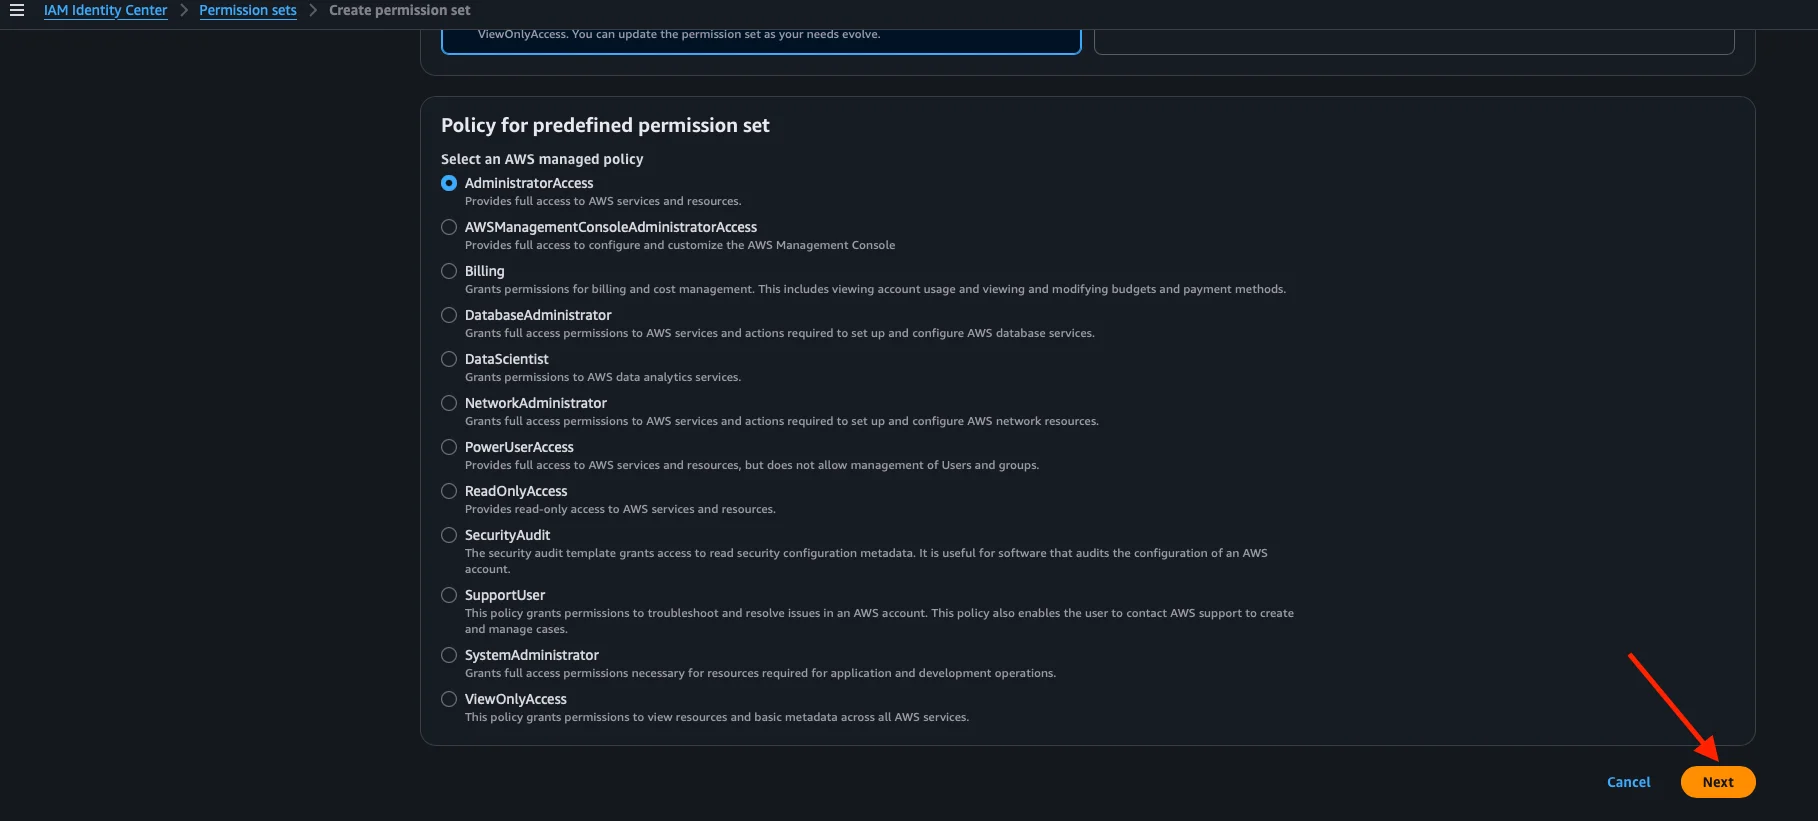
If we scroll down a bit, we see the full list of predefined policies: besides AdministratorAccess, there are more limited options like ReadOnlyAccess, PowerUserAccess, Billing, or ViewOnlyAccess, ideal when you want to apply least privilege. With AdministratorAccess selected, we click Next.
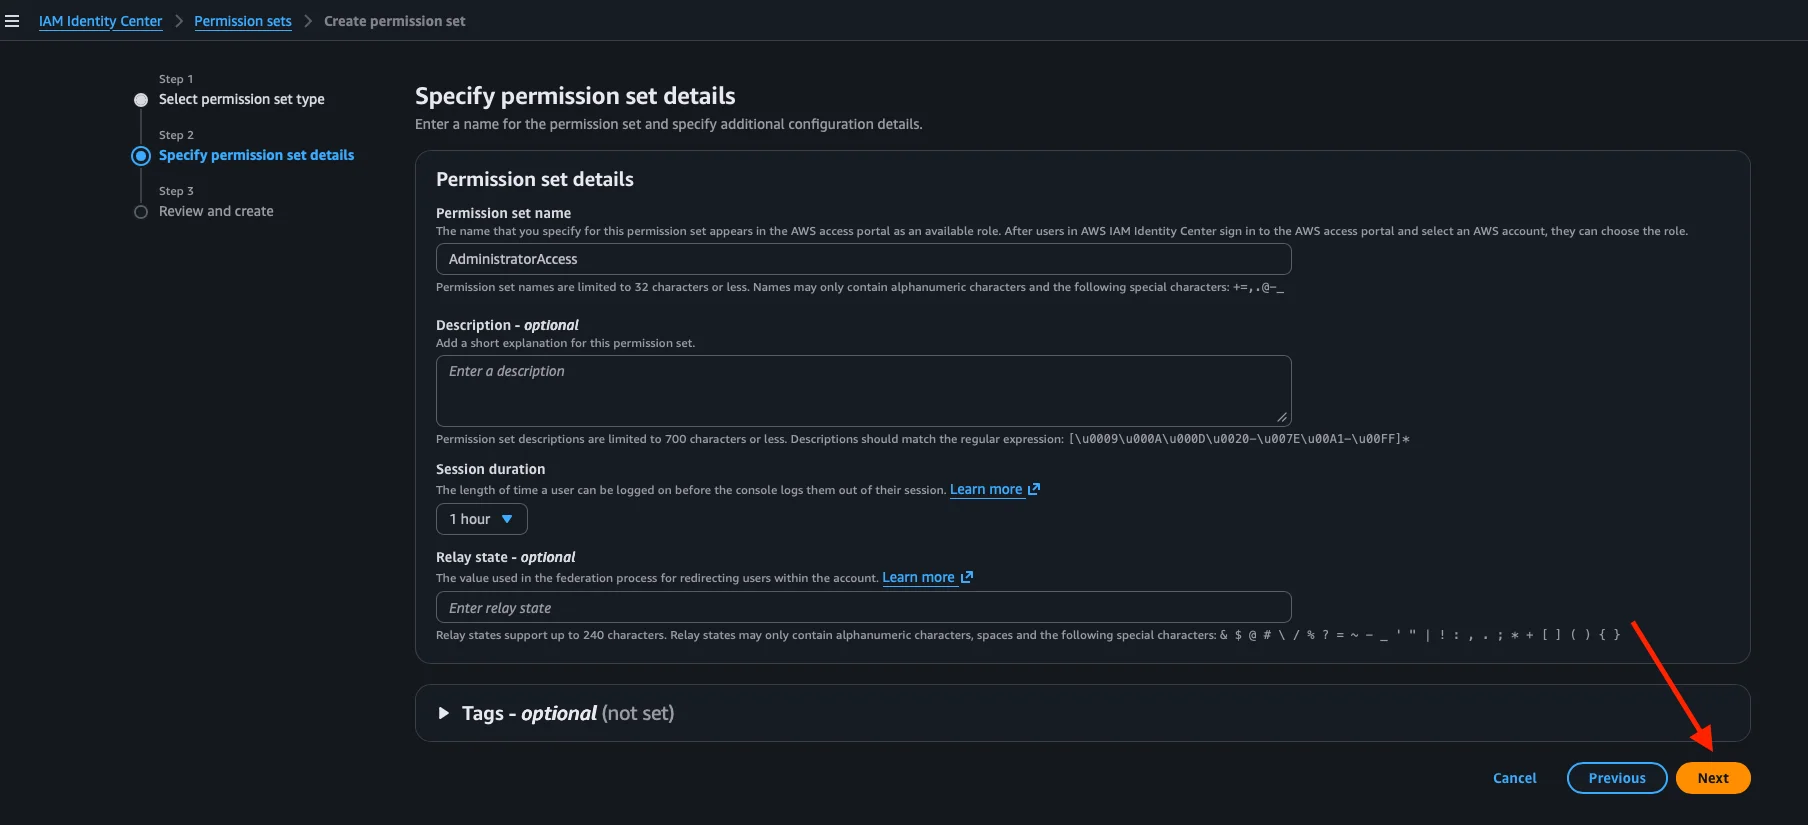
In Step 2 we give the permission set a name (we keep AdministratorAccess) and define the Session duration, that is, how long the session lasts before having to authenticate again (by default, 1 hour). The rest of the fields are optional. We click Next.
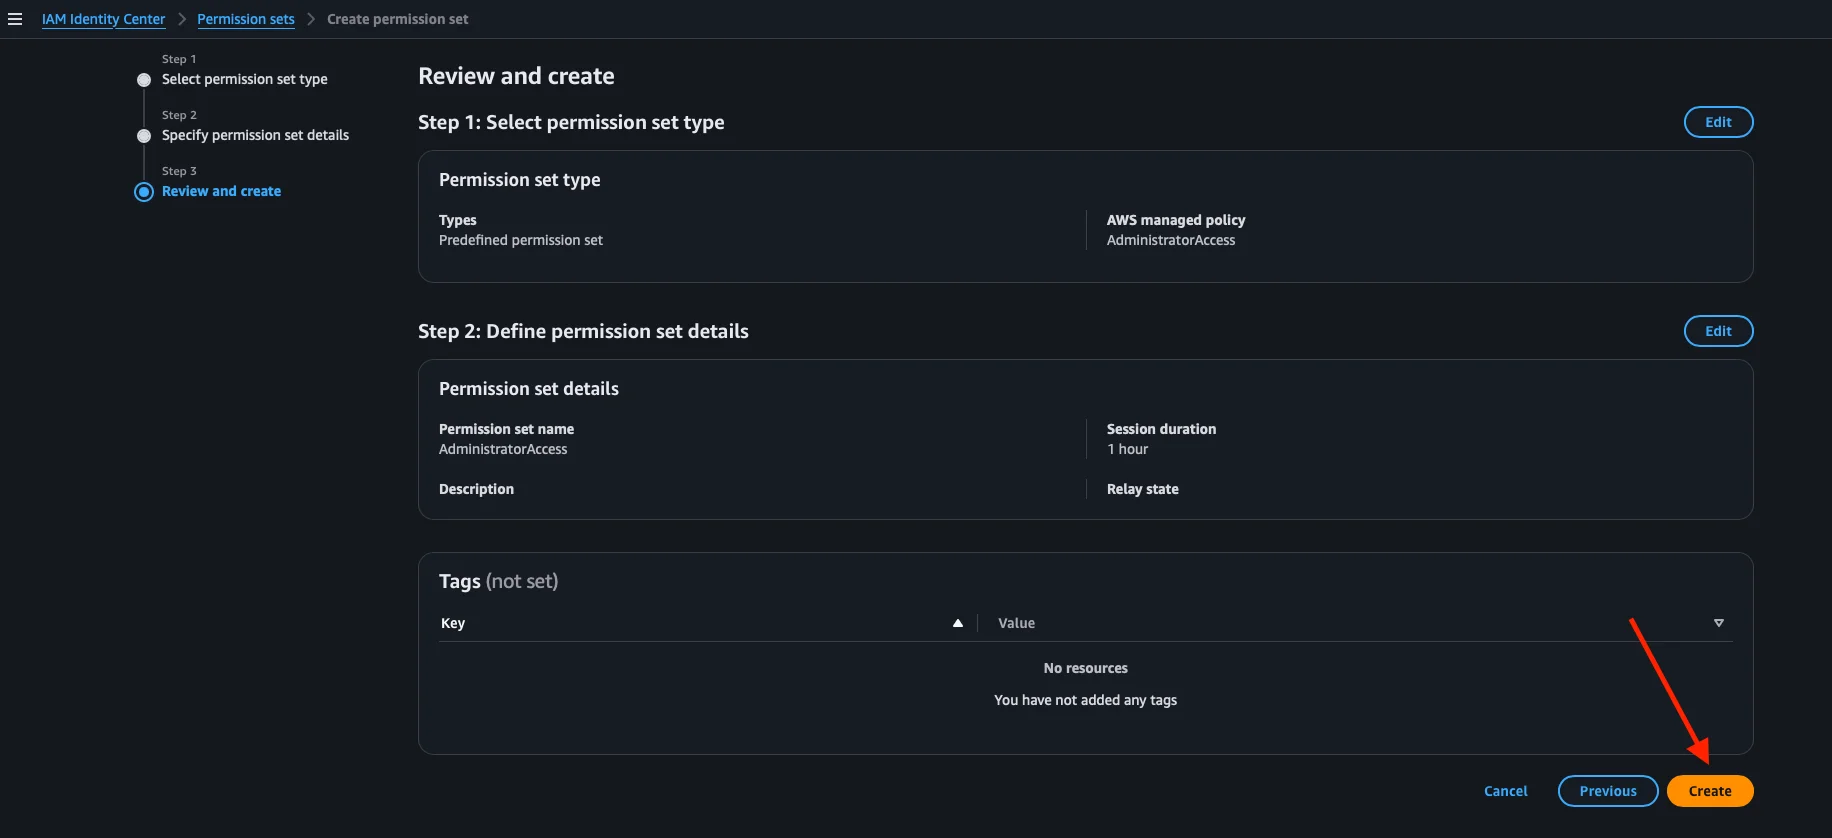
Finally, in Step 3 we review the summary and click Create.
Step 9: Assign access to the account
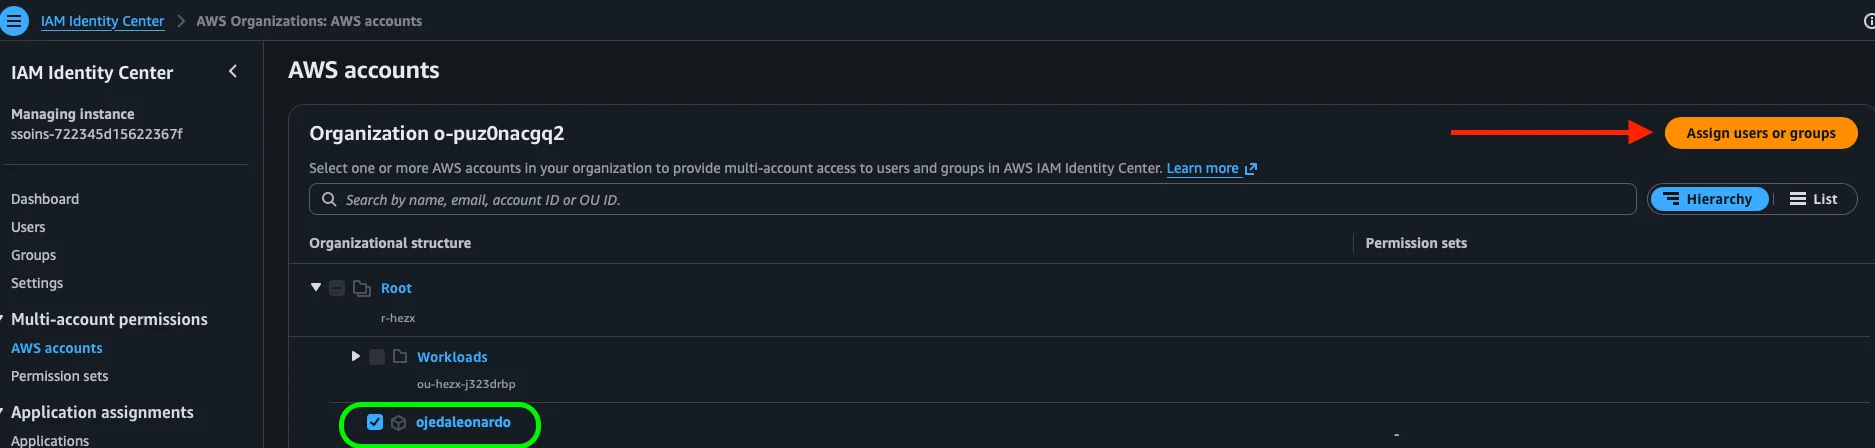
We already have the who (the group) and the what (the permission set). We’re missing the where. We go to AWS accounts, select the account we want to grant access to, and click Assign users or groups.
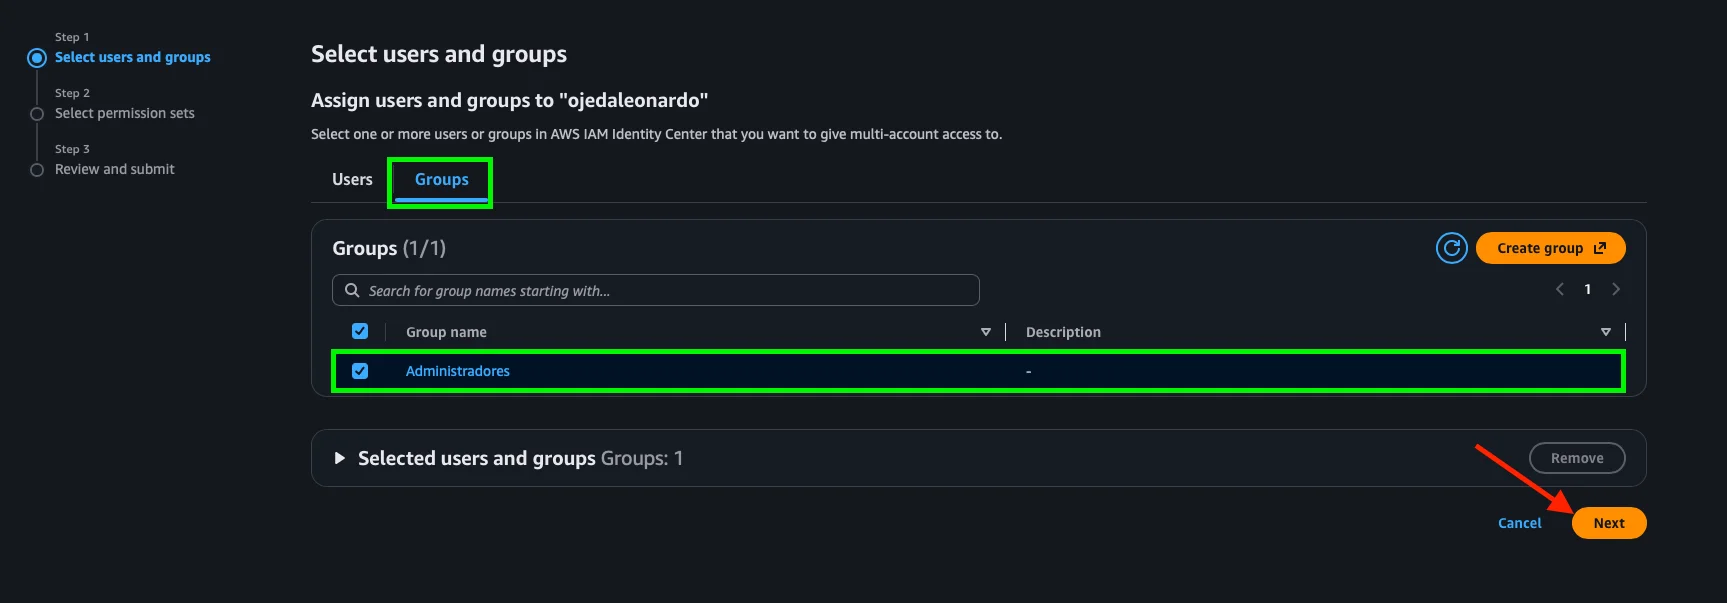
In Step 1 we go to the Groups tab and select our Administradores group. We click Next.
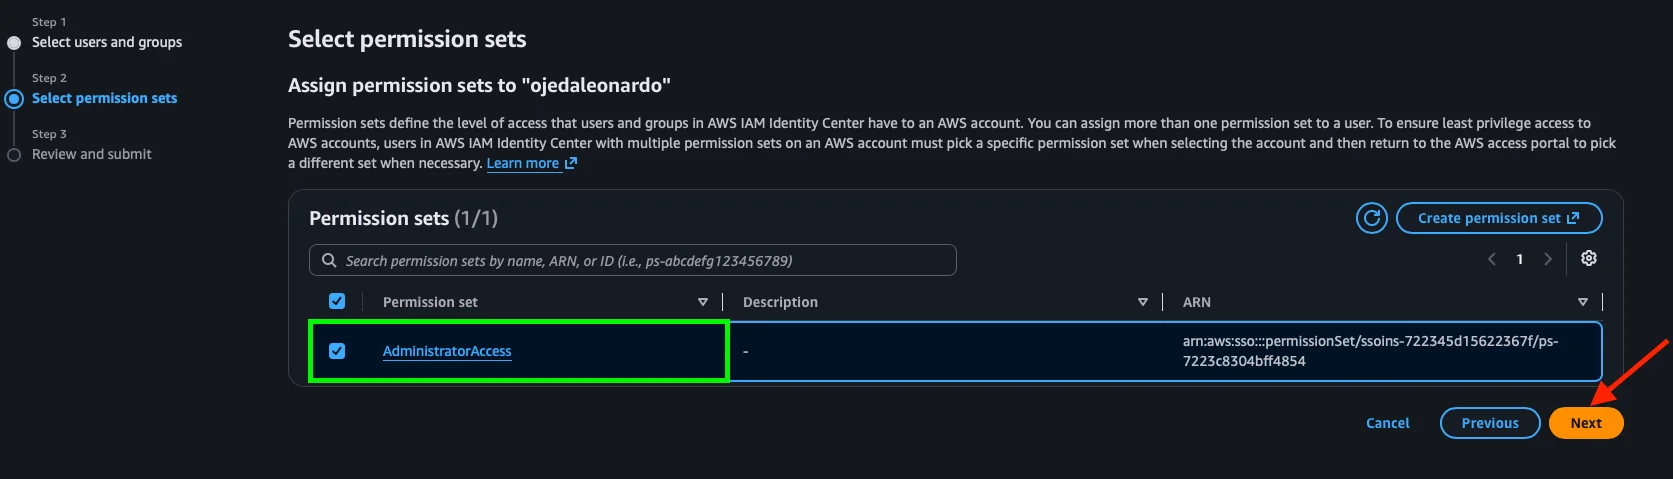
In Step 2 we choose the permission set we created, AdministratorAccess. We click Next.
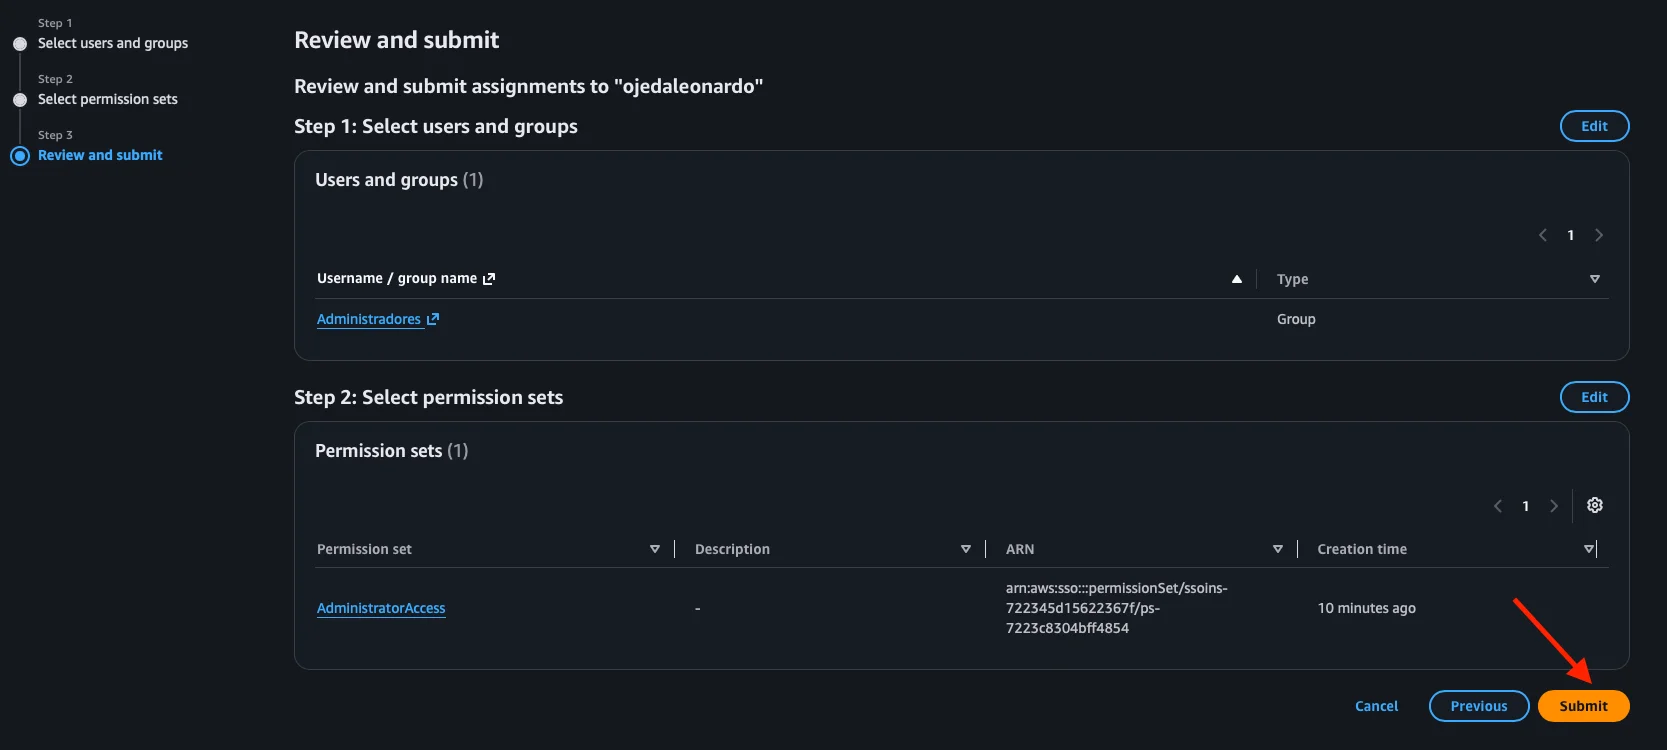
In Step 3 we review that everything is correct (the Administradores group with the AdministratorAccess permission set) and click Submit. IAM Identity Center automatically creates the corresponding IAM role in the account.
Step 10: Sign in through the access portal
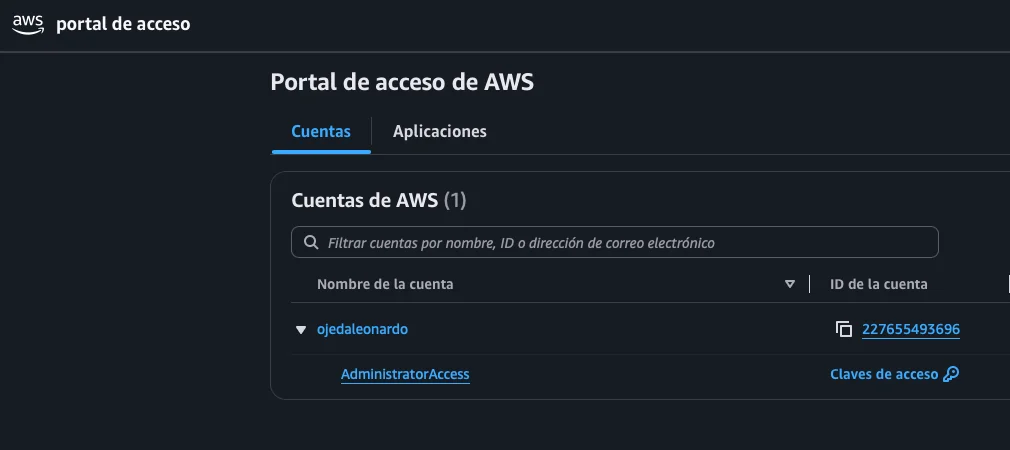
The moment of truth! We open the access portal URL we saw on the dashboard. The first time, the user accepts the invitation that arrived by email, sets their password, and registers their MFA. Once inside, the Accounts tab shows the accounts we have access to. Expanding our account reveals the AdministratorAccess role: with one click we enter the console for that account, or with Access keys we get temporary credentials to use the CLI.
MFA and best practices
Now that we have centralized access working, here are some important recommendations:
- Enable MFA for everyone: the built-in MFA is free and supports authenticator apps, security keys, and passkeys. In a serious environment it should be mandatory.
- Apply least privilege: don’t give
AdministratorAccessto everyone. Create more limited permission sets (for example,ReadOnlyAccessor a custom one) based on what each role needs. - Assign to groups, not to people: it makes onboarding and offboarding easier and keeps access organized.
- Customize the portal URL: in Settings you can change the subdomain to one that’s easier for your team to remember.
- Stop using long-lived IAM users: once you have Identity Center, it’s the recommended entry point. IAM users with permanent credentials should be the exception, not the rule.
Conclusions
In this post we set up IAM Identity Center and achieved something key for working professionally on AWS: centralized, secure, and cost-free access to all our accounts. We understood the identity source, created users and groups, defined permissions with permission sets, and assigned them to an account, all from a single place. On top of that, we said goodbye to long-lived credentials thanks to temporary access.
In the next post we’ll enable AWS CloudTrail at the Organization level, to have a centralized audit log of everything that happens across our accounts. If we control who gets in (Identity Center), the next logical step is to record what each person does.