We already have our account secured, we understand how IAM permissions work, we’ve used S3, and we set up cost alerts with Budgets. So far, everything we’ve done has been within a single account, but in the real world, companies (and even those of us who are learning) need to separate environments, projects, or teams into different accounts. That’s what AWS Organizations is for. In this post, we’ll see what it is, why it’s useful, and how to create our first Organization.
Why use multiple accounts?
It might seem strange to talk about “multiple accounts” when we’re just getting started, but understanding this concept from the beginning is very valuable. The main reasons for separating into different accounts are:
- Security Isolation: If something goes wrong in one account (a compromised resource, a misconfigured permission), the other accounts are not affected.
- Environment Separation: You can have one account for development, another for testing, and another for production, without the risk of mixing them up.
- Cost Control: Each account has its own billing, making it easier to know how much each project or team spends.
- Independent Service Limits: AWS Service Quotas are applied per account, so one account with heavy usage won’t block the others.
AWS recommends a Multi Account strategy as a best practice, and AWS Organizations is the tool that allows us to manage them centrally.
What is AWS Organizations?
AWS Organizations is a free service that allows you to create and manage multiple AWS accounts under a single Organization. From a central account (the Management Account), we can:
- Create new AWS accounts or invite existing ones.
- Group accounts into Organizational Units (OUs) to organize them.
- Apply Service Control Policies (SCPs) to define what accounts can and cannot do.
- Consolidate billing for all accounts into a single invoice.
It’s like having a Central Management Hub that groups all our accounts and gives us centralized control over them.
Key concepts
Before creating our organization, let’s understand the main components:
Management Account
This is the account from which we create the organization. It has full control: it can create accounts, move accounts between OUs, apply policies, and manage consolidated billing. Our current account will become the management account. For security, AWS recommends not using this account to deploy workloads, only to manage the organization.
Member Accounts
These are all the other accounts within the organization. Each one operates independently with its own resources, users, and permissions, but is subject to the policies applied from the management account.
Organizational Units (OUs)
These are “folders” that allow us to logically group accounts. For example, we could have an OU called Production and another called Development, each with its own accounts and policies. OUs can be nested (an OU inside another), creating a hierarchical structure.
Service Control Policies (SCPs)
These are policies applied at the organization or OU level. Unlike the IAM Policies we saw in previous posts (which grant permissions), SCPs define the maximum boundary of permissions that accounts can have. They work as a filter: even if a user has AdministratorAccess in their account, if there’s an SCP blocking a service, that user won’t be able to use it. SCPs do not apply to the management account.
Root
This is the top-level container of the organization. All accounts and OUs hang from the root. When we create the organization, the root is created automatically.
Step 1: Access AWS Organizations
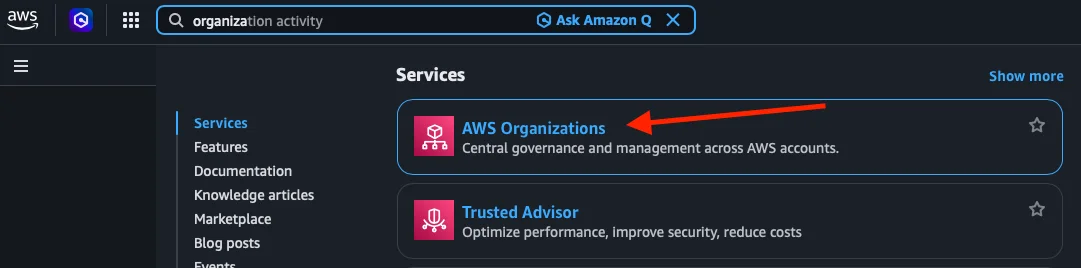
From the AWS console, search for Organizations in the search bar and click on the result.
Step 2: AWS Organizations main page
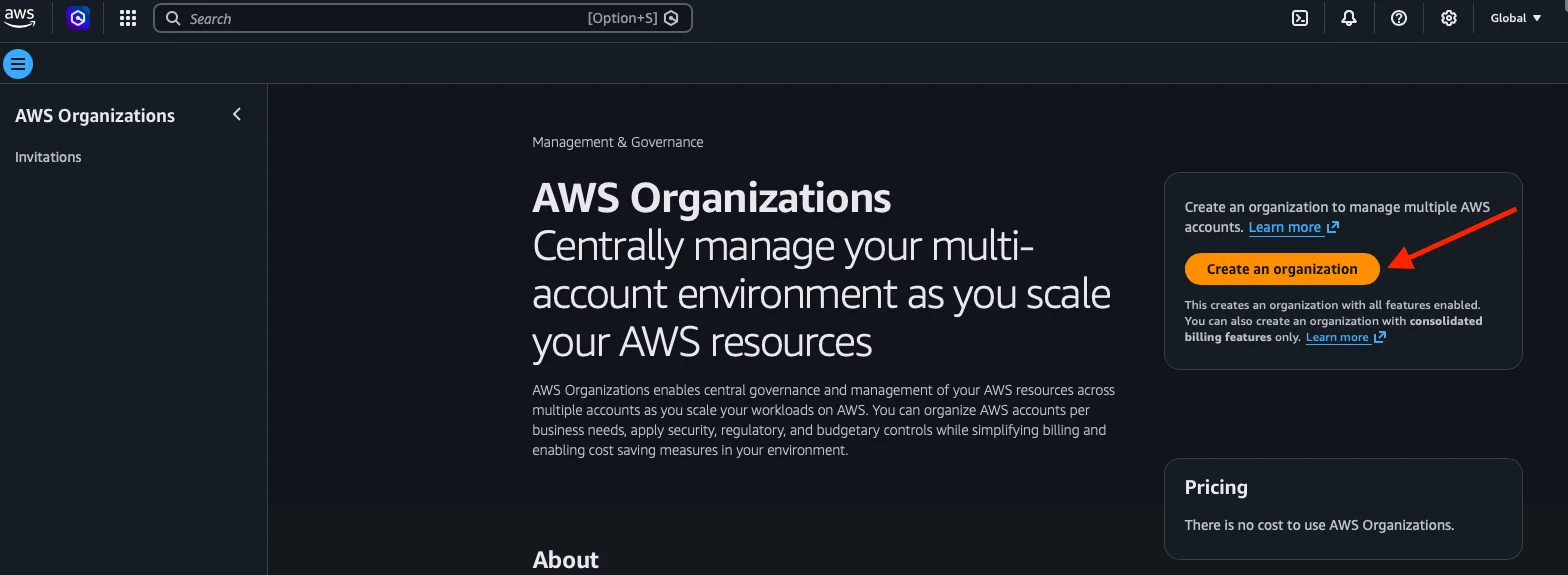
When we enter, we see the service’s main page, where AWS explains that Organizations allows centrally managing a Multi Account environment. On the right, we see the Create an organization button and an important detail: “There is no cost to use AWS Organizations”, the service is completely free. We click on Create an organization.
Step 3: Considerations before creating
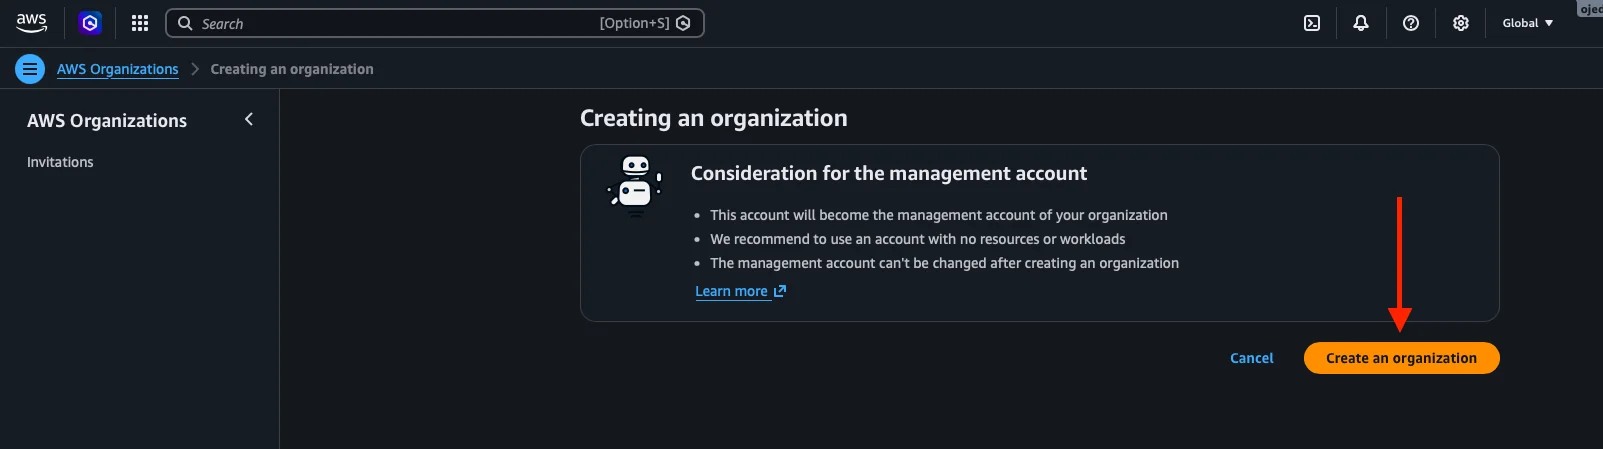
Before confirming, AWS shows us a screen with important considerations about the Management Account:
- This account will become the Management Account of the Organization.
- It is recommended to use an account with no resources or workloads.
- The Management Account cannot be changed after creating the Organization.
This reinforces the best practice we mentioned earlier: the Management Account should only be used for management, not for deploying services. We click Create an organization to confirm.
Step 4: Organization created
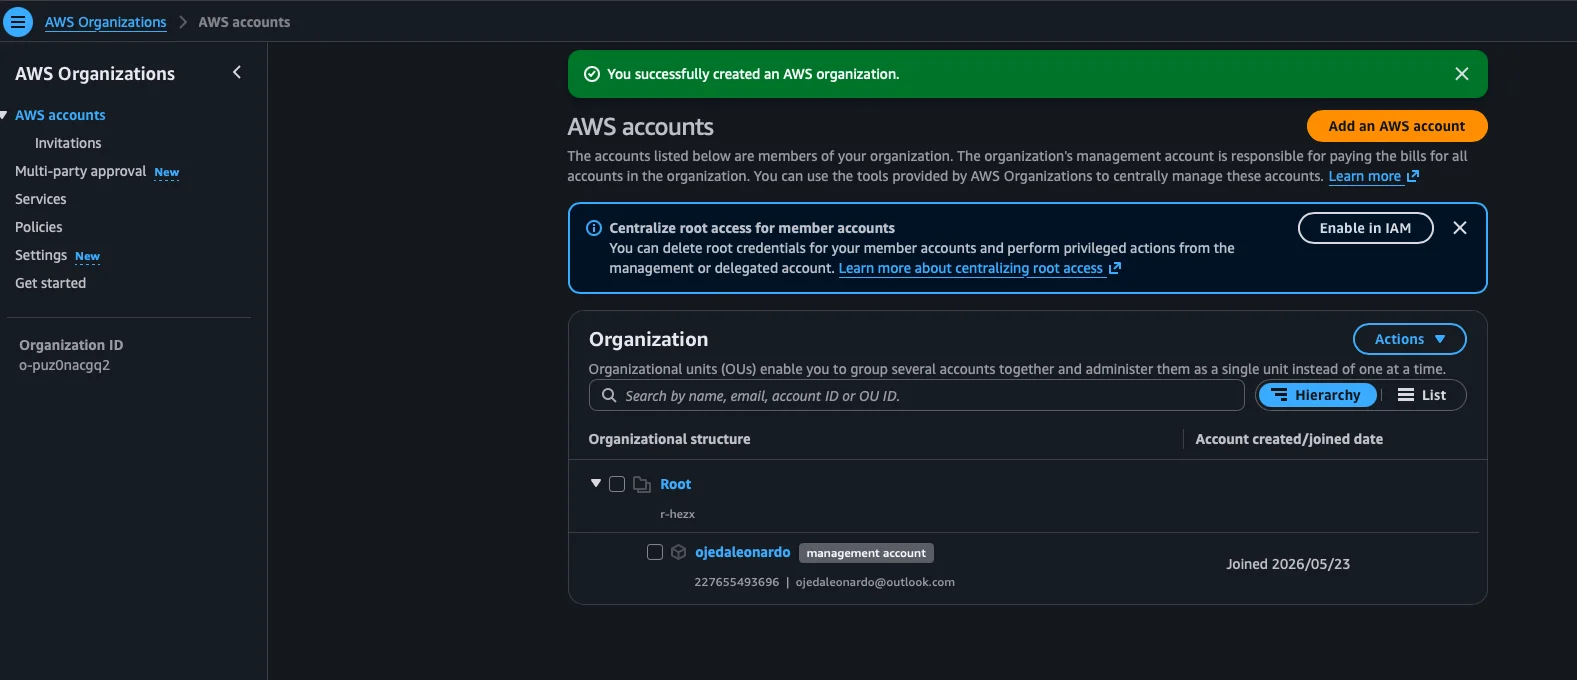
The Organization is created in seconds. AWS shows us the green banner “You successfully created an AWS organization” and takes us directly to the AWS accounts view. Here we can see:
- In the left sidebar: the available sections like AWS accounts, Invitations, Policies, Services, and Settings.
- The Organization ID of our Organization.
- The organizational structure in hierarchy view: the Root contains our account with the management account label, along with the Account ID and associated email.
A blue banner also appears about “Centralize root access for member accounts”, this is a feature to centralize root access for member accounts, but it’s not necessary to configure it now.
Note: You’ll receive a verification email from AWS Organizations at the email address associated with your account. This is normal and simply confirms that your account is now part of an Organization.
Step 5: Create an Organizational Unit (OU)
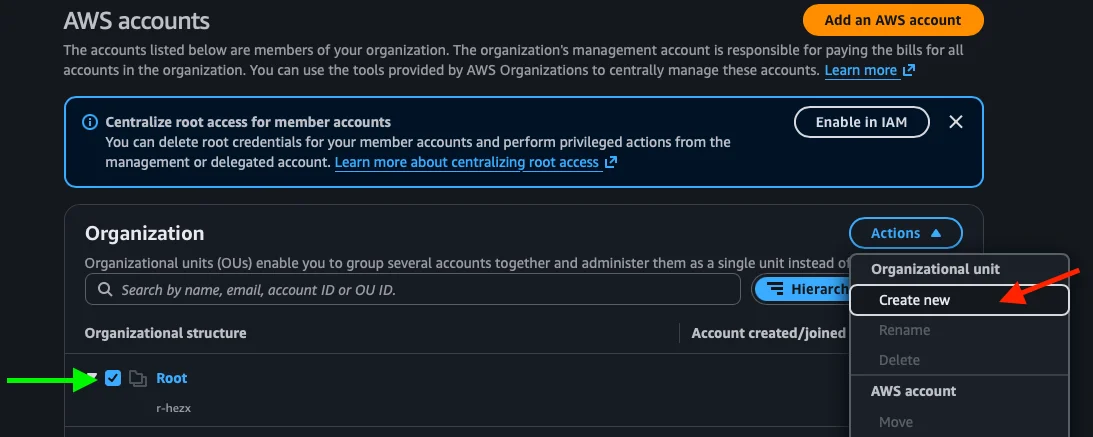
Let’s create our first OU to organize future accounts. We select the Root checkbox and click Actions. In the dropdown menu, under Organizational unit, we select Create new.
Step 6: Name the OU
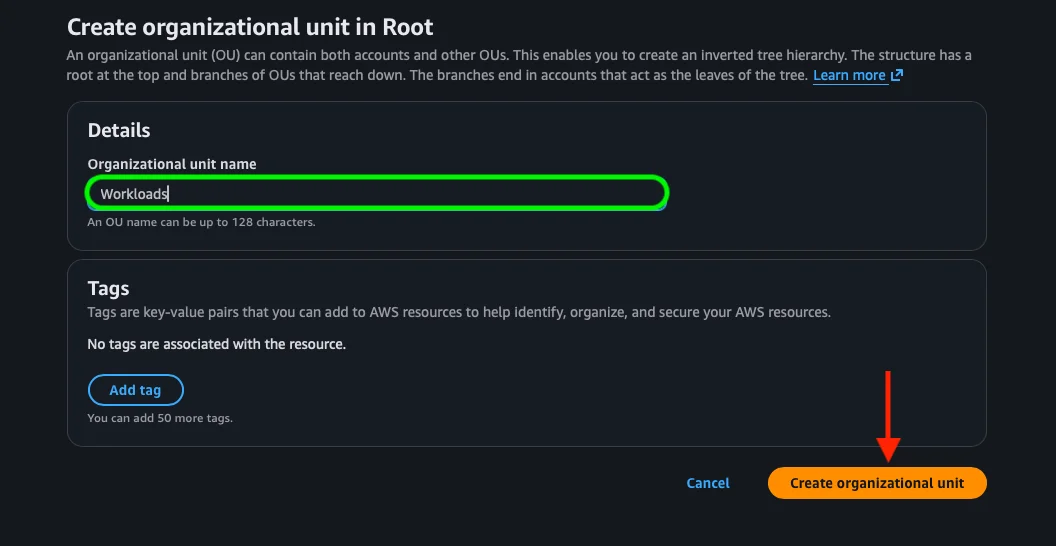
AWS takes us to the “Create organizational unit in Root” form. Here we give the OU a descriptive name, in our case Workloads, which is where we’ll place the accounts we use to deploy services and practice. We can also add Tags if we want, but it’s not necessary for now. We click Create organizational unit.
Step 7: Final structure
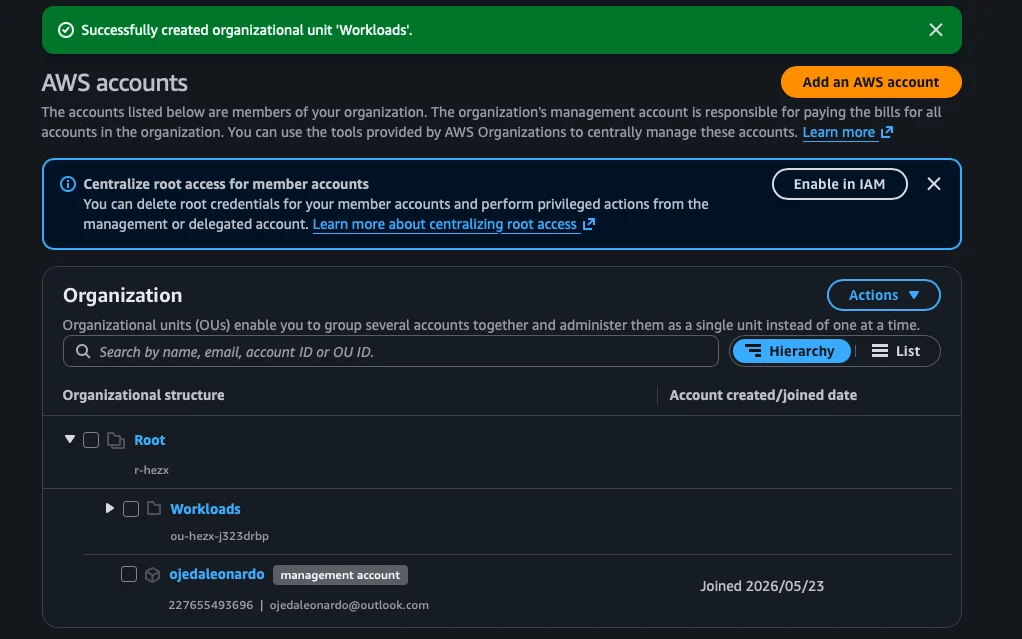
AWS confirms with the green banner “Successfully created organizational unit ‘Workloads’”. Now our Organization has a clearer structure: the Root contains the Workloads OU and our ojedaleonardo account as the Management Account. In the future, when we create new accounts (for example, a development account or a production account), we can place them inside this OU.
What are Service Control Policies (SCPs)?
We mentioned SCPs before, but it’s worth going a bit deeper. SCPs are a very powerful tool that allows us to set security guardrails at the organizational level. Some practical examples:
- Restrict regions: we can create an SCP that prevents member accounts from using services outside specific regions (for example, only allow
us-east-1andsa-east-1). - Block costly services: we can block the use of expensive services like Amazon Redshift or SageMaker in development accounts.
- Prevent log deletion: we can protect CloudTrail so that nobody disables audit logs.
By default, when we create the organization, an SCP called FullAWSAccess is applied, which allows everything. As we progress, we can add restrictions according to our needs.
Important: SCPs don’t grant permissions, they only limit them. A user needs to have IAM permissions and also the SCP must allow it. It’s like a double check: IAM says “you can do it” and the SCP says “it’s allowed in this account.”
Consolidated billing
One of the immediate benefits of using Organizations is Consolidated Billing. This means that:
- All accounts in the organization receive a single invoice in the management account.
- We can see the cost breakdown by individual account.
- Volume discounts are applied: usage across all accounts is aggregated to calculate discounts (for example, in S3 or EC2).
- Savings Plans and Reserved Instances can be shared across accounts.
This works automatically when creating the organization, we don’t need to configure anything additional.
Best practices
Now that we have our organization created, here are some recommendations:
- Don’t use the management account for workloads: this account should only be used to manage the organization. Services and applications go in member accounts.
- Enable CloudTrail in the organization: this way you have a centralized audit log for all accounts.
- Use OUs to group accounts: even if we have few accounts for now, the structure makes it easier to apply policies in bulk.
- Start with simple SCPs: you don’t need to set up complicated SCPs from day one. You can add restrictions as your organization grows.
- Protect the management account: use MFA, limit access, and treat it as the most critical account in your infrastructure.
Conclusions
In this post, we created our first AWS organization, understood key concepts like management account, OUs, and SCPs, and prepared the structure to manage multiple accounts professionally. Even though we only have one account for now, this foundation will allow us to scale in an organized and secure way.
In the next post, we’ll configure IAM Identity Center (formerly known as AWS SSO) to access our accounts centrally, without needing to manage individual IAM users in each account.